- SAP Agent
- Set up On-prem Agent on Boost.space Integrator
- Set up On-prem Agent on your machine
- Connect SAP Agent to Boost.space Integrator
- Build SAP Agent Scenarios
- Material
- Get Material Availability
- Change Material
- Purchase Order
- Change Purchase Order
- Add Purchase Order Item
- Purchase Order Item
- Change Purchase Order Item(s)
- Delete Purchase Order Item(s)
- Revoke Purchase Order Item Deletion
- Purchase Requisition
- Create Purchase Requisition
- Change Purchase Requisition
- Add Purchase Requisition Item
- Purchase Requisition Item
- Change Purchase Requisition Item
- Delete Purchase Requisition Item
- Revoke Purchase Requisition Item Deletion
- Sales Order
- Get Sales Order Detail
- Create Sales Order
- Change Sales Order
- Set Sales Order Delivery Block
- Remove Sales Order Delivery Block
- Set Billing Block
- Remove Billing Block
- Sales Order Item
- Change Sales Order Item(s)
- Reject Sales Order Item(s)
- Remove Sales Order Item Delivery Block
- Delivery
- Post Goods Issue
- Create Delivery From Sales Order items
- Remove Delivery Block
- Outline Agreement
- Change Outline Agreement
- Generic
- Make an RFC Call
With SAP Agent modules in Boost.space Integrator, you can manage the materials, purchase orders, purchase order items, purchase requisitions, purchase requisition items, sales orders, sales order items, deliveries, and outline agreements in your SAP Agent account.
To use the SAP Agent modules, you must have SAP credentials and sufficient permissions for the SAP action you want to perform.
Additionally, you must do the following before you can connect the SAP Agent app to Boost.space Integrator.
![[Note]](https://docs.boost.space/wp-content/themes/bsdocs/docs-parser/HTML/css/image/note.png) |
Note |
|---|---|
|
Your Boost.space Integrator subscription needs to include On-prem Agent (OPA) to use this app. |
-
Log in to Boost.space Integrator.
-
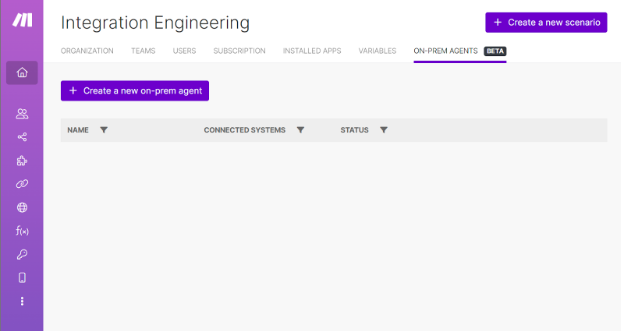
Click Organization in the left sidenav and choose the On-prem Agents tab.
-
Click + Create a new on-prem agent
-
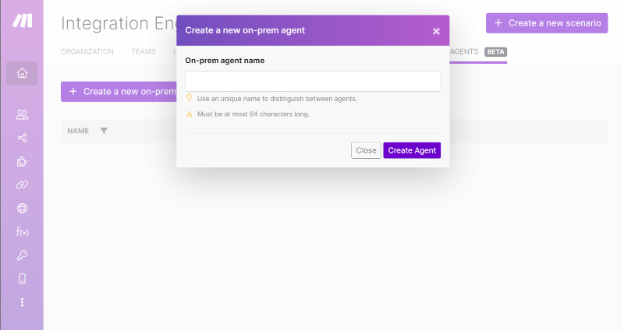
Enter a name for your On-prem agent and click Create Agent.
-
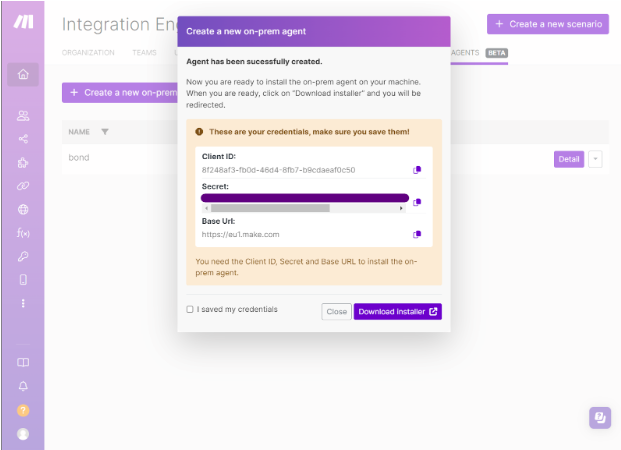
Store the Client ID, Client secret , and Base URL in a safe place. They will be used in a later step.
-
Check next to I saved my credentials and click Download Installer.
-
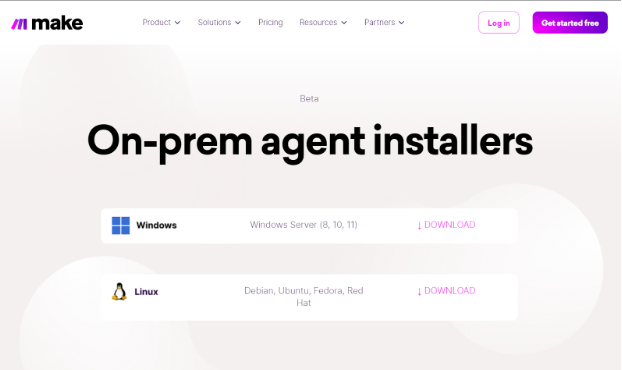
You will be redirected to the download page. Download the On-prem Agent client for your operating system. Choose Linux for macOS.
-
Set up On-prem Agent on your machine and then return to Boost.space Integrator.
-
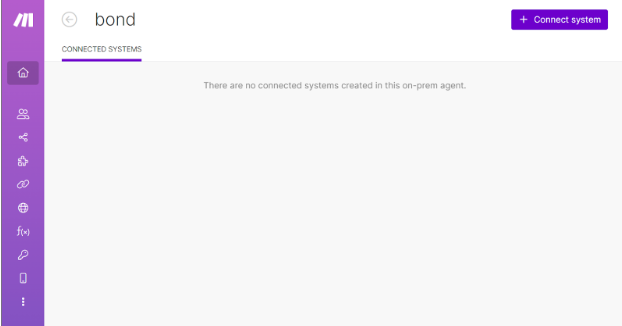
Click Detailon your newly created OPA in Boost.space Integrator.
-
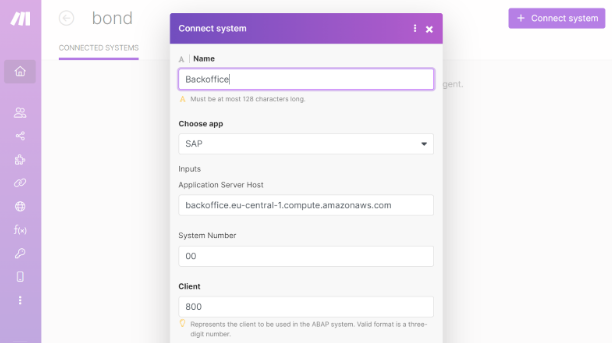
Click + Connected System. Input the connection information regarding your SAP instance.
For example:
Application Server Host
{host}.compute.amazonaws.com
System Number
00
Client
800
For more information about the On-prem Agent, please refer to Installing the On-prem Agent.
To complete this setup, you need to be an SAP Service user (S User) that is authorized to download software from SAP portals. Usually the SAP BASIS has this access. Also, your machine must be able to connect to your SAP ECC instance.
For Mac/Unix
-
Unarchive the Installer that you downloaded when setting up OPA on Boost.space Integrator.
-
Open
application-local.yml, replace theCHANGE_THISwith your credentials and ignore all other options. -
Download the JCO connector suitable for your operating system.
-
Unarchive it and copy only
libsapjco3.dylib / libsapjco3.soandsapjco3.jarto thejcofolder under the installation path. -
Use your preferred package manager or any other way to have the Java Runtime (at least version 11) installed. On macOS you can use Homebrew.
-
In the installation folder, run
java -jar agent.jar. Do not close the terminal.
For Windows
-
Install Java, if you haven’t installed.
-
Unarchive the Installer that you downloaded when setting up OPA on Boost.space Integrator.
-
Run the unarchived “Make_Agent_Installer.exe”.
-
Provide your client credentials (the Client ID, Client secret, and BASE URL) during installation.
-
Download the SAP Java Connector and choose your operating system. You need at least version 3.1.
-
Unarchive it and copy only
sapjco3.dllandsapjco3.jarto thejcofolder under the installation pathC:\Program Files\Make Agent. Stop the service in the task manager (Ctrl + Alt + Del) if you cannot overwrite existing files. The service name ismake-agent. -
Restart the machine. On-prem Agent should run as a service in the background on system startup. If not, check the
make-agentservice in task manager to see if its status is Running.
To establish the connection in Boost.space Integrator:
-
Log in to your Boost.space Integrator account, add an SAP Agent module to your scenario, and click Create a connection.
-
Optional: In the Connection name field, enter a name for the connection.
-
In the Connected System field, choose a connected system.
-
In the Username field, enter your SAP ECC username.
-
In the Password field, enter your SAP ECC password.
-
Click Save.
-
If prompted, authenticate your account and confirm access.
You have successfully established the connection. You can now edit your scenario and add more SAP Agent modules. If your connection requires reauthorization at any point, follow the connection renewal steps here.
After connecting the app, you can perform the following actions:
Get Material Availability.
|
Connection |
|
|
Material Number |
Enter the material number about which you want to get further details, e.g. |
|
Plant |
Enter the plant for which you want to check the material availability, e.g. |
|
Material Unit |
Enter the unit in which yo want to check the material availability, e.g. |
|
Custom Error Handling |
Disables the default error handling. This field is intended for use by experienced users. |
Modifies an existing material’s data.
|
Connection |
|
|
Material Number |
Enter the number of the material to be changed, e.g. |
|
Field |
Select the field to be changed. Options displayed below will vary, based on the field selected to be changed. |
|
Custom Error Handling |
Disables the default error handling. This field is intended for use by experienced users. |
Modifies a purchase order.
|
Connection |
|||||||||||||
|
Purchase Order Number |
Enter the number of the purchase order you want to change, e.g. |
||||||||||||
|
Fields |
Select the fields to be changed.
|
||||||||||||
|
Custom Error Handling |
Disables the default error handling. This field is intended for use by experienced users. |
Adds an item to an existing purchase order.
|
Connection |
|||||||||||||||||
|
Purchase Order Number |
Enter the number of the purchase order you want to change, e.g. |
||||||||||||||||
|
Purchase Order Items |
|
||||||||||||||||
|
Custom Error Handling |
Disables the default error handling. This field is intended for use by experienced users. |
Modifies one or more existing purchase order items.
|
Connection |
|
|
Purchase Order Number |
Enter the number of the purchase order you want to change, e.g. |
|
Field |
Select the field to be changed for one or several purchase order items at once. Options displayed below will vary, based on the field selected to be changed. |
|
Custom Error Handling |
Disables the default error handling. This field is intended for use by experienced users. |
Deletes an existing purchase order item.
|
Connection |
|||
|
Purchase Order Number |
Enter the number of the purchase order for you which you want to delete one or several items, e.g. |
||
|
Purchase Order Items |
|
||
|
Custom Error Handling |
Disables the default error handling. This field is intended for use by experienced users. |
Revokes the deletion of a purchase order item.
|
Connection |
|||
|
Purchase Order Number |
Enter the number of the purchase order for you which you want to revoke the deletion of one or several items, e.g. |
||
|
Purchase Order Items |
|
||
|
Custom Error Handling |
Disables the default error handling. This field is intended for use by experienced users. |
Creates a purchase requisition.
|
Connection |
|||||||||||
|
Purchase Requisition Type |
Enter the order type for the purchase requisition, e.g. |
||||||||||
|
Purchase Requisition Items |
|
||||||||||
|
Custom Error Handling |
Disables the default error handling. This field is intended for use by experienced users. |
Modifies a purchase requisition.
|
Connection |
|||||
|
Purchase Requisition Number |
Enter the number of the purchase requisition you want to change, e.g. |
||||
|
Fields |
Select the fields to be changed.
|
||||
|
Custom Error Handling |
Disables the default error handling. This field is intended for use by experienced users. |
Adds an item to an existing purchase requisition.
|
Connection |
|||||||||||
|
Purchase Requisition Number |
Enter the number of the purchase requisition you want to add an item to, e.g. |
||||||||||
|
Purchase Requisition Items |
|
||||||||||
|
Custom Error Handling |
Disables the default error handling. This field is intended for use by experienced users. |
Modifies one or more purchase requisition items.
|
Connection |
|
|
Purchase Requisition Number |
Enter the number of the purchase requisition you want to change, e.g. |
|
Field |
Select the field to be changed for one or several purchase requisition items at once. Options displayed below will vary, based on the field selected to be changed. |
|
Custom Error Handling |
Disables the default error handling. This field is intended for use by experienced users. |
Deletes a purchase requisition item.
|
Connection |
|||
|
Purchase Requisition Number |
Enter the number of the purchase requisition for which you want to delete one or several item,, e.g. |
||
|
Purchase Requisition Items |
|
||
|
Custom Error Handling |
Disables the default error handling. This field is intended for use by experienced users. |
Revokes the deletion of a purchase requisition item.
|
Connection |
|||
|
Purchase Requisition Number |
Enter the number of the purchase requisition for which you want to revoke the deletion of one or several items, e.g. |
||
|
Purchase Requisition Items |
|
||
|
Custom Error Handling |
Disables the default error handling. This field is intended for use by experienced users. |
Retrieves sales order details
|
Connection |
|
|
Sales Order Number |
Enter the number of the sales order for which you want to get all header and item details, e.g. |
|
Custom Error Handling |
Disables the default error handling. This field is intended for use by experienced users. |
Creates a sales order.
|
Connection |
|||||||
|
Sales Order Type |
Enter the sales order type for the order to be created, e.g. |
||||||
|
Sales Organization |
Enter the sales organization for the order to be created, e.g. |
||||||
|
Distribution Channel |
Enter the distribution channel for the order to be created, e.g. |
||||||
|
Division |
Enter the division for the order to be created, e.g. |
||||||
|
Sold-to party |
Enter the sold-to party for the order to be created, e.g. |
||||||
|
Ship-to party |
Optional: Enter the ship-to party for the order to be created if the default value should not be derived from the sold-to party, e.g. |
||||||
|
Sales Order Items |
|
||||||
|
Custom Error Handling |
Disables the default error handling. This field is intended for use by experienced users. |
Modifies a sales order.
|
Connection |
|
|
Sales Order Number |
Enter the number of the sales order for which you want to perform changes, e.g. |
|
Fields |
Select the fields to be changed, choosing Yes or No for each.
|
|
Custom Error Handling |
Disables the default error handling. This field is intended for use by experienced users. |
Sets a delivery block on a sales order.
|
Connection |
|
|
Sales Order Number |
Enter the number of the sales order for which you want to set the delivery block, e.g. |
|
New Delivery Block |
Enter the new delivery block at header level for the sales order, e.g. |
|
Custom Error Handling |
Disables the default error handling. This field is intended for use by experienced users. |
Removes a delivery block from a sales order.
|
Connection |
|
|
Sales Order Number |
Enter the number of the sales order for which you want to remove the delivery block, e.g. |
|
Custom Error Handling |
Disables the default error handling. This field is intended for use by experienced users. |
Sets a billing block on a sales order.
|
Connection |
|
|
Sales Order Number |
Enter the number of the sales order for which you want to set the billing block, e.g. |
|
Billing Block |
Add the value for the billing block, e.g. |
|
Custom Error Handling |
Disables the default error handling. This field is intended for use by experienced users. |
Removes a billing block from a sales order.
|
Connection |
|
|
Sales Order Number |
Enter the number of the sales order for which you want to remove the billing block, e.g. |
|
Custom Error Handling |
Disables the default error handling. This field is intended for use by experienced users. |
Modifies one or more sales order items.
|
Connection |
|
|
Sales Order Number |
Enter the number of the sales order for which you want to perform changes, e.g. |
|
Field |
Select the field to be changed for one or several sales order items at once. Options displayed below will vary, based on the field selected to be changed. |
|
Custom Error Handling |
Disables the default error handling. This field is intended for use by experienced users. |
Rejects a sales order item.
|
Connection |
|||||
|
Sales Order Number |
Enter the number of the sales order for which you want to reject an item, e.g. |
||||
|
Sales Order Items |
|
||||
|
Custom Error Handling |
Disables the default error handling. This field is intended for use by experienced users. |
Removes a delivery block from sales order item schedule lines.
|
Connection |
|||||
|
Sales Order Number |
Enter the number of the sales order for which you want to remove a sales order item delivery block, e.g. |
||||
|
Sales Order Items |
|
||||
|
Custom Error Handling |
Disables the default error handling. This field is intended for use by experienced users. |
Post goods issue on a delivery.
|
Connection |
|
|
Delivery Number |
Enter the delivery number for which you want to post a goods issue, e.g. |
|
Custom Error Handling |
Disables the default error handling. This field is intended for use by experienced users. |
Creates a delivery from Sales Order Items.
|
Connection |
|||||||
|
Sales Order Number |
Enter the sales order number for one or several items for which you want to create a delivery, e.g. |
||||||
|
Items |
|
||||||
|
Delivery Creation Date |
Optional: enter the delivery creation data, which is typical today’s date, e.g. |
||||||
|
Shipping Point/Receiving Point |
Optional: Enter the shipping point, e.g. |
||||||
|
Custom Error Handling |
Disables the default error handling. This field is intended for use by experienced users. |
Removes a block on a delivery.
|
Connection |
|
|
Delivery Number |
Enter the delivery number for which the block shall be removed, e.g. |
|
Custom Error Handling |
Disables the default error handling. This field is intended for use by experienced users. |
Modifies an existing outline agreement.
|
Connection |
|||||
|
Outline Agreement Number |
Enter the outline agreement number to be changed, e.g. |
||||
|
Fields |
Select the fields to be changed.
|
||||
|
Custom Error Handling |
Disables the default error handling. This field is intended for use by experienced users. |
Executes an arbitrary authorized RFC call.
|
Connection |
|
|
Remote Function Module |
Enter the module for which you want to perform the API call. Based on the specified function, dynamic fields appear for you to fill and execute the action. |
|
BAPI Transaction Handling |
Define the required commit type (only relevant for the single BAPI call defined in this action). It will implicitly add a |
|
Custom Error Handling |
Disables the default error handling. This field is intended for use by experienced users. |
