- HTTP
- Overview of the HTTP modules
- Make a request
- Example HTTP request with the Make a request module
- Make a Basic Auth request
- Make an API key Auth request
- Create an API key connection for the Make an API key Auth request module
- Module settings reference:
- Make a client certificate authentication request
- Get a file
- Resolve a target URL
- Retrieve Headers
- How to generate JSON Web Tokens (JWT)
The HTTP app provides modulesa module is an application or tool designed to handle specific business functions, such as CRM, project management, or inventory. The system's modular architecture allows you to activate only the modules you need, enabling customization and scalability as your business requirements evolve. for communication based on the Hypertext Transfer Protocol (HTTP). HTTP is the fundamental component of data transferData transfer is the amount of data transferred through your scenario. for the World Wide Web. As the backbone of information exchange between web servers and clients, HTTP allows you to download web pages, access files, make API calls, and triggerThe initial event that starts a scenario. It can be an action, a scheduled time, or a custom event, and is essential to define at the beginning of each scenario. webhooksA webhook is a way for an app to send real-time information to a specific URL in response to certain events or triggers..
Select a modulea module is an application or tool designed to handle specific business functions, such as CRM, project management, or inventory. The system's modular architecture allows you to activate only the modules you need, enabling customization and scalability as your business requirements evolve. of the HTTP app based on the authentication requirements of the resource you want to use. To use modules that require authentication, you have to create a connection first.
- Make a request: universal module, best to use for resources that do not require authentication.
- Make a Basic Auth request: for resources that require basic authentication.
- Make an API key Auth request: for resources that require API key authentication.
- Make an OAuth 2.0 request: for resources that require OAuth 2.0 authorization.
- Make a Client Certificate Auth request: for resources that require client-side certificate authentication.
- Get a file: download a file from the URL.
- Resolve a target URL: retrieve the target URL from a chain of HTTP redirects.
- Retrieve headers: to get headers from the HTTP request module in separate bundles.
![[Note]](https://docs.boost.space/wp-content/themes/bsdocs/docs-parser/HTML/css/image/note.png) |
Note |
|---|---|
| The module dialog fields that are displayed in bold (in the Boost.spaceA platform that centralizes and synchronizes company data from internal and external sources, offering a suite of modules and addons for project management, CRM, data visualization, and more. Has many features to optimize your workflow! IntegratorPart of the Boost.space system, where you can create your connections and automate your processes.scenarioA specific connection between applications in which data can be transferred. Two types of scenarios: active/inactive., not in this documentation article) are mandatory! |
The Make a request module allows you to create an HTTP request and send it to a server. The output bundleA bundle is a chunk of data and the basic unit for use with modules. A bundle consists of items, similar to how a bag may contain separate, individual items. contains the HTTP response.
| Evaluate all states as errorsService is unavailable due to a failure, a service responds with unexpected data or the validation of input data fails. (except for 2xx and 3xx) | Use the response statusIn Boost.space, statuses are indicators assigned to records within modules to represent their current state or progress. They can be system-defined, such as "Active" or "Done," or custom-created to fit specific workflows. Statuses help track and manage tasks, projects, and processes efficiently. to detect errors. Otherwise, the module reports only Boost.space Integrator related errors (like mappingMapping links the modules in your scenario. When you map an item, you connected the data retrieved by one module to another module to perform the desired action. For example, you can map the email address and subject lines from the Email > Watch emails module to Google Sheets > Add a row and create a spreadsheet of email addresses... errors or missing required values). | ||||||
| URL | Enter the request URL. | ||||||
| Serialize URL | Encodes the API call URL with the URL encoding (encoding special characters for example). | ||||||
| Method | Select the HTTP method you want to use:
|
||||||
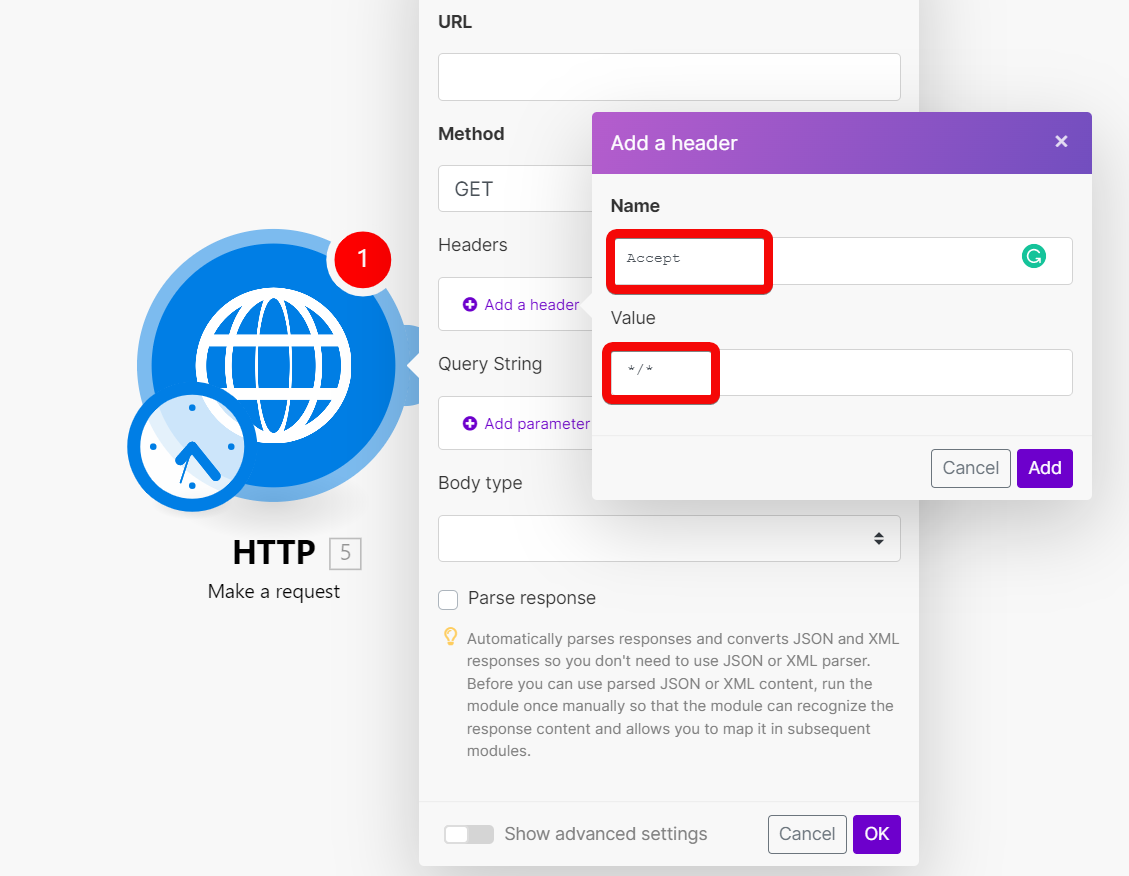
| Headers | Enter request headers. For example, the response content type.
|
||||||
| Query String | Enter the query key-value pairs. | ||||||
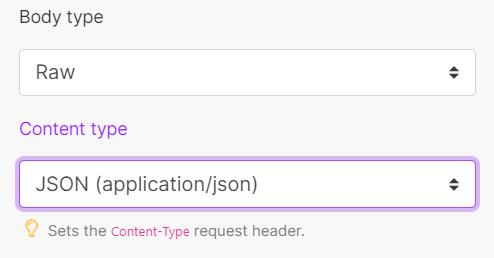
| Body type | HTTP body contains the data transferred in an HTTP request.
|
||||||
| Parse response | Enable to parse HTTP responses into bundles. With this option, you don’t need to add the Parse JSON or Parse XML modules. Otherwise, the HTTP module returns the raw response data.
Before you can use parsed JSON or XML content, run the module once manually so that the module can recognize the response content and allow you to map it in subsequent modules. 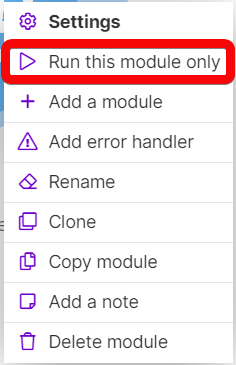 |
||||||
| UserCan use the system on a limited basis based on the rights assigned by the admin. name | Enter the user name to send the request with the basic auth. | ||||||
| Password | Enter the password to send the request with the basic auth. | ||||||
| Timeout | Specify the request timeout in seconds (1-300). Default: 40 seconds. | ||||||
| Share cookies with other HTTP modules | Enable to share cookies from the server with all HTTP modules in your scenario. | ||||||
| Self-signed certificate | Upload your certificate if you want to use TLS using your self-signed certificate. | ||||||
| Reject connections that use unverified (self-signed) certificates | Enable to reject connections that use unverified TLS certificates. | ||||||
| Follow redirect | Enable to follow URL redirects that return 3xx response statusesIn Boost.space, statuses are indicators assigned to records within modules to represent their current state or progress. They can be system-defined, such as "Active" or "Done," or custom-created to fit specific workflows. Statuses help track and manage tasks, projects, and processes efficiently.. | ||||||
| Follow all redirect | Enable to follow URL redirects regardless of response statuses. | ||||||
| Disable serialization of multiple same query string keys as arrays | Boost.space Integrator handles multiple values for the same URL query string parameter key as arrays (e.g., www.test.com?foo=bar&foo=baz will be converted to www.test.com?foo[0]=bar&foo[1]=baz). Enable to deactivate this behavior. |
||||||
| Request compressed content | Enable to request compression of the response data. Adds the Accept-Encoding header. |

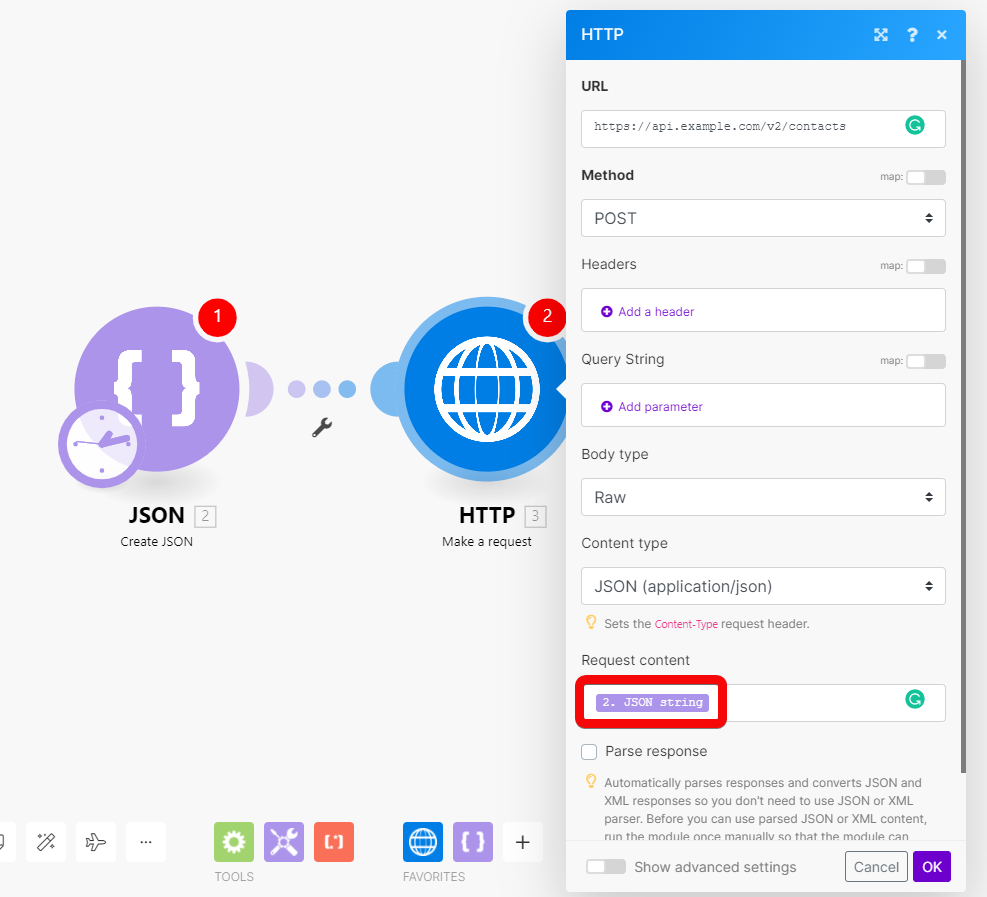
Check the following screenshot to see how to set up the Make a request module to send a POST request with the body in the JSON data format:
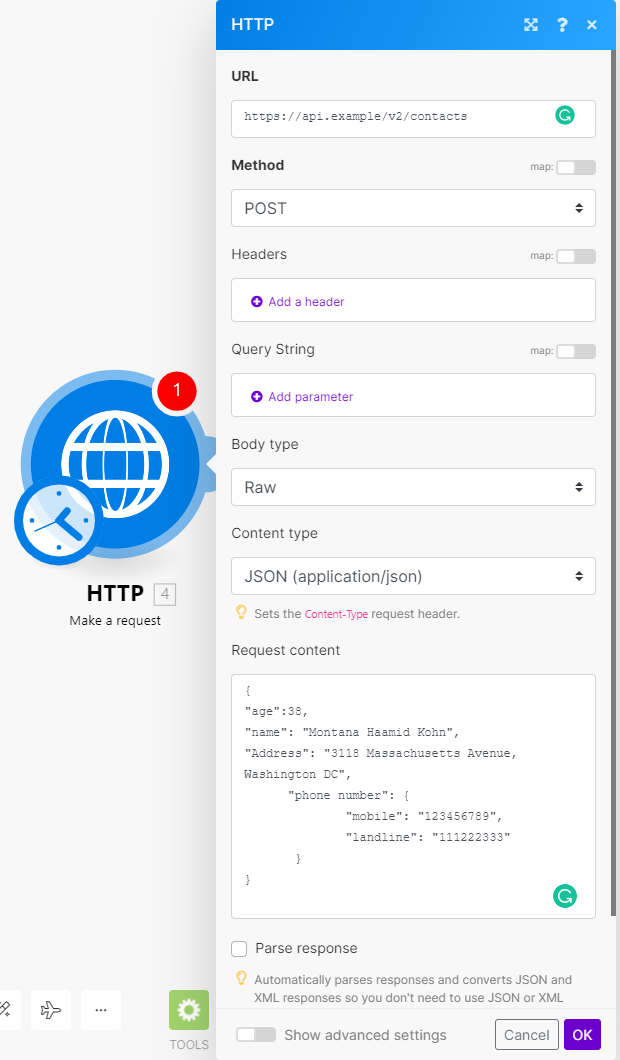
To make sure your JSON is valid, use a JSON validator (for example: https://jsonlint.com/) or use a Create JSON module to create the JSON.
![[Caution]](https://docs.boost.space/wp-content/themes/bsdocs/docs-parser/HTML/css/image/caution.png) |
Caution |
|---|---|
| Be careful when combining JSON data with mapping variables or functionFunctions you can use in Boost.space Integrator - create, update, delete, get, search. directly in the Request content field. Mixing JSON with mapping can lead to an invalid JSON structure. |
The Make a Basic Auth request module allows you to send an HTTP request with the basic authentication. The output bundle contains the HTTP response.
| Credentials | Click Add to add your credentials (user name and password) for basic authentication. | ||||||
| Evaluate all states as errors (except for 2xx and 3xx) | Use the response status to detect errors. Otherwise, the module reports only Make related errors (like mapping errors or missing required values). | ||||||
| URL | Enter the request URL. | ||||||
| Serialize URL | Encodes the API call URL with the URL encoding (encoding special characters for example). | ||||||
| Method | Select the HTTP method you want to use:
|
||||||
| Headers | Enter request headers. For example, the response content type.
|
||||||
| Query String | Enter the query key-value pairs. | ||||||
| Body type | HTTP body contains the data transferred in an HTTP request.
|
||||||
| Parse response | Enable to parse HTTP responses into bundles. With this option, you don’t need to add the Parse JSON or Parse XML modules. Otherwise, the HTTP module returns the raw response data.
Before you can use parsed JSON or XML content, run the module once manually so that the module can recognize the response content and allow you to map it in subsequent modules. |
||||||
| Timeout | Specify the request timeout in seconds (1-300). Default: 40 seconds. | ||||||
| Share cookies with other HTTP modules | Enable to share cookies from the server with all HTTP modules in your scenario. | ||||||
| Self-signed certificate | Upload your certificate if you want to use TLS using your self-signed certificate. | ||||||
| Reject connections that use unverified (self-signed) certificates | Enable to reject connections that use unverified TLS certificates. | ||||||
| Follow redirect | Enable to follow URL redirects that return 3xx response statuses. | ||||||
| Follow all redirect | Enable to follow URL redirects regardless of response statuses. | ||||||
| Disable serialization of multiple same query string keys as arrays | Boost.space Integrator handles multiple values for the same URL query string parameter key as arrays (e.g., www.test.com?foo=bar&foo=baz will be converted to www.test.com?foo[0]=bar&foo[1]=baz). Enable to deactivate this behavior. |
||||||
| Request compressed content | Enable to request compression of the response data. Adds the Accept-Encoding header. |
The Make an API key Auth request module allows you to send API calls to services that require API key authorization. The module also supports “Bearer” authorization.
The output bundle contains the HTTP response.
Check out the following example if you want to set up a connectionUnique, active service acces point to a network. There are different types of connections (API key, Oauth…). for the Make an API key Auth request module:
- In the Make an API key Auth request module settings, click the Add button. The Add a new keychainThe keychain helps you to administer the keys you have stored in Boost.space Integrator. Each key is a unique identifier used for encryption. window pops up.
- Fill in:
- Name: The labelIn Boost.space, a label is a tag that can be added to items within a module. It's a flexible tool used to categorize and organize data, making it easier to customize workflows and processes. for your API key connection.
- Key: The API key to authorize the HTTP calls. If the API uses “Bearer” or “Token” authorization, add the word before the API key.Example:
Bearer 1234-5678-abcd-efghNote You can use the eye icon at the edge of the box to reveal the API key and the text you add to it. If you do, make sure that you are the only one viewing the content. - API key placement: Select if you want the authorization in the request header or query string.
- API key parameter name: The name of the parameter that contains the API key.
- Click Create to create the connection.
You created an API key connection. You can now use the connection in the Make an API key Auth request module.
| Evaluate all states as errors (except for 2xx and 3xx) | Use the response status to detect errors. Otherwise, the module reports only Boost.space Integrator related errors (like mapping errors or missing required values). | ||||||
| URL | Enter the request URL. | ||||||
| Serialize URL | Encodes the API call URL with the URL encoding (encoding special characters for example). | ||||||
| Method | Select the HTTP method you want to use:
|
||||||
| Headers | Enter request headers. For example, the response content type.
|
||||||
| Query String | Enter the query key-value pairs. | ||||||
| Body type | HTTP body contains the data transferred in an HTTP request.
|
||||||
| Parse response | Enable to parse HTTP responses into bundles. With this option, you don’t need to add the Parse JSON or Parse XML modules. Otherwise, the HTTP module returns the raw response data.
Before you can use parsed JSON or XML content, run the module once manually so that the module can recognize the response content and allow you to map it in subsequent modules. |
||||||
| Timeout | Specify the request timeout in seconds (1-300). Default: 40 seconds. | ||||||
| Share cookies with other HTTP modules | Enable to share cookies from the server with all HTTP modules in your scenario. | ||||||
| Self-signed certificate | Upload your certificate if you want to use TLS using your self-signed certificate. | ||||||
| Reject connections that use unverified (self-signed) certificates | Enable to reject connections that use unverified TLS certificates. | ||||||
| Follow redirect | Enable to follow URL redirects that return 3xx response statuses. | ||||||
| Follow all redirect | Enable to follow URL redirects regardless of response statuses. | ||||||
| Disable serialization of multiple same query string keys as arrays | Boost.space Integrator handles multiple values for the same URL query string parameter key as arrays (e.g., www.test.com?foo=bar&foo=baz will be converted to www.test.com?foo[0]=bar&foo[1]=baz). Enable to deactivate this behavior. |
||||||
| Request compressed content | Enable to request compression of the response data. Adds the Accept-Encoding header. |
Module settings reference:
| Evaluate all states as errors (except for 2xx and 3xx) | Use the response status to detect errors. Otherwise, the module reports only Boost.space Integrator related errors (like mapping errors or missing required values). | ||||||
| URL | Enter the request URL. | ||||||
| Serialize URL | Encodes the API call URL with the URL encoding (encoding special characters for example). | ||||||
| Method | Select the HTTP method you want to use:
|
||||||
| Headers | Enter request headers. For example, the response content type.
|
||||||
| Query String | Enter the query key-value pairs. | ||||||
| Body type | HTTP body contains the data transferred in an HTTP request.
|
||||||
| Parse response | Enable to parse HTTP responses into bundles. With this option, you don’t need to add the Parse JSON or Parse XML modules. Otherwise, the HTTP module returns the raw response data.
Before you can use parsed JSON or XML content, run the module once manually so that the module can recognize the response content and allow you to map it in subsequent modules. |
||||||
| Timeout | Specify the request timeout in seconds (1-300). Default: 40 seconds. | ||||||
| Share cookies with other HTTP modules | Enable to share cookies from the server with all HTTP modules in your scenario. | ||||||
| Self-signed certificate | Upload your certificate if you want to use TLS using your self-signed certificate. | ||||||
| Reject connections that use unverified (self-signed) certificates | Enable to reject connections that use unverified TLS certificates. | ||||||
| Follow redirect | Enable to follow URL redirects that return 3xx response statuses. | ||||||
| Follow all redirect | Enable to follow URL redirects regardless of response statuses. | ||||||
| Disable serialization of multiple same query string keys as arrays | Boost.space Integrator handles multiple values for the same URL query string parameter key as arrays (e.g., www.test.com?foo=bar&foo=baz will be converted to www.test.com?foo[0]=bar&foo[1]=baz). Enable to deactivate this behavior. |
||||||
| Request compressed content | Enable to request compression of the response data. Adds the Accept-Encoding header. |
Sends an HTTP(S) request to services that require a client certificate authorization.
| Evaluate all states as errors (except for 2xx and 3xx) | Use the response status to detect errors. Otherwise, the module reports only Boost.space Integrator related errors (like mapping errors or missing required values). | ||||||
| URL | Enter the request URL. | ||||||
| Serialize URL | Encodes the API call URL with the URL encoding (encoding special characters for example). | ||||||
| Method | Select the HTTP method you want to use:
|
||||||
| Headers | Enter request headers. For example, the response content type.
|
||||||
| Query String | Enter the query key-value pairs. | ||||||
| Body type | HTTP body contains the data transferred in an HTTP request.
|
||||||
| Parse response | Enable to parse HTTP responses into bundles. With this option, you don’t need to add the Parse JSON or Parse XML modules. Otherwise, the HTTP module returns the raw response data.
Before you can use parsed JSON or XML content, run the module once manually so that the module can recognize the response content and allow you to map it in subsequent modules. |
||||||
| Timeout | Specify the request timeout in seconds (1-300). Default: 40 seconds. | ||||||
| Share cookies with other HTTP modules | Enable to share cookies from the server with all HTTP modules in your scenario. | ||||||
| Self-signed certificate | Upload your certificate if you want to use TLS using your self-signed certificate. | ||||||
| Reject connections that use unverified (self-signed) certificates | Enable to reject connections that use unverified TLS certificates. | ||||||
| Follow redirect | Enable to follow URL redirects that return 3xx response statuses. | ||||||
| Follow all redirect | Enable to follow URL redirects regardless of response statuses. | ||||||
| Disable serialization of multiple same query string keys as arrays | Boost.space Integrator handles multiple values for the same URL query string parameter key as arrays (e.g., www.test.com?foo=bar&foo=baz will be converted to www.test.com?foo[0]=bar&foo[1]=baz). Enable to deactivate this behavior. |
||||||
| Request compressed content | Enable to request compression of the response data. Adds the Accept-Encoding header. |
Downloads a file from a URL.
| URL | Enter the URL of the file you want to download. You can use the file (map the file data) in other modules in the scenario. |
Enter the URL you want to resolve. The output bundle contains the link to which the original URL redirects in the location response header.
This module helps you to get a direct URL to a resource instead of a redirect URL. For example, links for sharing files in storage services like Dropbox redirect you before you reach the target file. The module navigates through the redirect chain and returns the target URL.
| URL | Enter the URL you want to resolve. |
| Method | Select the method you want to use. |
Returns each header (name and value) from the specified HTTP module in a separate bundle.
| Source Module | Select the module you want to retrieve headers from. |
You can generate JWT tokens using the HS256 algorithm with built-in functionsFunctions you can use in Boost.space Integrator - create, update, delete, get, search.:
Header:

Code for copy & paste:
{{replace(replace(replace(base64("{""alg"":""HS256"",""typ"":""JWT""}"); "/=/g"; emptystring); "/\+/g"; "-"); "/\//g"; "_")}}
Payload:

Code for copy & paste:
{{replace(replace(replace(base64("{""iss"":""key"",""exp"":" + (timestamp + 60) + "}"); "/=/g"; emptystring); "/\+/g"; "-"); "/\//g"; "_")}}
TokenA secure code used to authenticate and authorize access to API endpoints, enabling users to connect with third-party applications.:

Code for copy & paste:
{{11.header}}.{{12.payload}}.{{replace(replace(replace(sha256(11.header + "." + 12.payload; "base64"; 16.secret); "/=/g"; emptystring); "/\+/g"; "-"); "/\//g"; "_")}}