- Ontraport
- Getting Started with Ontraport
- Connecting Ontraport to Boost.space Integrator
- General Object Modules
- Watch Events
- Pipeliner CRM
- Connecting Pipeliner CRM to Boost.space Integrator
- Pipeliner API credentials
- Connecting to Boost.space Integrator
- Setting up Pipeliner CRM webhooks
- Search Objects
- Get an Object
- Create an Object
- Update an Object
- Delete an Object
- List Objects with Tag
- Tag Objects
- Untag Objects
- Add an Object to a Sequence or Campaign
- Remove an Object from a Sequence or Campaign
- Message
- Rule
- Other
The Ontraport modules allow you to watch, create, update, search, and delete objects, rules, events, and messages in your Ontraport account.
Prerequisites
-
An Ontraport account
In order to use Ontraport with Boost.space Integrator, it is necessary to have an Ontraport account. If you do not have one, you can create an Ontraport account at ontraport.com/signup-pro.
The module dialog fields that are displayed in bold (in the Boost.space Integrator scenario, not in this documentation article) are mandatory!
To connect your Ontraport account to Boost.space Integrator you need to obtain the API Key from your Ontraport account and insert it in the Create a connection dialog in the Boost.space Integrator module.
1. Log in to your Ontraport account.
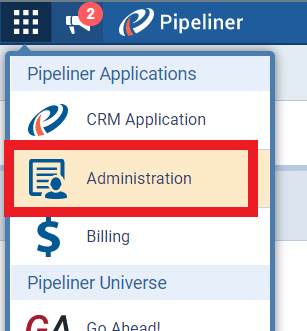
2. Click Your Profile Icon > Administration > Integrations > Ontraport API Instructions and Key Manager.
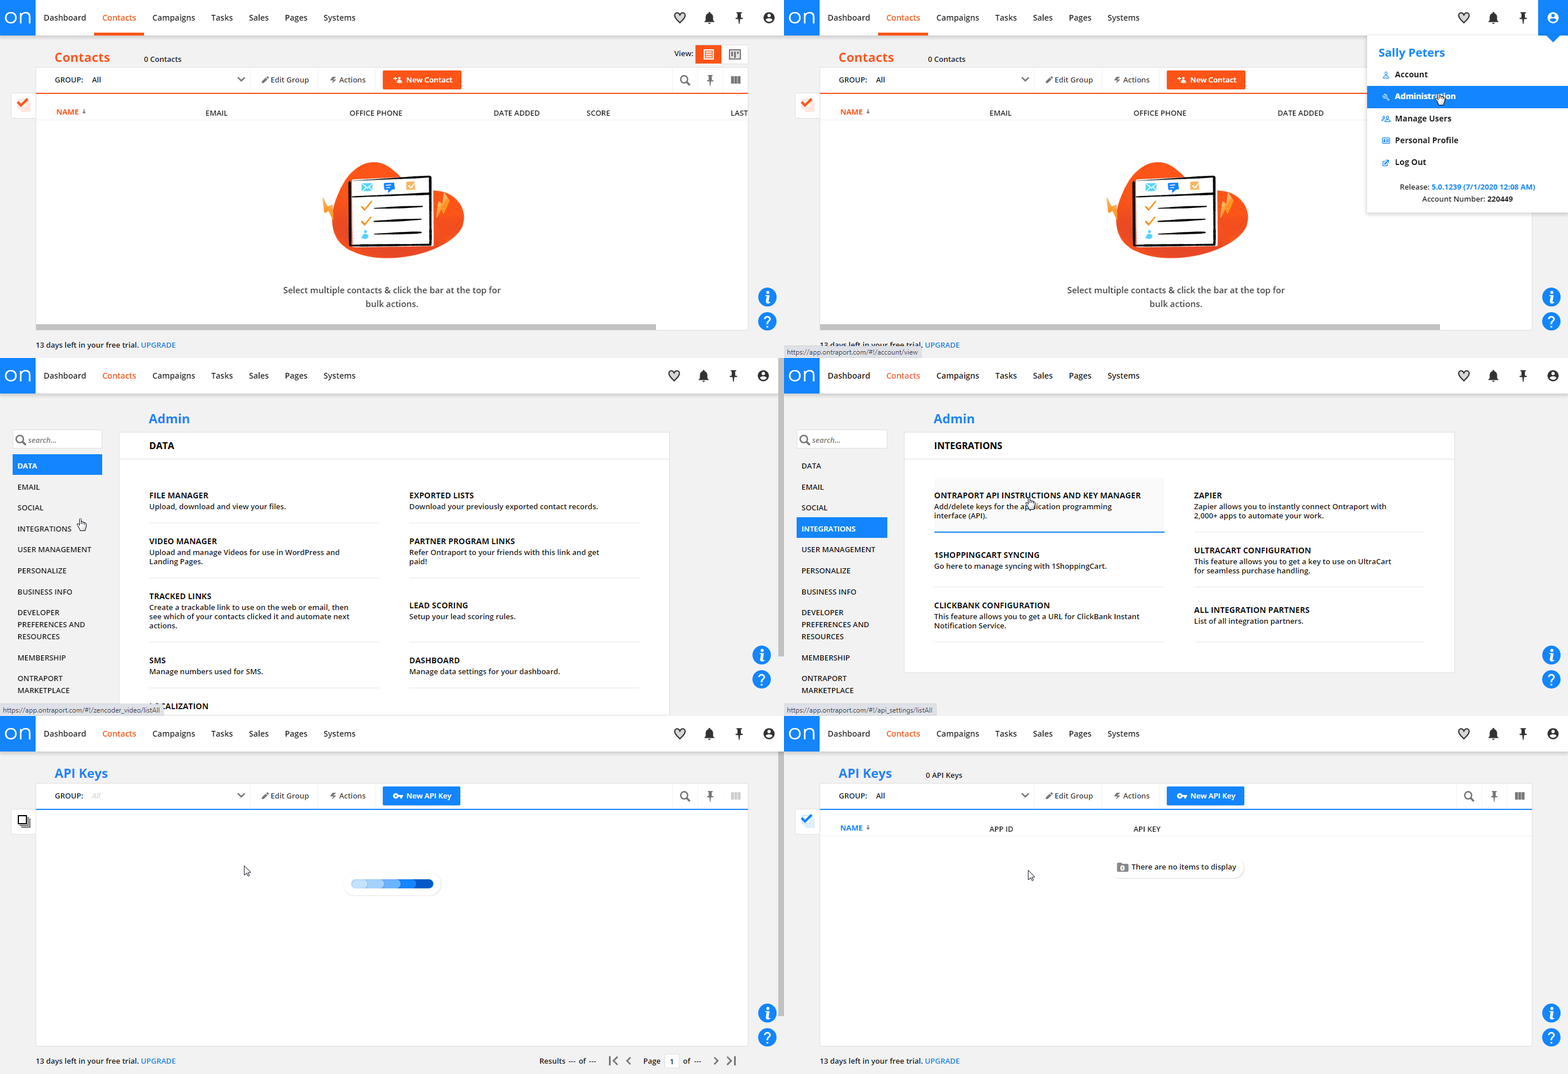
3. Click New API Key, fill the details in the API Application and accept the agreement, enter a name for API and select the options for API. Click Save.
4. Copy theAPP ID and API Key to your clipboard.

5. Go to Boost.space Integrator and open the Ontraport module’s Create a connection dialog.
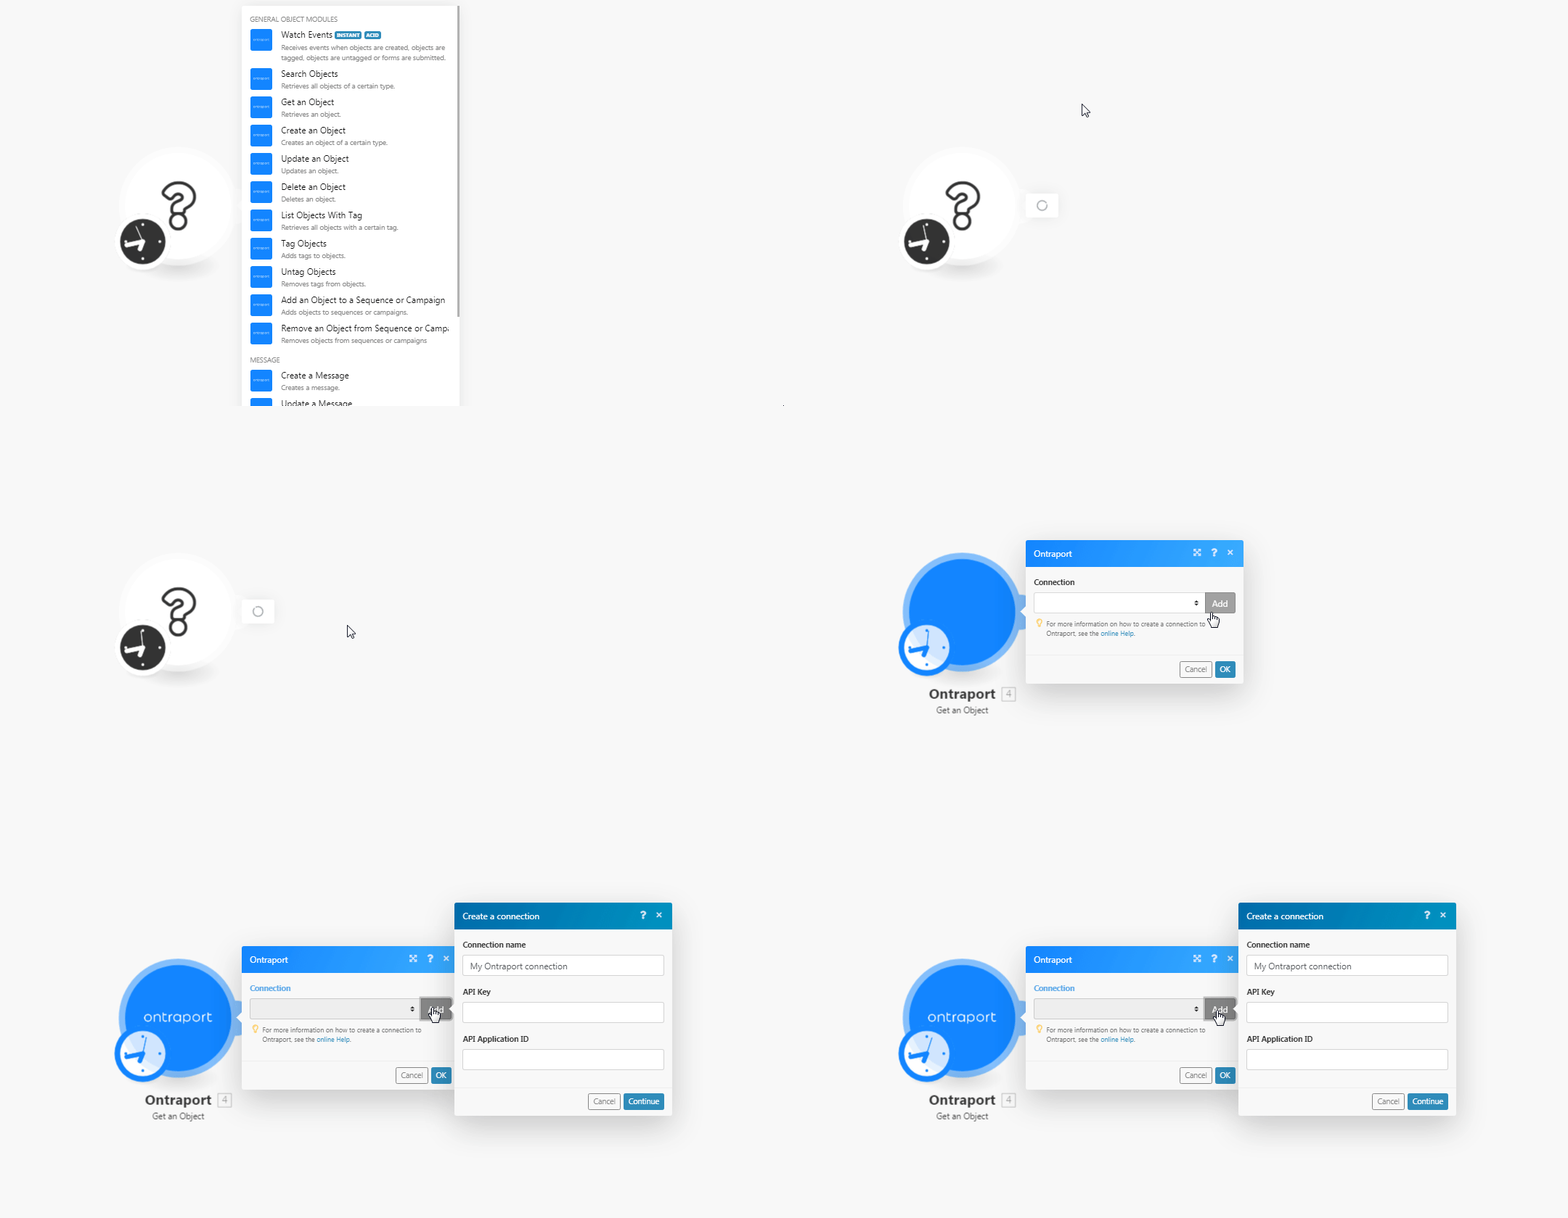
6. In the Connection name field, enter a name for the connection.
7. In the API Key and API Application ID fields, enter the API key and APP ID copied in step 4. Click Continue.
The connection has been established.
Receives events when objects are created, objects are tagged, objects are untagged or forms are submitted.
|
Webhook Name |
Enter a name for the webhook. |
|
Connection |
|
|
Object Type ID |
Select the Object Type ID you want to watch. |
|
Event |
Select the event you want to watch:
|
|
Tag ID |
Select the Tag ID you want to watch. |
|
Form ID |
Select the Form ID you want to watch. |
|
Data Format |
Select the data format:
|
See the Connecting to Ontraport webhook using Boost.space Integrator for adding the webhook in Ontraport.
With Pipeliner CRM modules in Boost.space Integrator, you can manage and monitor all your accounts, appointments, contacts, leads, opportunities, and tasks in your Pipeliner CRM account.
To get started with Pipeliner CRM, create an account at pipelinersales.com.
To make a connection you need to obtain API access credentials from your Pipliner CRM account.
-
Log in to your Pipeliner CRM account.
-
Click the menu in the top-left, corner, then click Administration.
-
Click Units, Users & Roles, then click Applications.
-
Select an existing API application, or create a new one.
-
Select the API application you want to use, then click Show API Access.
-
Copy the user name, password, and space ID to your clipboard. Make a note of the server location too.
-
Go to your Boost.space Integrator scenario and select the Pipeliner CRM module you want to use.
-
Under Connection, click Add.
-
Give your new connection a name.
-
Paste the user name, password, and space ID that you copied in step 6.
-
Select the server location you want to use.
-
Click Save.
You have successfully established the connection.
-
Go to your Boost.space Integrator scenario and select the Pipeliner CRM module you want to use.
-
Under Connection, click Add.
-
Give your new connection a name.
-
Paste the user name, password, and space ID that you copied in step 6.
-
Select the server location you want to use.
-
Click Save.
You have successfully established the connection.
To use any of the Pipeliner CRM Watch modules, you must first set up a webhook.
-
Go to your Boost.space Integrator scenario and select the Pipeliner CRM Watch module you want to use.
-
Click Add.
-
Give your new webhook a name.
-
Select which connection you want to use or create a new one by following the steps below.
-
Click Save.
The app-specific webhook attaches automatically in your Pipeliner CRM account.
Retrieves all objects of a certain type.
|
Connection |
|
|
Object Type ID |
Select Object Type ID whose object you want to search. |
|
Search |
Enter any keyword or phrase to filter the objects. |
|
Search Notes |
Select whether object notes can be searchable:
|
|
Object IDs |
Add the Object IDs |
|
Limit |
Enter the maximum number of objects Boost.space Integrator should return during one scenario execution cycle. |
Retrieves an object.
|
Connection |
|
|
Object Type ID |
Select the Object Type ID whose object type details you want to retrieve. |
|
Object ID |
Select the Object ID whose details you want to retrieve. |
Creates an object of a certain type.
|
Connection |
|
|
Object Type ID |
Select the Object Type ID whose object you are creating. When you select an object, the dynamic fields related to the object type auto-populates which you have to fill for creating or updating the object. Refer to the Ontraport API documentation. |
Updates an object.
|
Connection |
|
|
Object Type ID |
Select the Object Type ID whose object you want to update. |
|
Object ID |
Select the Object ID you want to update. When you select an object, the dynamic fields related to the object type auto-populates which you have to fill for creating or updating the object. Refer to the Ontraport API documentation. |
Deletes an object.
|
Connection |
|
|
Object Type ID |
Select the Object Type ID whose object type details you want to retrieve. |
|
Object ID |
Select the Object ID whose details you want to retrieve. |
Retrieves all objects with a certain tag.
|
Connection |
|
|
Object Type ID |
Select the Object Type ID whose object you want to list with tag. |
|
Tag |
Enter the tags whose associated objects you want to list. |
|
Search |
Enter any keyword or phrase to filter the objects. |
|
Search Notes |
Select whether object notes can be searchable:
|
|
Limit |
Enter the maximum number of objects Boost.space Integrator should return during one scenario execution cycle. |
Tag objects.
|
Connection |
|
|
Object Type |
Select the object type to whose object you want to add the tags. |
|
Tag |
Enter the tag or keyword you want to add as a tag to the object. |
|
Object ID |
Enter the object ID to which you want to add the tag. |
Removes a tag from objects.
|
Connection |
|
|
Object Type |
Select the object type to whose object you want to untag. |
|
Tag |
Enter the tag or keyword you want to untag from the object. |
|
Object ID |
Select the object ID from which you want to untag. |
Adds objects to sequence or campaigns.
|
Connection |
|
|
Object Type |
Select the object type to whose object you want to add to the sequence or campaign. |
|
Sequence or Campaign |
Select whether you want to add the object to sequence or campaign:
|
|
Sequences |
Select the sequence to which you want to add the object. |
|
Campaign |
Enter the campaign to which you want to add the object. |
|
Object ID |
Select the Object ID which you want to add to the sequence or campaign. |
Removes objects from sequences or campaigns.
|
Connection |
|
|
Object Type |
Select the object type whose object you want to remove from the sequence or campaign. |
|
Sequence or Campaign |
Select the option you want to remove from the object:
|
|
Sequences |
Select the sequence to which you want to remove from the object. |
|
Campaign |
Enter the campaign from which you want to remove the object. |
|
Object ID |
Select the Object ID which you want to add to the sequence or campaign. |
Creates a message.
|
Connection |
|
|
Message Name |
Enter the name of the message. |
|
Message Subject |
Enter the subject line of the message. |
|
Message Type |
Select the message type:
|
|
Send From Email address |
Enter the email address from which you are sending the message. |
|
From Name |
Select the name that appears in the email. |
|
Reply to Email Address |
Enter the email address to which the recipient can reply. |
|
Plain Text |
Enter the email body message. |
|
HTML Text |
Enter the email body message in HTML format. |
|
Email Title |
Enter the email title. |
|
Type |
Select the email type:
|
|
Spam Score |
Enter the spam score for this email so it appears in the spam folder of the recipient. |
|
Template Content |
Enter the template details. The template details may overwrite other fields that appear below this field. |
|
SMS Content |
Enter the message text. |
|
Task Data |
Enter the task details. |
|
Due Date |
Enter the date by which the task must be completed. |
|
Task Owner |
Enter the task owner’s name. |
|
Task Form |
Enter the Task ID of the form which needs to be filled on completing the task. |
|
Object Type ID |
Select the Object Type ID. |
Updates a message.
|
Connection |
|
|
Message ID |
Select the Message ID you want to update. |
|
Message Name |
Enter the name of the message. |
|
Message Subject |
Enter the subject line of the message. |
|
Message Type |
Select the message type:
|
|
Send From Email address |
Enter the email address from which you are sending the message. |
|
From Name |
Select the name that appears in the email. |
|
Reply to Email Address |
Enter the email address to which the recipient can reply. |
|
Plain Text |
Enter the email body message. |
|
HTML Text |
Enter the email body message in HTML format. |
|
Email Title |
Enter the email title. |
|
Type |
Select the email type:
|
|
Spam Score |
Enter the spam score for this email so it appears in the spam folder of the recipient. |
|
Template Content |
Enter the template details. The template details may overwrite other fields that appear below this field. |
|
SMS Content |
Enter the message text. |
|
Task Data |
Enter the task details. |
|
Due Date |
Enter the date by which the task must be completed. |
|
Task Owner |
Enter the task owner’s name. |
|
Task Form |
Enter the Task ID of the form which needs to be filled on completing the task. |
|
Object Type ID |
Select the Object Type ID. |
Creates a rule.
|
Connection |
|
|
Rule Name |
Enter a name for the rule. |
|
Rule Events |
Enter the events for which the rule triggers. For the list of events, see here. |
|
Rule Actions |
Enter the actions for which the rule triggers. For the list of actions, see here. |
|
Object Type ID |
Select the Object Type ID for which you are creating the rules. |
|
Rule Conditions |
Enter the conditions which when met, the rule triggers. For the list of conditions, see here. |
|
Rule Tags |
Enter the keywords as tags for the rule. |
|
Pause |
Select whether the rule is paused:
|
Updates a rule.
|
Connection |
|
|
Rule ID |
Select the Rule ID you want to update. |
|
Pause |
Select whether the rule is paused:
|
|
Rule Name |
Enter a name for the rule. |
|
Rule Events |
Enter the events for which the rule triggers. For the list of events, see here. |
|
Rule Actions |
Enter the actions for which the rule triggers. For the list of actions, see here. |
|
Rule Conditions |
Enter the conditions which when met, the rule triggers. For the list of conditions, see here. |
|
Rule Tags |
Enter the keywords as tags for the rule. |
|
Object Type ID |
Select the Object Type ID for which you are creating the rules. |
Performs an arbitrary authorized API call.
|
Connection |
||||
|
URL |
Enter a path relative to
|
|||
|
Method |
Select the HTTP method you want to use: GET to retrieve information for an entry. POST to create a new entry. PUT to update/replace an existing entry. PATCH to make a partial entry update. DELETE to delete an entry. |
|||
|
Headers |
Enter the desired request headers. You don’t have to add authorization headers; we already did that for you. |
|||
|
Query String |
Enter the request query string. |
|||
|
Body |
Enter the body content for your API call. |
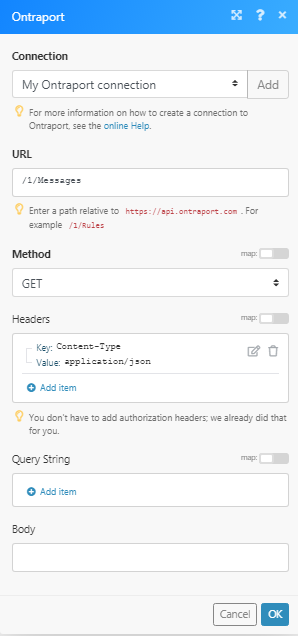
The following API call returns all the messages from your Ontraport account:
URL: /1/Messages
Method: GET
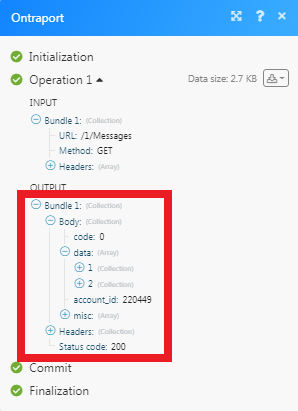
Matches of the search can be found in the module’s Output under Bundle > Body > data.In our example, 2 messages were returned:
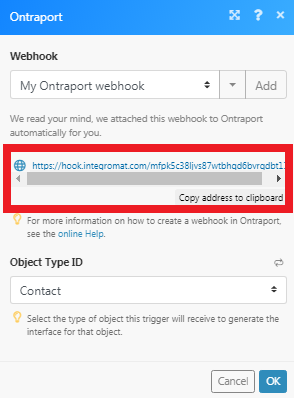
1. In the Watch events module, enter the details as mentioned in the Watch Events and copy the address to your clipboard.
2. Log in to your Ontraport account and open your Campaign map > Advanced > Send to a Webhook and add the webhook information to the flow.
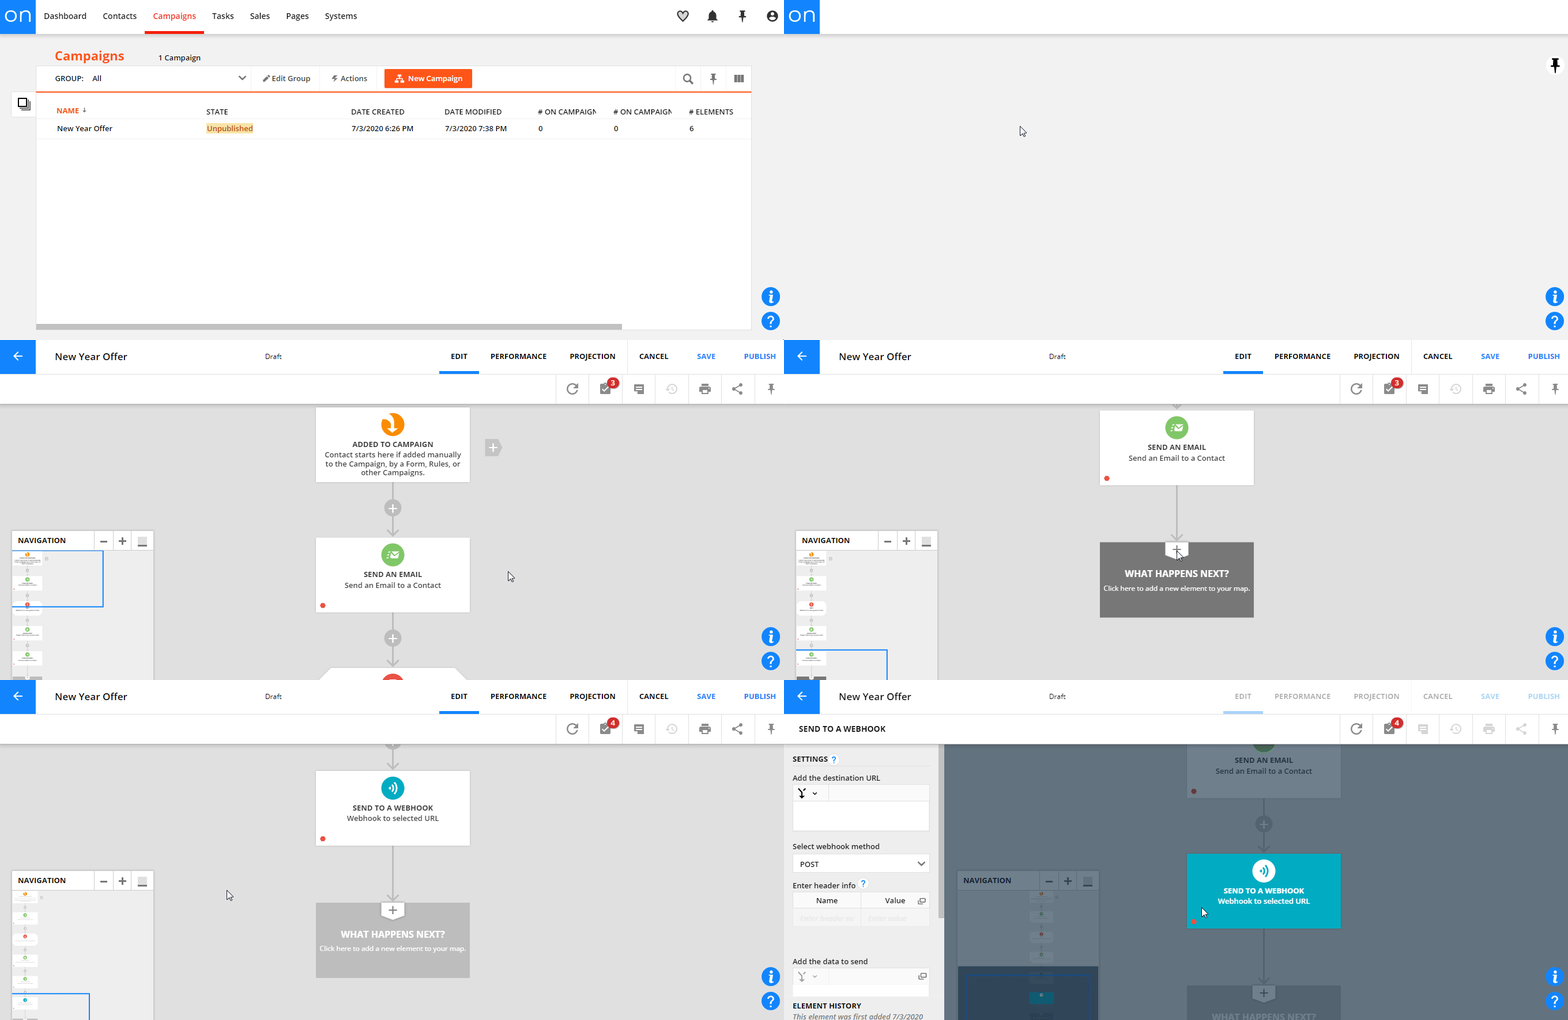
You can also add webhooks from your Administration settings, see Ontraport Webhooks for more information.
3. Add the URL address copied in step 1 and select the events for which you want to receive triggers and click Done.
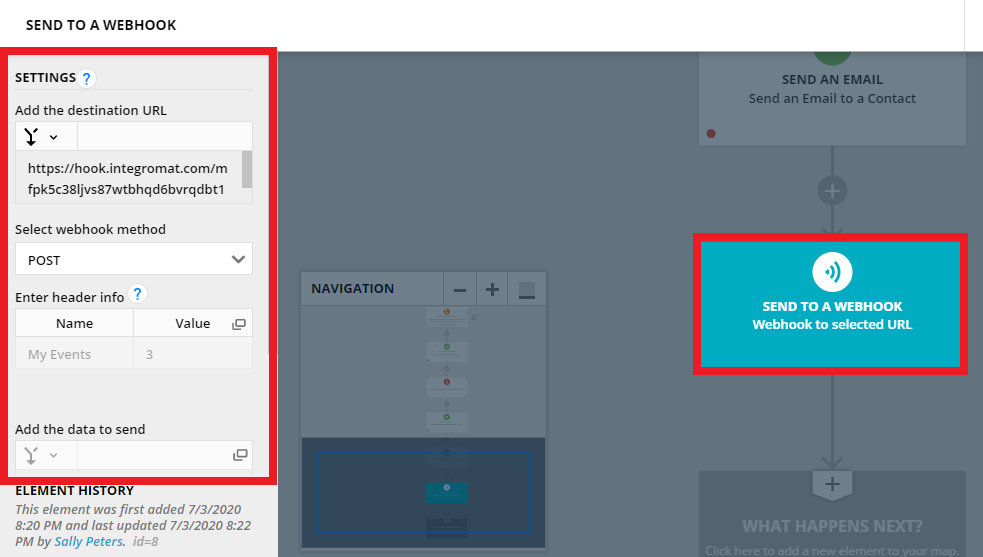
You have successfully added the webhook.

![[Note]](https://docs.boost.space/wp-content/themes/bsdocs/docs-parser/HTML/css/image/note.png)