Step-by-Step Guide: Creating Automated Actions in Boost.spaceA platform that centralizes and synchronizes company data from internal and external sources, offering a suite of modules and addons for project management, CRM, data visualization, and more. Has many features to optimize your workflow!
Introduction
In the Boost.space systemA platform that centralizes and synchronizes company data from internal and external sources, offering a suite of modules and addons for project management, CRM, data visualization, and more. Has many features to optimize your workflow!, automations play a crucial role in streamlining your workflow and saving time. By utilizing the “Actions and Triggers” feature, you can automate various tasks within the system. This documentation provides a comprehensive overview of actions and triggersIn Boost.space, this feature enables you to automate workflows by defining specific conditions (triggers) that initiate automated responses (actions). For example, you can set up a trigger to detect when a record's status changes and configure an action to send a notification or execute a webhook in response., guiding you through the process of setting up automated actions and configuring triggers.
Video
Automated Actions
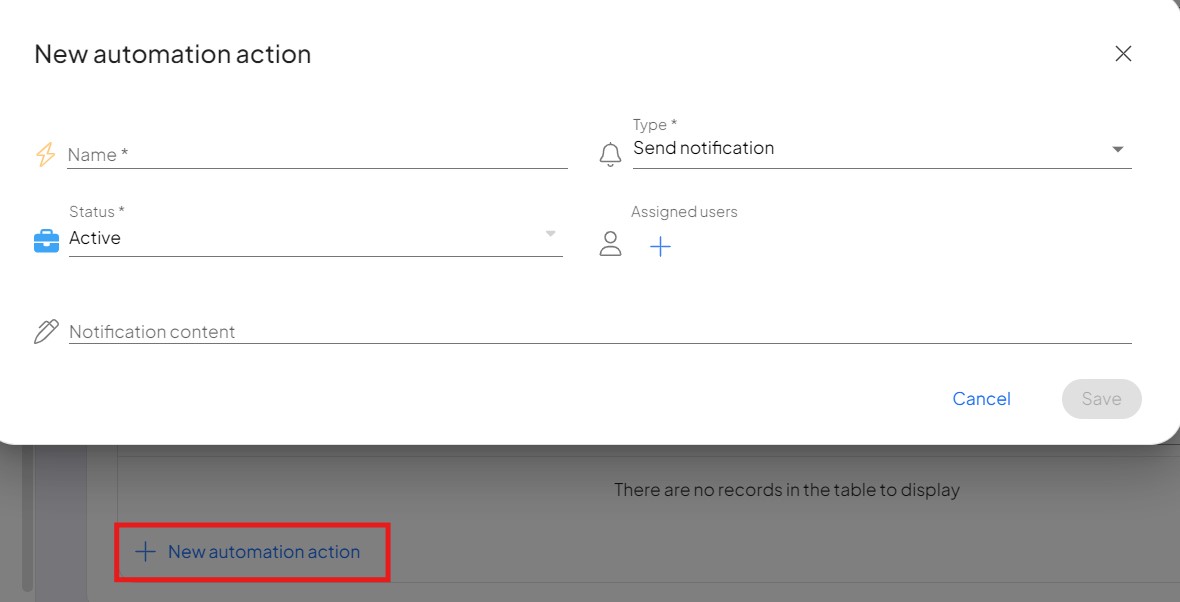
Automated actions are the building blocks of your automation process. To create a new action, follow these steps:
- Access the system settingsMain settings of the Boost.space system that is accessible only by admins. You can change a variety of things here (custom fields, actions and triggers, design, etc.) in Boost.space.
- Navigate to the “Webhooks” section.
- Look for the option to set up automated actions.
- Choose the desired type for your action: system notification, email, or webhook.
- Fill in the necessary fields, including the name and other required information.
Note: Setting up webhooks can be done automatically through Boost.space, eliminating the need for manual configuration. If you choose to utilize webhooks, you can manage their settings by accessing the “Webhooks” section and clicking on the edit button.

Triggers
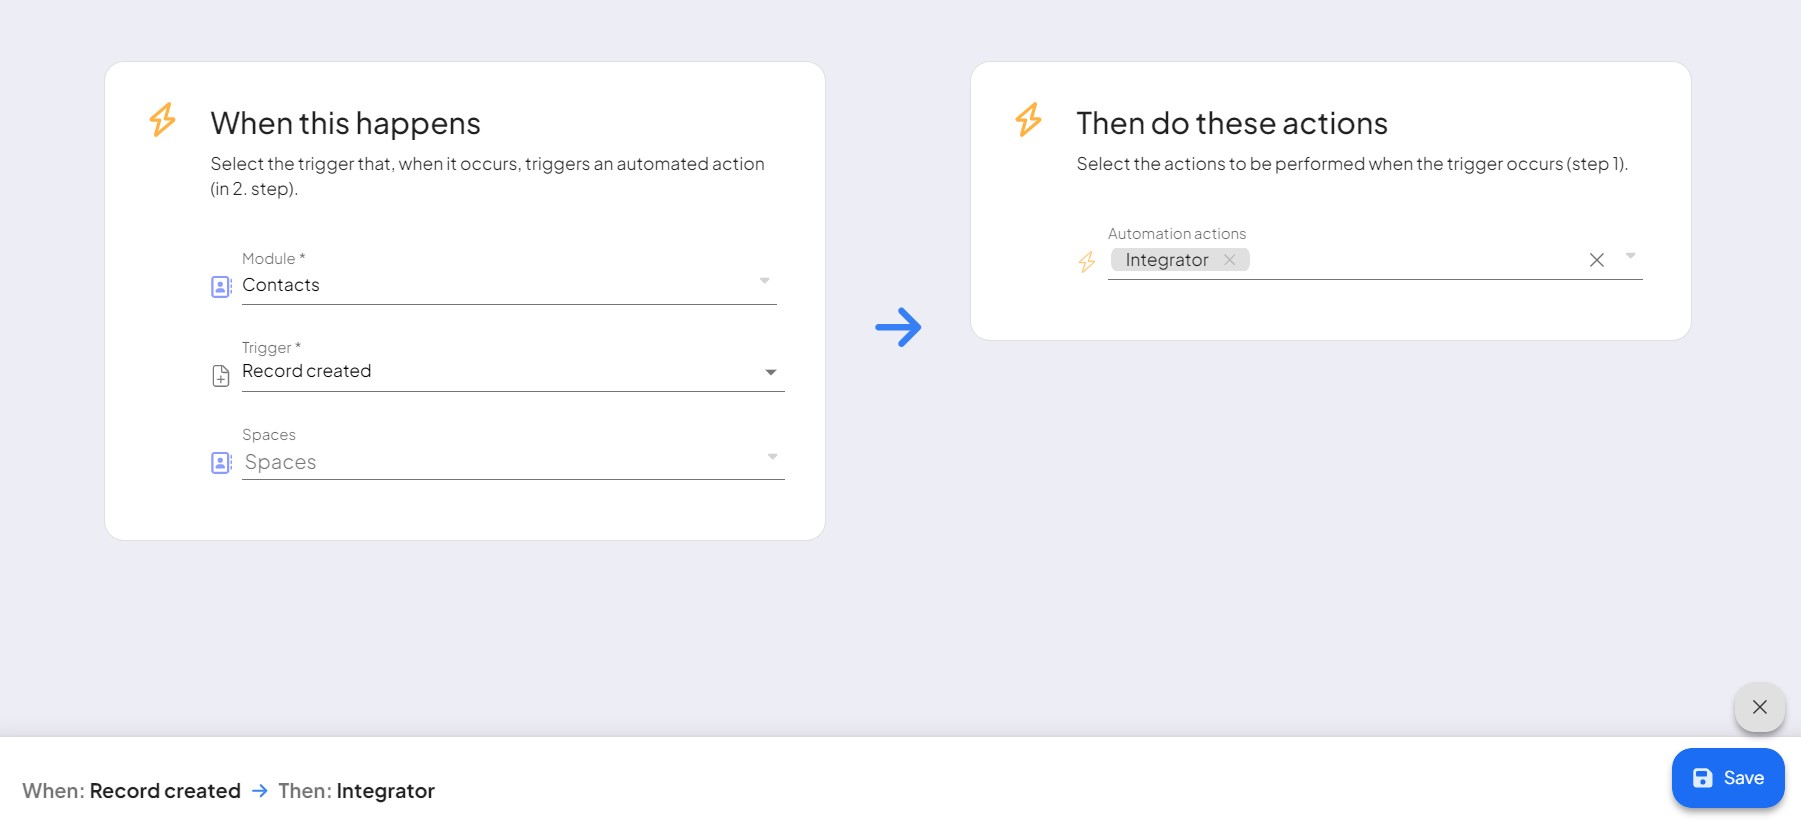
Triggers serve as the catalysts for your automated actions. To ensure your automatic actions are triggered appropriately, follow these steps:
- Access the “Webhooks” section in the system settings.
- Locate the trigger configuration interface.
- Select the modulea module is an application or tool designed to handle specific business functions, such as CRM, project management, or inventory. The system's modular architecture allows you to activate only the modules you need, enabling customization and scalability as your business requirements evolve. or addonTools in the Boost.space system that extend primary modules with additional functionality, allowing customization of workflows to fit your company's needs. They offer features such as creating forms, managing projects, and facilitating communication. Each addon integrates with others, enhancing the overall functionality of your workspace. for which you want to create a trigger.
- Specify the trigger type, such as create, update, or delete.
- Set the spaceIn Boost.space, a space is a subunit within a module that helps organize and categorize data, ensuring clarity even with large volumes. For example, within the Contacts module, you might have spaces like "Client Database" or "Supplier Database." Access to each space is restricted to users who have created it or have been granted access. to which the trigger applies. If no specific space is chosen, the trigger will be automatically applied to all spacesIn Boost.space, a space is a subunit within a module that helps organize and categorize data, ensuring clarity even with large volumes. For example, within the Contacts module, you might have spaces like "Client Database" or "Supplier Database." Access to each space is restricted to users who have created it or have been granted access. within the module.
By referring to the triggers overview, you can easily identify the cause-and-effect relationship between your chosen actions and triggers. The right side of the screen allows you to define the desired actions that occur after a particular trigger is activated.

Conclusion
Automation is a powerful feature within the Boost.space system, enabling you to streamline your processes and enhance efficiency. By understanding how to set up automated actions and configure triggers, you can leverage the full potential of Boost.space’s automation capabilities. Take advantage of these tools to simplify your workflow and focus on more critical aspects of your work.
