The Wave modules allow you to create, add, remove, retrieve, and list the leads, sequence, tags, subscriptions, and events in your Wave account.
Prerequisites
- A Wave account
In order to use Wave with Boost.space Integrator, it is necessary to have a Wave account. If you do not have one, you can create a Wave account at my.waveapps.com/register.
![[Note]](https://docs.boost.space/wp-content/themes/bsdocs/docs-parser/HTML/css/image/note.png) |
Note |
|---|---|
| The module dialog fields that are displayed in bold (in the Boost.space Integrator scenario, not in this documentation article) are mandatory! |
You can connect wave to Boost.space Integrator in two ways:
1. Go to Boost.space Integrator and open the Wave module’s Create a connection dialog, in the Connection Type, select Wave OAuth 2.0, and click Continue.
2. Confirm the access by clicking the Allow Access.
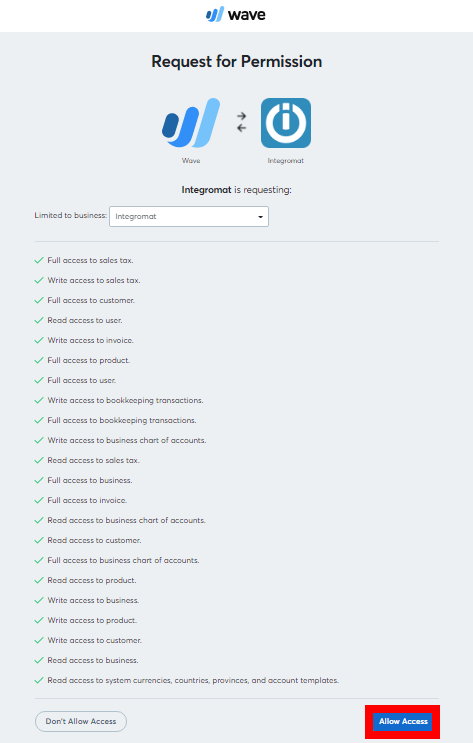
The connection has been established.
To connect your Wave account to Boost.space Integrator you need to obtain the Access Token from your Wave account and insert it in the Create a connection dialog in the Boost.space Integrator module.
1. Go to the Wave Developer website and create an Application.
2. Click theApplication Name > Create Token. Copy the token to your clipboard.
3. Go to Boost.space Integrator and open the Wave module’s Create a connection dialog.
4. In the Connection name field, enter a name for the connection.
5. In the Access Token field, enter the token copied in step 3 and click Continue.
The connection has been established.
List customers from the Wave account.
| Connection | Establish a connection to your Wave account. |
| Business ID | Select the Business ID whose customer details you want to retrieve. |
Returns details about a particular customer by ID.
| Connection | Establish a connection to your Wave account. |
| Business ID | Select the Business ID whose customer details you want to retrieve. |
| Customer ID | Select the Customer ID whose details you want to retrieve. |
Returns a customer by email.
| Connection | Establish a connection to your Wave account. |
| Business ID | Select the Business ID whose customer details you want to retrieve. |
| Email Address | Select the email address whose details you want to retrieve. |
Creates a new customer.
| Connection | Establish a connection to your Wave account. |
| Business ID | Select the Business ID whose customer details you want to create. |
| Email Address | Enter the email address of the customer. |
| Client’s Name | Enter the client’s name of the customer. |
| First Name | Enter the first name of the customer. |
| Last Name | Enter the last name of the customer. |
| Mobile | Enter the mobile number of the customer. |
| Internal Notes | Enter the information about the customer you want to notify the members internally. |
| Phone | Enter the phone number of the customer. |
| Fax | Enter the fax number of the customer. |
| Toll-Free | Enter any toll-free number of the customer if available. |
| Website | Enter the website address of the customer. |
| Address 1 | Enter the street address of the customer. |
| Address 2 | Enter the street address of the customer. |
| City | Enter the city name of the customer. |
| State/Province | Enter the state province code of the customer. For example, US-CA for California. |
| Country | Enter the two-character country name of the customer. For example, US for the USA. |
| Zip/Postal Code | Enter the are postal code of the customer. |
| Name | Enter the shipping address name of the customer. |
| Address 1 | Enter the street address of the customer. |
| Address 2 | Enter the street address of the customer. |
| City | Enter the city name of the customer. |
| State/Province | Enter the state province code of the customer. For example, US-CA for California. |
| Country | Enter the two-character country name of the customer. For example, US for the USA. |
| Zip/Postal Code | Enter the are postal code of the customer. |
| Delivery Instructions for handling | Enter any special instructions to be followed when delivering to the customer. |
| Currency | Enter the currency codes applicable to the customer based on ISO 4217. For example, USD, CAD, EUR |
Updates existing customers.
| Connection | Establish a connection to your Wave account. |
| Business ID | Select the Business ID whose customer details you want to update. |
| Customer ID | Select the customer whose details you want to update. |
| Email Address | Enter the email address of the customer. |
| Client’s Name | Enter the client’s name of the customer. |
| First Name | Enter the first name of the customer. |
| Last Name | Enter the last name of the customer. |
| Mobile | Enter the mobile number of the customer. |
| Internal Notes | Enter the information about the customer you want to notify the members internally. |
| Phone | Enter the phone number of the customer. |
| Fax | Enter the fax number of the customer. |
| Toll-Free | Enter any toll-free number of the customer if available. |
| Website | Enter the website address of the customer. |
| Address 1 | Enter the street address of the customer. |
| Address 2 | Enter the street address of the customer. |
| City | Enter the city name of the customer. |
| State/Province | Enter the state province code of the customer. For example, US-CA for California. |
| Country | Enter the two-character country name of the customer. For example, US for the USA. |
| Zip/Postal Code | Enter the are postal code of the customer. |
| Name | Enter the shipping address name of the customer. |
| Address 1 | Enter the street address of the customer. |
| Address 2 | Enter the street address of the customer. |
| City | Enter the city name of the customer. |
| State/Province | Enter the state province code of the customer. For example, US-CA for California. |
| Country | Enter the two-character country name of the customer. For example, US for the USA. |
| Zip/Postal Code | Enter the are postal code of the customer. |
| Delivery Instructions for handling | Enter any special instructions to be followed when delivering to the customer. |
| Currency | Enter the currency codes applicable to the customer based on ISO 4217. For example, USD, CAD, EUR |
Deletes a customer.
| Connection | Establish a connection to your Wave account. |
| Business ID | Select the Business ID whose customer details you want to delete. |
| Customer ID | Select the customer whose details you want to delete. |
Creates an invoice.
| Connection | Establish a connection to your Wave account. | ||||||||||||
| Business ID | Select the Business ID whose customer invoice you want to create. | ||||||||||||
| Customer ID | Select the customer whose invoice you want to create. | ||||||||||||
| Status | Select the status of the invoice:
|
||||||||||||
| Currency | Enter the currency codes applicable to the customer based on ISO 4217. For example, USD, CAD, EUR. If no currency code is provided, the business default currency is applied. |
||||||||||||
| Title | Enter a name for the invoice. If no details are provided, the business’s default invoice title is used. | ||||||||||||
| Subhead | Enter the invoice subheading text. If no details are provided, the business’s default invoice subheading is used. | ||||||||||||
| Invoice Number | Enter the invoice number. If no details are provided, the system finds the largest invoice number and will add 1 to it. | ||||||||||||
| Items | Add the items for the invoice.
|
||||||||||||
| PO Number | Enter the purchase order number of the invoice. | ||||||||||||
| Invoice Date | Enter the date when the invoice is issued. | ||||||||||||
| Due Date | Enter the date by when the payment of the invoice is due. | ||||||||||||
| Memo | Enter the invoice notes. | ||||||||||||
| Footer | Enter the text that will appear in the footer of the invoice. | ||||||||||||
| Disable Credit Card Payments | Select whether you want to disable the credit card payments for the invoice:
|
||||||||||||
| Disable Bank Payments | Select whether you want to disable the bank payments for the invoice:
|
||||||||||||
| Item Title | Enter the label for the item column to list the line items. | ||||||||||||
| Unit Title | Enter the label for the unit column to list the units of the line items. | ||||||||||||
| Amount Title | Enter the label for the amount column to enter the amount of the line items. | ||||||||||||
| Price Title | Enter the label for the price column to enter the price of the line items. | ||||||||||||
| Hide Name | Select whether you want to hide the product’s item name in the invoice:
|
||||||||||||
| Hide Description | Select whether you want to hide the product’s item’s description in the invoice:
|
||||||||||||
| Hide Amount | Select whether you want to hide the product’s item’s amount in the invoice:
|
||||||||||||
| Hide Price | Select whether you want to hide the product’s item’s price in the invoice:
|
||||||||||||
| Hide Unit | Select whether you want to hide the product’s item’s units in the invoice:
|
Sends an invoice.
| Connection | Establish a connection to your Wave account. |
| Invoice ID | Enter (map) the Invoice ID which you want to send through email. |
| To | Enter the email address to which you want to send the invoice. |
| Subject | Enter the subject line of the email. |
| Message | Enter the message text of the email. |
| Attach PDF | Select whether you want to attach the invoice PDF to the email:
|
Approve an invoice by ID.
| Connection | Establish a connection to your Wave account. |
| Business ID | Select the Business ID whose customer’s invoice you want to approve. |
| Invoice ID | Select the Invoice ID you want to approve. |
Lists invoices.
| Connection | Establish a connection to your Wave account. |
| Limit | Set the maximum number of invoices Boost.space Integrator should return during one scenario execution cycle. |
| Business ID | Select the Business ID of the customer’s invoices you want to list. |
| Sort Order | Select the order in which you want to list the invoices:
|
| Status | Select the status of the invoice you want to list:
|
Returns invoices since the last check.
| Connection | Establish a connection to your Wave account. |
| Limit | Set the maximum number of invoices Boost.space Integrator should return during one scenario execution cycle. |
| Business ID | Select the Business ID whose customer’s invoices you want to watch. |
| Sort Order | Select the order in which you want to watch the invoices:
|
| Status | Select the status of the invoice you want to watch:
|
Creates a new product or service.
| Connection | Establish a connection to your Wave account. |
| Business ID | Select the Business ID for which you want to create the new product or service. |
| Income Account ID | Select the Income Account ID which you want to associate with the product or service. |
| Expense Account ID | Select the Expense Account ID which you want to associate with the product or service. |
| Default Sales Tax IDs | Select the Default Sales Tax IDs which you want to associate with the product or service. |
| Name | Enter the name of the product or service. |
| Unit Price | Enter the per-unit price of the product or service. |
| Description | Enter the details of the product or service. |
Lists products.
| Connection | Establish a connection to your Wave account. |
| Limit | Set the maximum number of products Boost.space Integrator should return during one scenario execution cycle. |
| Business ID | Select the Business ID whose products you want to list. |
| Sort Order | Select the order in which you want to list the products:
|
| Is Sold | Select whether you want to list the sold products:
|
| Is Bought | Select whether you want to list the products that are bought:
|
| Is Archived | Select whether you want to list the archived products:
|
| Modified After | Enter the date to list the product that is modified on or after the specified date. |
| Modified Before | Enter the date to list the product that is modified on or before the specified date. |
Updates a product or service.
| Connection | Establish a connection to your Wave account. |
| Business ID | Select the Business ID for which you want to update the product or service. |
| Income Account ID | Select the Income Account ID which you want to associate with the product or service. |
| Expense Account ID | Select the Expense Account ID which you want to associate with the product or service. |
| Default Sales Tax IDs | Select the Default Sales Tax IDs which you want to associate with the product or service. |
| Name | Enter the name of the product or service. |
| Unit Price | Enter the per-unit price of the product or service. |
| Description | Enter the details of the product or service. |
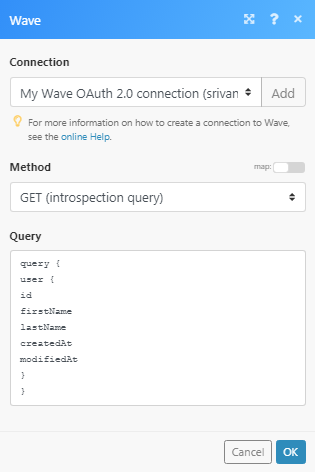
Performs an arbitrary authorized GraphQL query.
| Connection | Establish a connection to your Wave account. |
| Method | Select the method of the API call you want to use. Wave supports both methods:
|
| Query | Enter the desired GraphQL query. See the Wave API documentation for examples and available queries. |
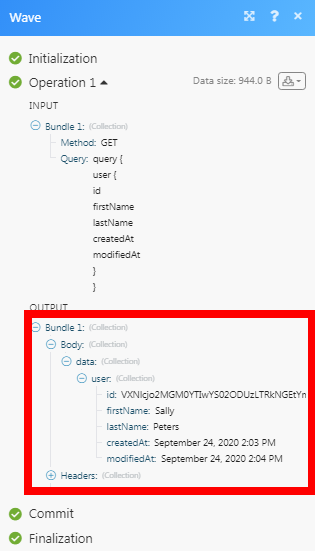
The following example returns the user details from your Wave account.
Method: GET
Query:
query{ user { id firstName lastName defaultEmail createdAt modifiedAt } }
Matches of the search can be found in the module’s Output under Bundle > Body. In our example, the user details were returned:
Creates a transaction.
| Connection | Establish a connection to your Wave account. | ||||||||||||
| Business ID | Select the Business ID whose transaction you want to create. | ||||||||||||
| External ID | Enter the External ID of the transaction. | ||||||||||||
| Date | Enter the date of the transaction. | ||||||||||||
| Description | Enter the details of the transaction. | ||||||||||||
| Notes | Enter any additional information about the transaction. | ||||||||||||
| Account ID | Select the Account ID applicable to the transaction. | ||||||||||||
| Amount | Enter the transaction amount. | ||||||||||||
| Direction | Select the transaction direction:
|
||||||||||||
| Line Items | Add the line items:
|
Creates a new account.
| Connection | Establish a connection to your Wave account. |
| Business ID | Select the Business ID whose account you are creating. |
| Subtype | Select the account subtype. |
| Currency | Enter the three-digit currency code applicable to the account. |
| Name | Enter a name for the account. |
| Description | Enter the details of the account. |
| Display ID | Enter the Display ID that appears on the account. |
Create an income/expense.
| Connection | Establish a connection to your Wave account. |
| Business ID | Select the Business ID whose sales tax you are creating. |
| Name | Enter a name for the sales tax. |
| Abbreviation | Enter the full name of the tax. For example, Value Added Tax for VAT. |
| Rate | Enter the tax percentage for the sales tax. |
Creates an income or expense.
| Connection | Establish a connection to your Wave account. |
| Business ID | Select the Business ID whose sales tax you are creating. |
| Type | Select the income or expense type:
|
| Category | Select the category. For example, Sales. |
| Cash Account | Select the cash account type for the income or expense. |
| Amount | Enter the amount of expense or income. |
| Date | Enter the date of expense or income received. |
| Description | Enter the details of expense or income. |
| Customer ID | Select the Customer ID whose expense or income details you are creating. |
| Taxes | Add the taxes for the items:
Sales Tax ID Select the Sales Tax ID applicable for the item. For example, Amount Enter the amount of tax. |
| External ID | Enter the External ID of the expense or income. |
| Notes | Enter any additional information about the expense or income you would like to share. |