- Using Telegram Bot with Boost.space Integrator
- Get the Telegram desktop app
- Create a Telegram bot
- Add your bot to the channel or group
- Find the Chat ID
- Use case 1: Send new RSS feed items as Telegram messages
- Step 1: Add a trigger module: Watch RSS feed items
- Step 2: Add an action module: Send a text message or a reply
- Step 3: Test and activate the scenario
- Use Case 2: Send Telegram messages to a Discord server
- Use Case 3: Send new form submissions to Telegram
- Add the Google Forms > Watch Responses trigger module
- Add the Telegram Bot > Send a text message or a reply module
Using Telegram Bot with Boost.space IntegratorPart of the Boost.space system, where you can create your connections and automate your processes.
Telegram is one of the most popular apps Make customers use. This tutorial guides you through the steps to set up Telegram to work with Make.
You can use Telegram in your Make scenariosA specific connection between applications in which data can be transferred. Two types of scenarios: active/inactive. to achieve the following basic use cases:
- triggerThe initial event that starts a scenario. It can be an action, a scheduled time, or a custom event, and is essential to define at the beginning of each scenario. a scenarioA specific connection between applications in which data can be transferred. Two types of scenarios: active/inactive. with a Telegram message and send the message data to another app
- get data from other apps and post a message to a Telegram channel or group
To use a Telegram bot in Make scenarios, you will need to:
- Create a Telegram bot and store its API tokenA secure code used to authenticate and authorize access to API endpoints, enabling users to connect with third-party applications.
- Add the bot into a chat as an admin
- Find the Chat ID for the channel or group
- Create the Make scenario using an API tokenA secure code used to authenticate and authorize access to API endpoints, enabling users to connect with third-party applications. and Chat ID
This tutorial explains the process using the Telegram desktop app, which makes the configuration easier. Download the Telegram desktop app. You can also use the mobile app.
You will interact with Telegram groups or channels using a Telegram bot. You need to create the bot and get its API token, which you will then use when connecting Telegram to Make.
- Use the search box in Telegram to find the user BotFather. The user’s handle is @BotFather. Watch out – the other users or groups with the same name are spam bots.
- Click Start.
- In the message you receive, click /newbot or type
/newbotinto a message. - Type a name for the bot and send the message.
- Type a unique username for the bot and send the message.
- In the message from BotFather, find the token to access the HTTP API. Copy and store the token somewhere, e.g., in a text file.
Note: To post in a channel or group, your bot must be an administrator of the channel or group. In the Manage channel or Manage group dialog, click Administrators and add your new bot with all permissions.
Your bot must be an administrator of the channel or group if you want the bot to read and post messages on your behalf. The same instructions apply to both setting up channels and setting up groups.
- Open the channel or group where you want to add the bot.
- Click the three dots in the top-right corner of the channel or group, and then click Manage channel or Manage group.
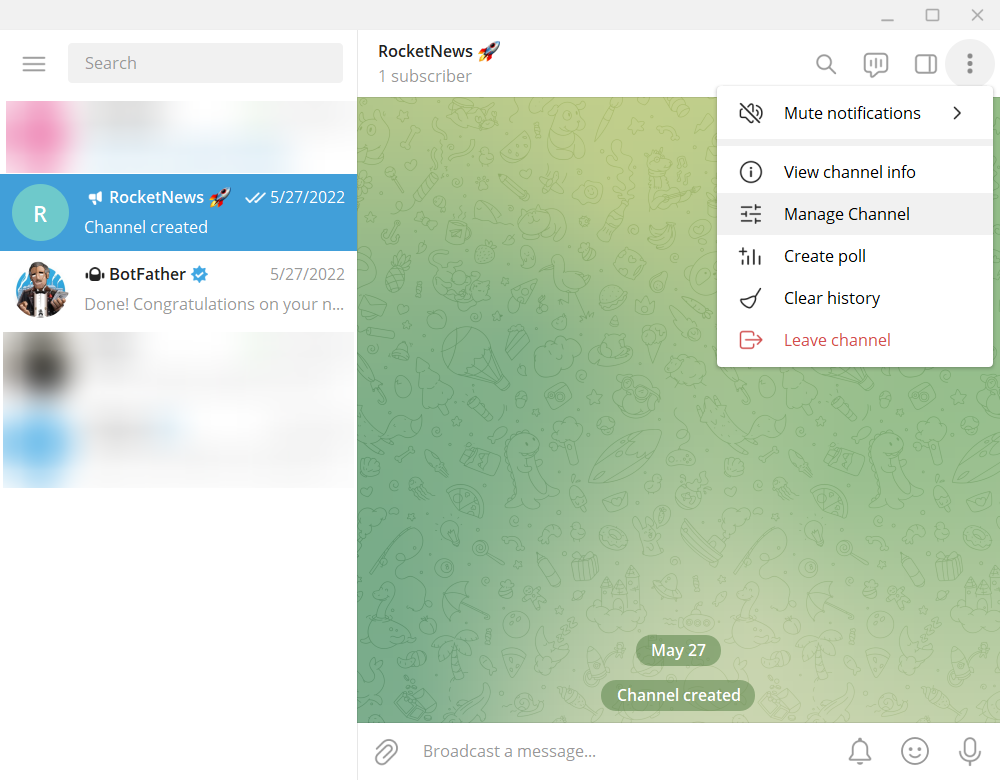
- In the dialog that appears, click Administrators, and then click Add administrator.
- Search for your bot using its name or its handle.
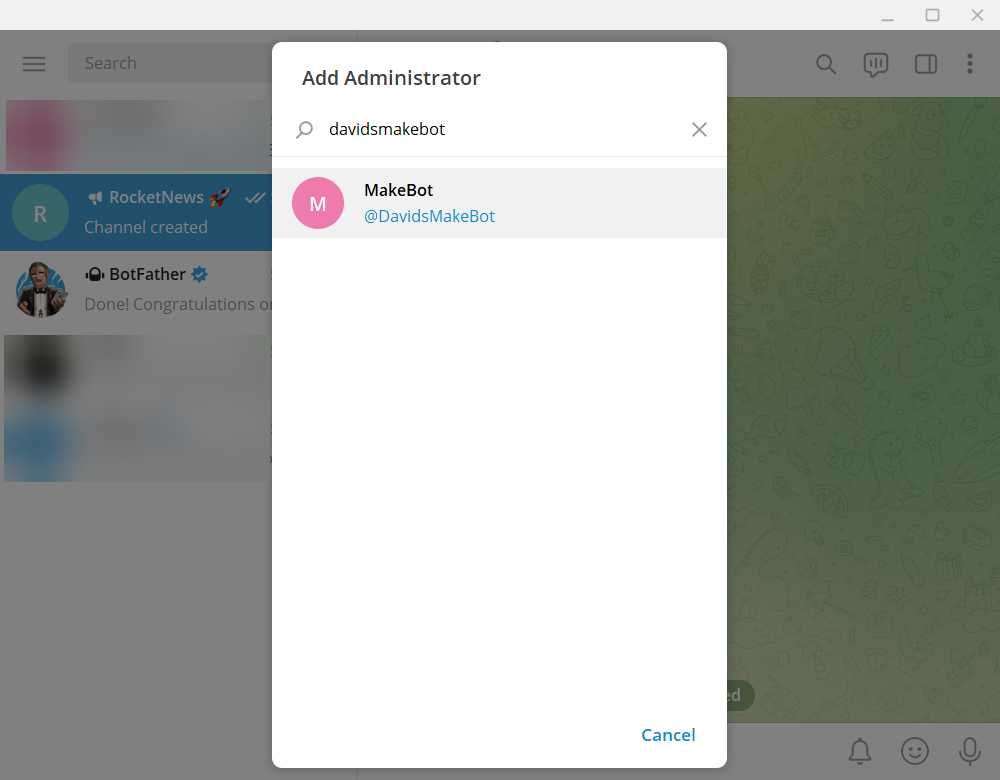
- In the search results, click the bot, and then click OK.
- Optionally, set up the bot’s permissions. We recommend you leave the permissions at their defaults. When done with setting up permissions, click Save.
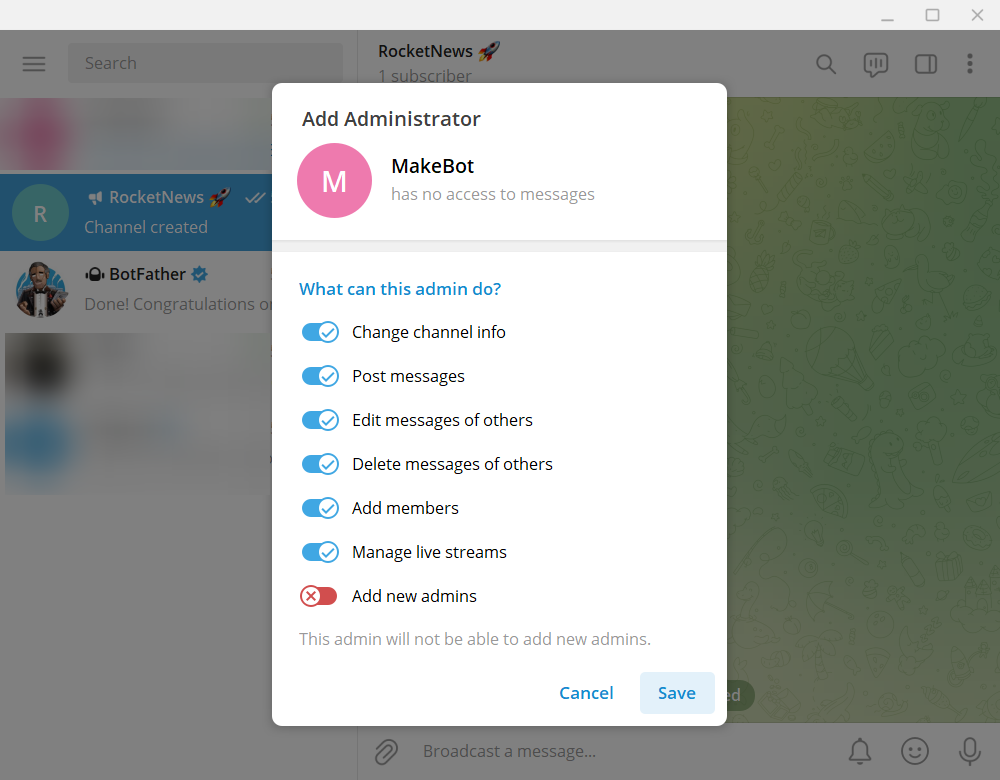
Your bot is now a member and an administrator of the channel or group. This allows the bot to read and post messages on your behalf.
To post messages into Telegram channels or groups, you need to know the Chat ID. You will use the Chat ID when setting up Make to read and send messages.
Find the Chat ID for Public channels
- Click the three dots menu in your channel and select View channel info.
- Find the link to the channel beginning with t.me/
The text that comes after t.me/ is your Chat ID. Example: if the link is t.me/exampleChat, the Chat ID is exampleChat.
Find the Chat ID for Private channels and Groups
Private channels and Groups don’t have a link from which you could easily find the Chat ID. This is why you need to find the Chat ID by sending a Telegram message to a Make scenario.
- In Make, create a new scenario.
- Add the Telegram Bot > Watch Updates module.
- Under WebhookA webhook is a way for an app to send real-time information to a specific URL in response to certain events or triggers., click Add. Type a name for the webhook.
- Your bot will send messages to this webhook. Make will process incoming messages to this webhook based on your scenario schedule. Learn more about webhooks. Learn more about scheduling scenarios.
- In the Create a webhook dialog, under ConnectionUnique, active service acces point to a network. There are different types of connections (API key, Oauth…)., click Add.
- Type a name for the connection, and then paste the API key that you received from BotFather. Save the connection settings and the webhook settings.
- Right-click the Watch Updates module, and then click Run this module only.
- Make starts listening for a new message.
- In Telegram, send a message to the channel or group whose ID you want to find. Your bot must be an administrator of this channel or group.
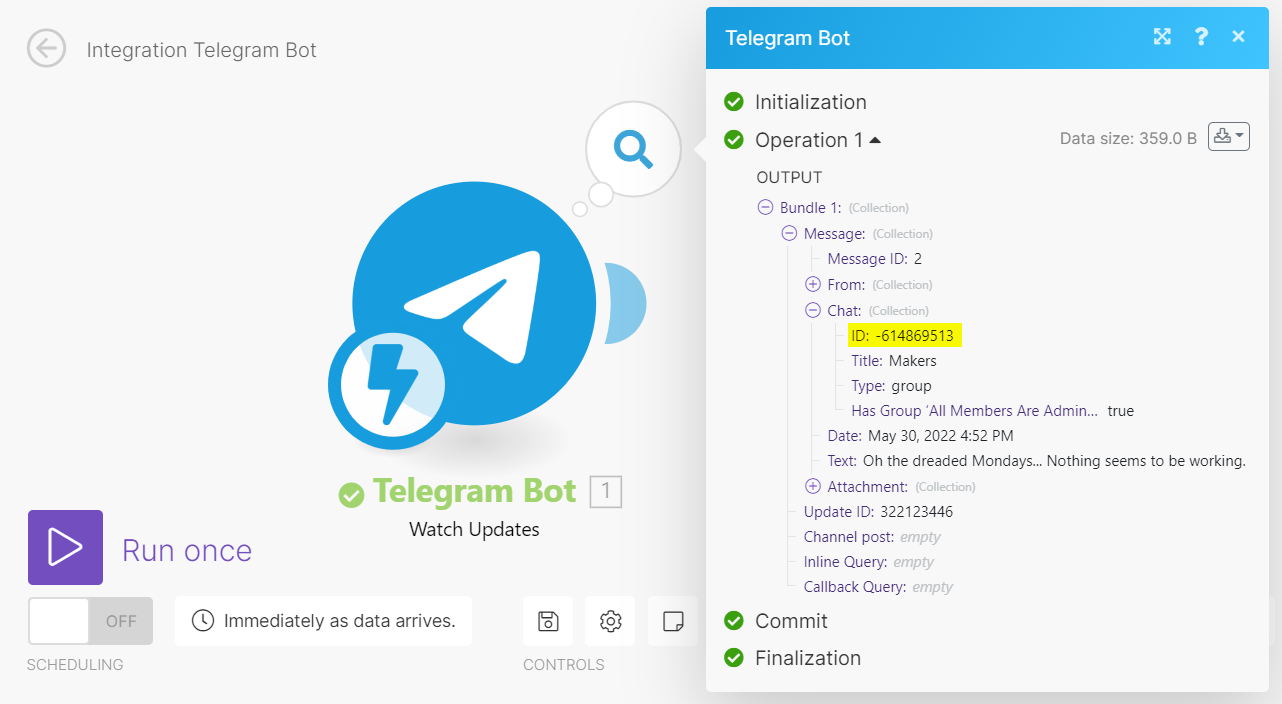
- Make receives the message through the webhook you set up. A number appears next to the module. Clicking this number allows you to inspect the details of the message.
- Click the number next to the Watch Updates module. Find the Chat ID under Message > Chat > ID. Save the ID for later use, including the minus sign at the beginning.
RSS feeds are files that contain a summary of updates from a blog, a news site, or any other website that chooses to publish an RSS feed. In this use case, you will create a scenario, which will get updates from an RSS feed and send them as Telegram messages.
A trigger module launches a scenario whenever something happens. In this use case, the trigger will watch for updates to an RSS feed. When a new item appears on that feed, the scenario will run and send that item to your Telegram chat.
- Create a new Make scenario.
- Click the plus sign to add the first module. From the list of apps, select RSS, and then select Watch RSS feed items. Read more about what you can do with RSS.
- In the module settings, paste the URL address of your favorite feed. Leave the other settings as they are for now.
- If you don’t have a favorite feed, try this out: https://www.nasa.gov/rss/dyn/breaking_news.rss
- Click OK.
- In the Choose where to start dialog, select one of the following options:
- From now on: Make will process only those items that will be added to the feed from now on. Select this option if you don’t want Make to send Telegram messages for the items that were in the feed before you created the scenario.
- RSS feed items from after a specific date: Make will start retrieving and processing items published after the date you selected.
- All RSS feed items: Make will retrieve and process all items that are available in the RSS feed.
- Select the first RSS feed item: shows the latest items and lets you choose one of them as the starting point. Make will retrieve and process the selected item and all newer items.
To be able to test the scenario, we recommend you select a specific item. This way you ensure that there are some items to process when testing the scenario. If you selected From now on, Make would not retrieve older items and you would have to wait for the RSS feed owner to publish new items.
- Click OK to save the settings.
- Right-click the module, and then click Run this module only.
- This retrieves one item from the RSS feed. You can click the number next to the module to view what the results look like. Running a module once also helps Make identify what types of data to expect from that particular module, which in turn helps you work with that data in subsequent modules more easily.
Now that you have a module that reads data, you will add another module, which will send the data to Telegram.
- Click Add another module, then find the Telegram Bot app. Click that app, and then click Send a Text Message or a Reply.
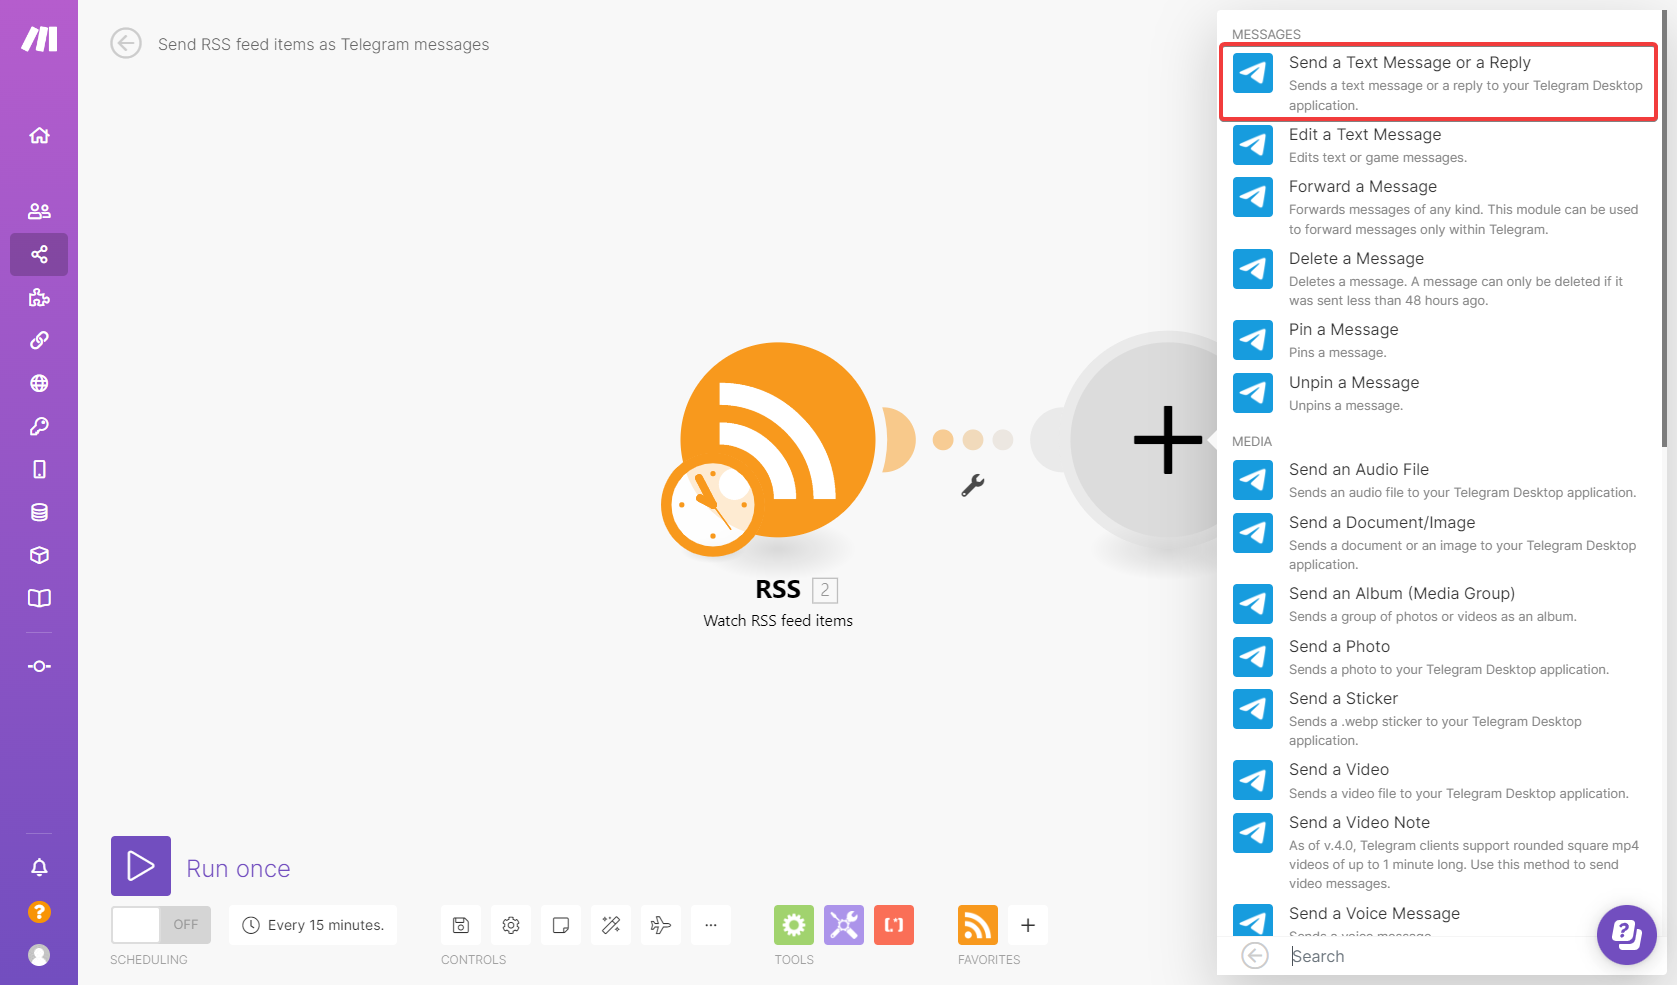
- Create a new connection or use the connection that you created when following instructions in Find the Chat ID for Private channels and Groups
- Enter the Chat ID of the chat where you want to post. Follow the instructions in Find the Chat ID.
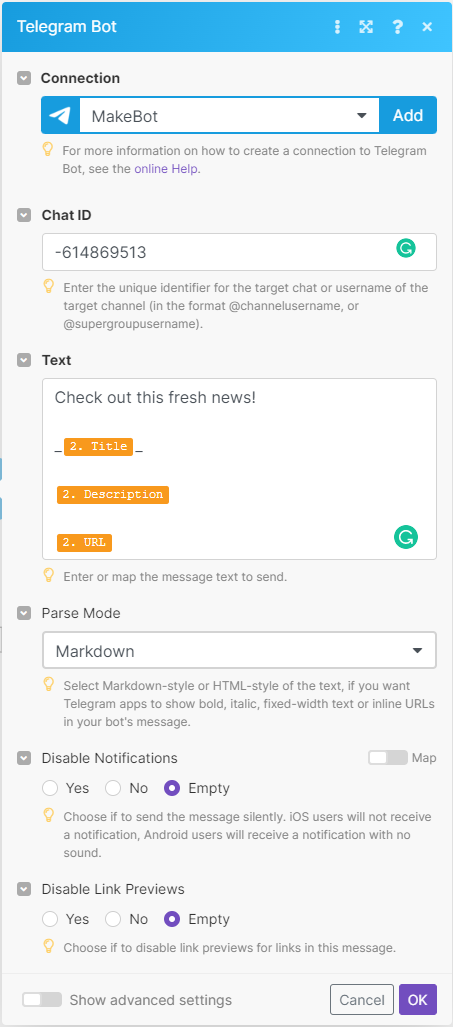
- Use the Text field to construct your message. You can type text, as well as map fields from the RSS module.
- When you place the cursor into the Text field, Make offers a dialog where you can insert data retrieved by the RSS module into the Telegram module. This is a key concept in Make called mapping, which allows passing data from one app to another.
- Mapped items appear in the color of the module where they originate and are marked with the number of the module.
- See the following screenshot for an example of how to construct a message using typed text, Markdown formatting, and mapped items from the RSS module.
- In Parse mode, select Markdown.
- Click OK.
To test the scenario, click Run once. The scenario retrieves another item from the RSS feed (if there are any) and sends it to your Telegram chat. Then, you click the numbers above the modules to inspect what data the scenario retrieved and how the data was processed.
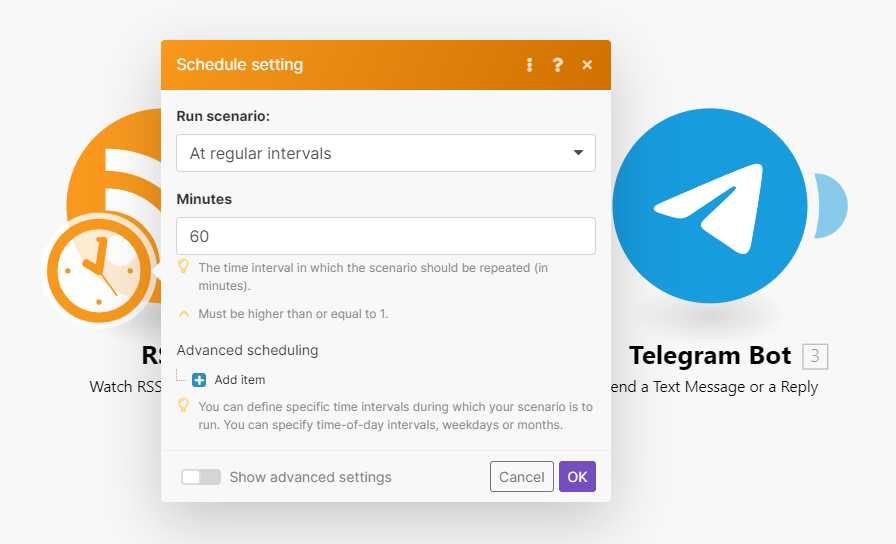
Before you activate the scenario, click the clock icon on the RSS module. In the Schedule setting dialog that appears, tell the RSS module when to check for new items in the RSS feed. If there are items to process at the scheduled time, the scenario will run and process the items.
 |
Finally, click the ON/OFF button in the bottom left corner to activate the scenario. From now on, the scenario will automatically check for new items in the RSS feed based on the schedule you set up.
Discord and Telegram are the two most used tools among online communities. Many people use Make to send Telegram messages to Discord or the other way around.
Similarly to the RSS feed use case, you will add a trigger module, which will watch for new messages in your Telegram chat. Then, you will add an action moduleYou can create, read, update, or delete data with an action module. Action modules are the most common type of module and can be at the beginning, middle, or end of a scenario. There is no limit to the number of action modules in your scenario. that will resend the Telegram message to Discord.
To build this automation, you need the following
- a Telegram bot
- a Telegram chat where the bot is an admin
- a Discord server
- a Discord channel to which you want to send the messages.
- Create a new scenario.
- Add the module Telegram Bot > Watch Updates. Configure the module the same way you did in Find the Chat ID.
- Click Add a new module. find Discord, and then select the Post a Message module.
- Under Connection, click Add.
- In the dialog that appears, log in to your Discord account, and then select your server and the channel to which you want to post messages. Click Continue.
- Leave the permission settings at their defaults and click Authorize.
- Test the scenario by clicking on ‘Run Once’ and send a message to the related Telegram chat. If the message was sent to Discord without any problems, you can activate the scenario by turning the switch on the left bottom corner on.
In this use case, you will create a scenario, which sends the summary of a user-submitted form to a Telegram chat. You can use this automation to send notifications for your new leads. In this example, use the popular Google Forms.
To work with your form responses, create a spreadsheet that will store the form submissions.
- Open your Google form.
- Select the Responses tab
- Click Create Spreadsheet.
The spreadsheet is created from the form and you can now proceed to work with your form responses in Make.
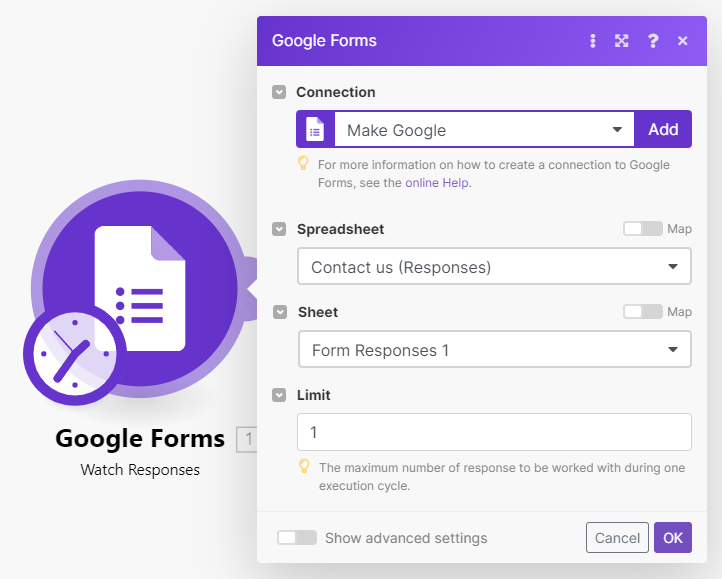
- Create a new scenario and add the Google Forms > Watch Responses module.
- Under Connection, click Add, and then follow the instructions on-screen. Alternatively, use an existing connection.
- Choose the spreadsheet that you created to store the responses. Select the sheet that contains the responses. Set the Limit to 1.
- The Limit setting of 1 tells Make to process one form response at a time.
- Click OK.
- Choose where to start getting data. If this is a new form, you can select All. Then click OK.
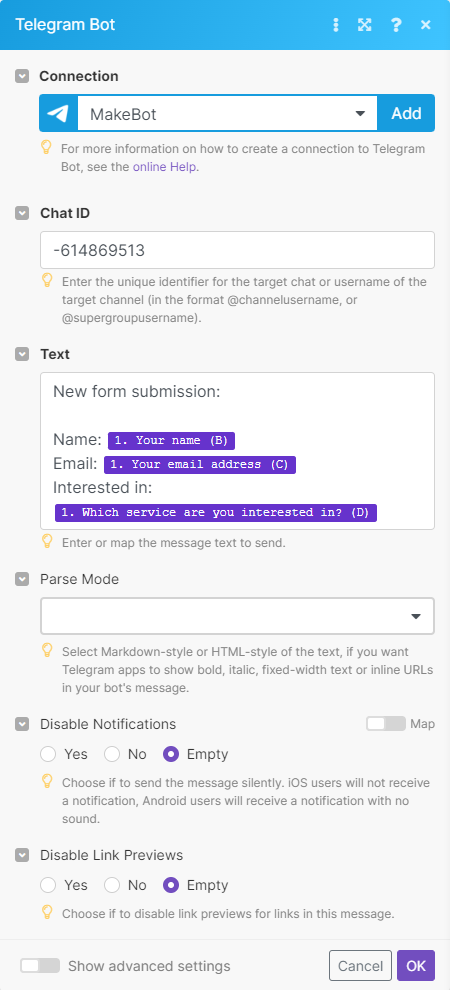
- Click Add another module, and then select Telegram Bot > Send a text message or a reply.
- Under Connection, use the same connection you created earlier.
- Enter the Chat ID.
- Create the message. Use mapping to insert the data from the Google form.
- Click OK.
- To test the scenario, send a new submission to your form. Then click Run Once.
After running the scenario, you receive the Telegram message as configured. If you don’t receive a message, make sure that there are new form submissions to process in your Google form.
When you’re satisfied with the test, you can set up a schedule and activate the scenario.
