Typical Errors in Boost.space Integrator
The Boost.spaceA platform that centralizes and synchronizes company data from internal and external sources, offering a suite of modules and addons for project management, CRM, data visualization, and more. Has many features to optimize your workflow! IntegratorPart of the Boost.space system, where you can create your connections and automate your processes. is a powerful tool designed to automate and streamline workflows by connecting various applications and modulesa module is an application or tool designed to handle specific business functions, such as CRM, project management, or inventory. The system's modular architecture allows you to activate only the modules you need, enabling customization and scalability as your business requirements evolve.. However, like any complex system, it can encounter errorsService is unavailable due to a failure, a service responds with unexpected data or the validation of input data fails. that may disrupt the smooth flow of data and processes. Understanding these typical errors and knowing how to resolve them is crucial for maintaining efficient integrations and ensuring seamless automation. In this article, we will explore some of the most common errors usersCan use the system on a limited basis based on the rights assigned by the admin. face when working with the Boost.space Integrator.
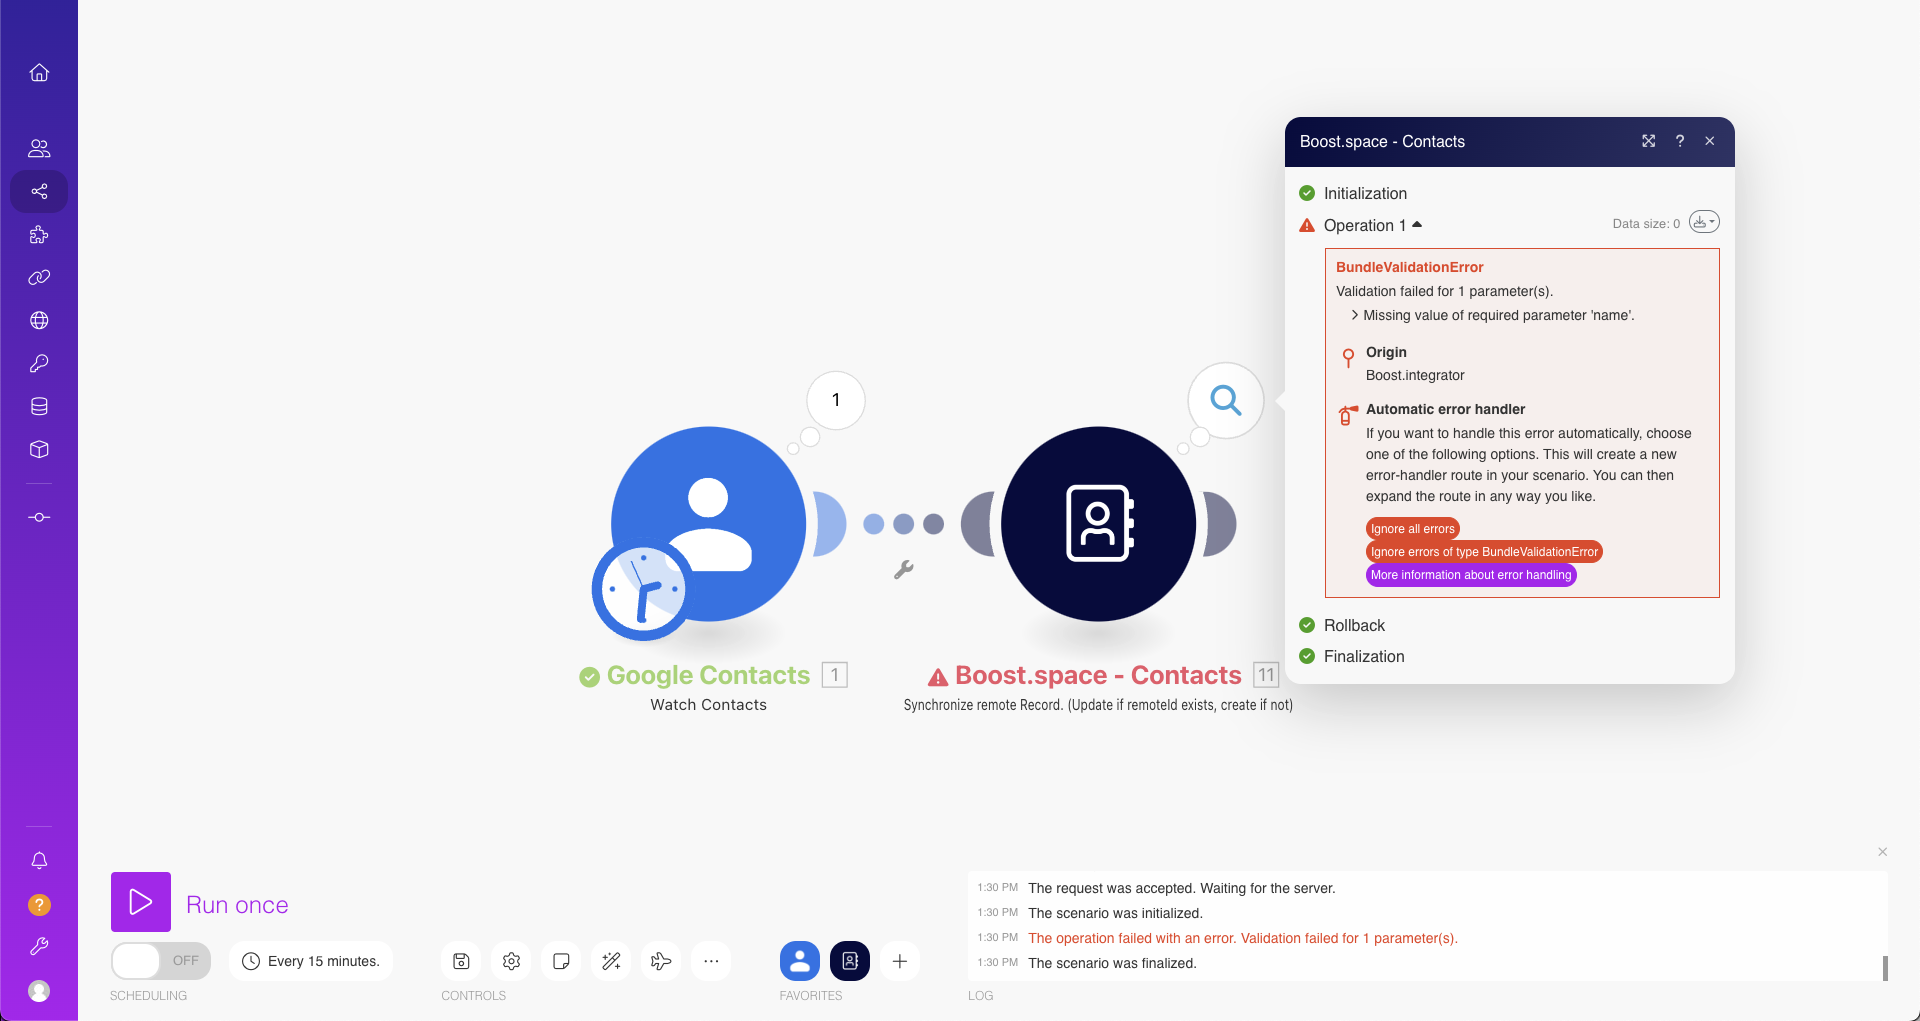
Missing value of required parameter
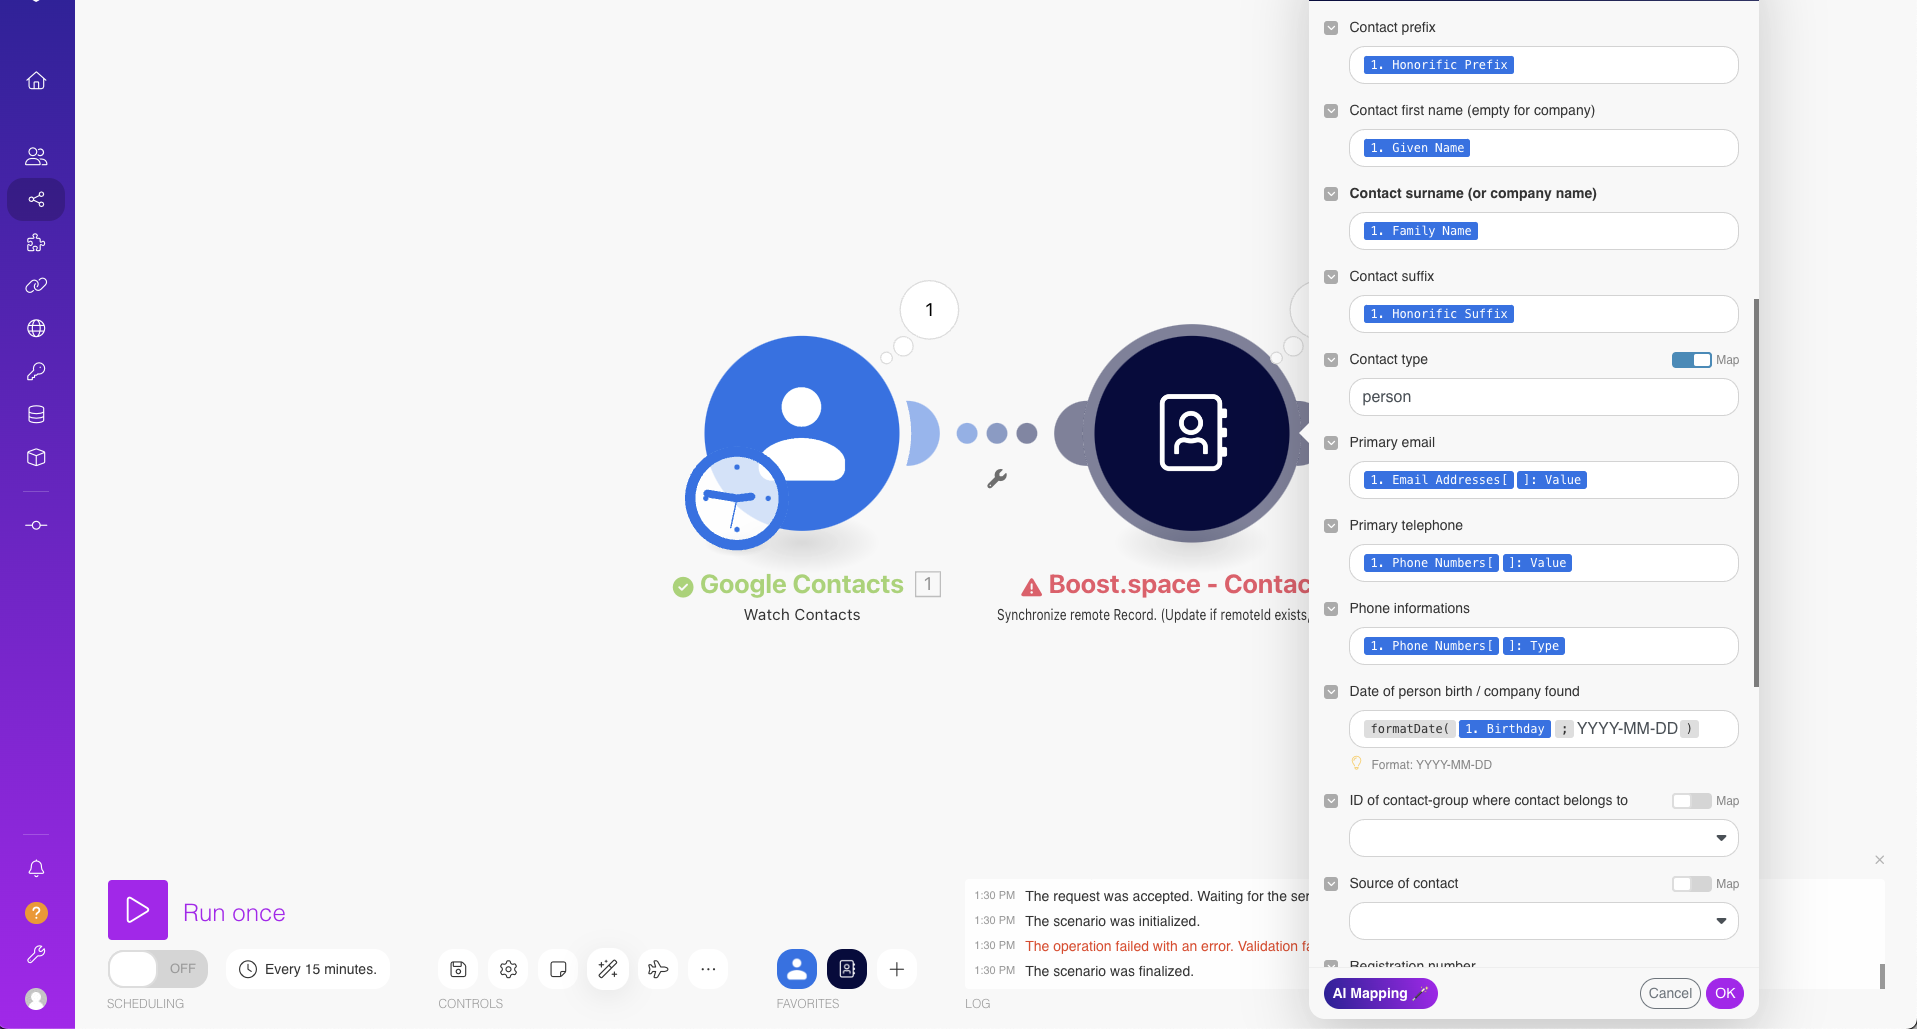
When creating integrations using an integrator tool, several common errors can arise. One such errorService is unavailable due to a failure, a service responds with unexpected data or the validation of input data fails. is the “Missing value of required parameter” error. This issue is often related to the mapping process within your scenarioA specific connection between applications in which data can be transferred. Two types of scenarios: active/inactive.. MappingMapping links the modules in your scenario. When you map an item, you connected the data retrieved by one module to another module to perform the desired action. For example, you can map the email address and subject lines from the Email > Watch emails module to Google Sheets > Add a row and create a spreadsheet of email addresses... involves connecting data between different modules (applications) in your scenario, allowing the data to be transferred from one modulea module is an application or tool designed to handle specific business functions, such as CRM, project management, or inventory. The system's modular architecture allows you to activate only the modules you need, enabling customization and scalability as your business requirements evolve. to another to achieve the desired automation.
“Missing Value of Required Parameter” Error
The “Missing value of required parameter…” error occurs due to missing values in the mapped fields that are mandatory to fill. These fields are typically marked as required (bold fields).
Steps to Resolve the Error
Step 1: Check Mapping Accuracy
- Review Mapping: Ensure the mapping is correct for the field that is causing the error.
- Verify Source Data: Confirm that the source application is providing data to the required field in the target module.
Step 2: Check Data from Source Application
- Validate Data: Ensure that the source application returns a value to the required field that is causing the error.
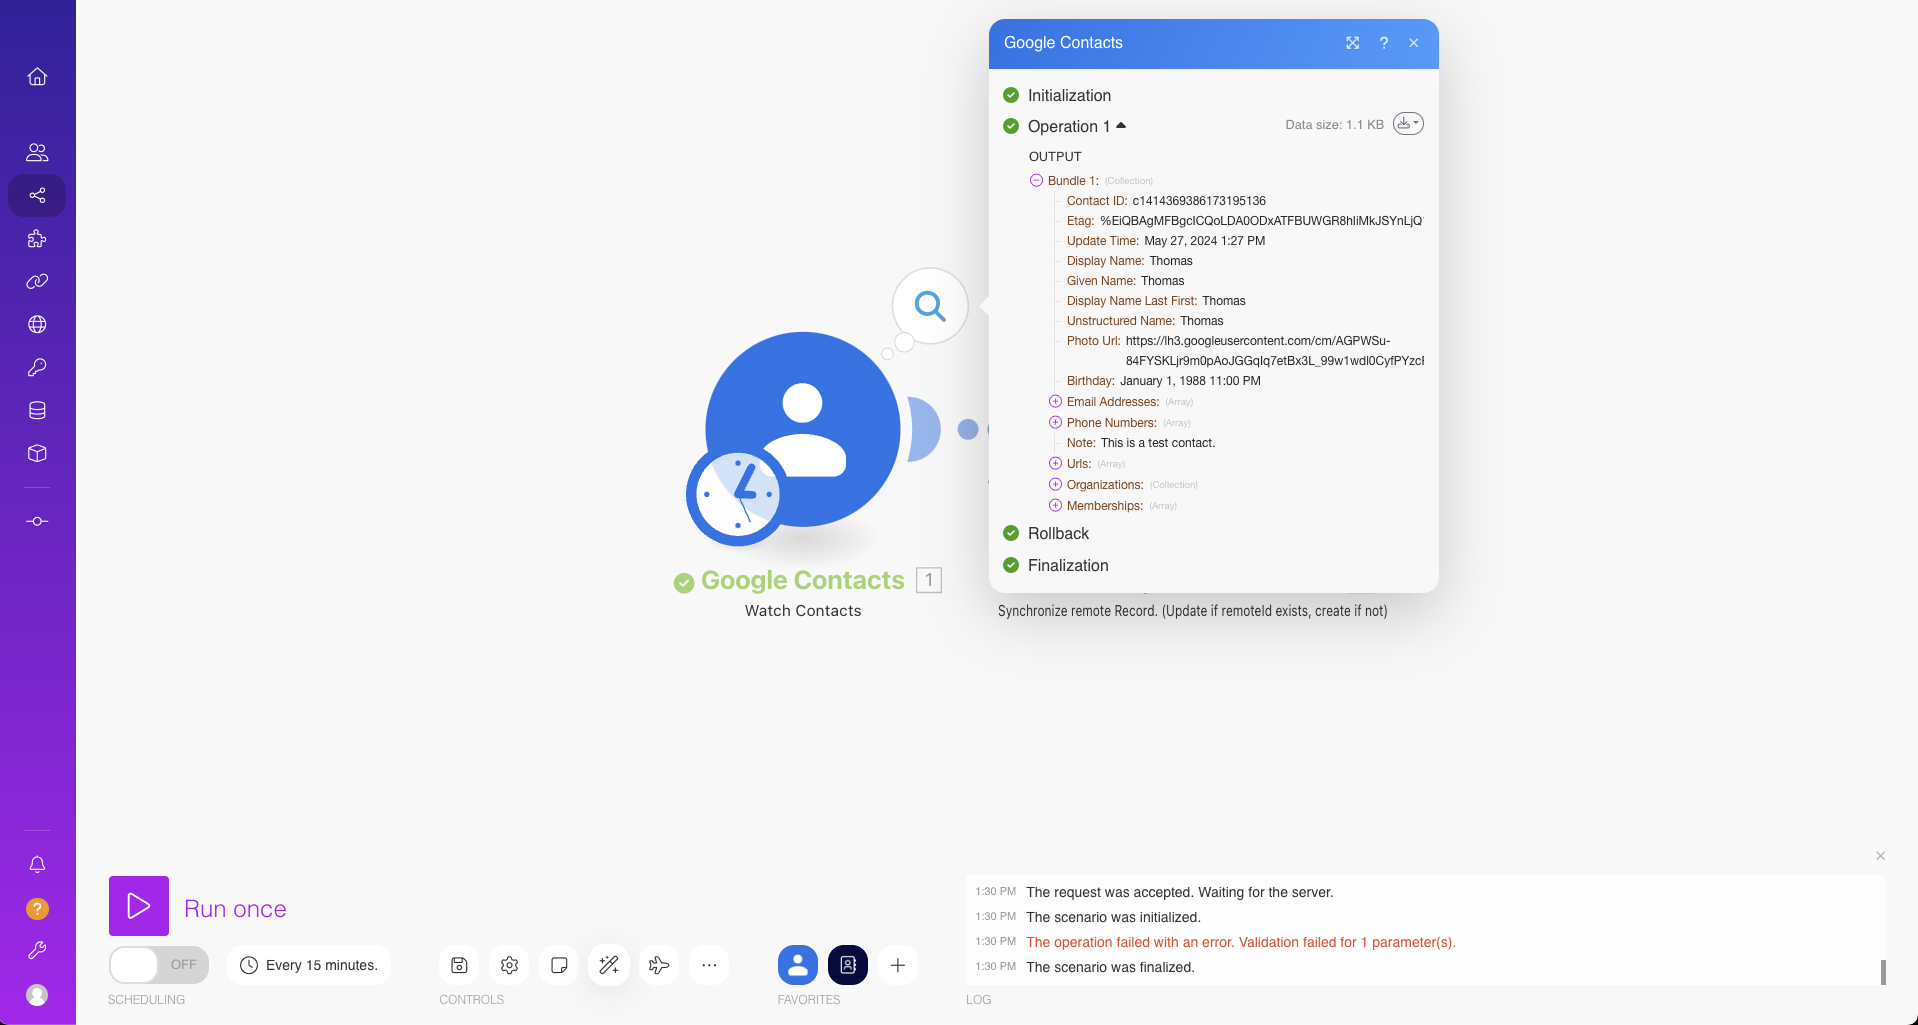
For example, if the “Family Name” field in Google Contacts is not returning a value, and it is mapped to the “Surname” field in Boost.space, this could triggerThe initial event that starts a scenario. It can be an action, a scheduled time, or a custom event, and is essential to define at the beginning of each scenario. the error.

Solutions to the Error
Error Handlers:
- Implement error handlers to manage and resolve integration errors. More information can be found here.
Adjust Mapping:
- Modify the mapping to another field or use a custom functionCreate and execute custom JavaScript functions in your scenarios. like “ifempty” to handle empty values. Detailed guidance is available here.
Use Filters:
- Apply filters between modules to ensure only data with values in the mapped fields pass through. This can prevent errors from occurring. More details can be found here.
Module timeout
In the Boost.space systemA platform that centralizes and synchronizes company data from internal and external sources, offering a suite of modules and addons for project management, CRM, data visualization, and more. Has many features to optimize your workflow!, encountering the “Module timeout” error is a common issue that users might face during their interactions with the application. This error typically appears with the message “The operationOperations are tasks in integration scenarios, similar to "operations" in Make.com. Each action, like reading or updating a record, counts as one operation. They’re essential for data syncing between apps and reset monthly. Going over the limit pauses syncing until you add more or upgrade your plan. timed out” and signifies that the allowed response time for a single module execution has been exceeded. By default, this response time is set to 40 seconds, although it can be longer for some applications.
Causes of the “Module Timeout” Error
The primary cause of this error is the prolonged response time from the target server. When the server takes too long to respond, the application fails to receive the necessary data within the predefined time frame, resulting in a timeout.
Several factors can contribute to this delay:
- High server load or slow server response
- Complex queries that take longer to process
- Network latency issues
- Large volumes of data being processed
Solutions for the “Module Timeout” Error
To address and mitigate the “Module timeout” error, consider the following solutions:
- Check the StatusIn Boost.space, statuses are indicators assigned to records within modules to represent their current state or progress. They can be system-defined, such as "Active" or "Done," or custom-created to fit specific workflows. Statuses help track and manage tasks, projects, and processes efficiently. of the Tool:
- Before diving into more complex troubleshooting steps, ensure that the tool you are working with is operational. There may be temporary outages or issues on the server side causing the delay.
- Restart the Scenario:
- Sometimes, simply restarting the scenario can resolve temporary issues. This step can help in re-establishing the connectionUnique, active service acces point to a network. There are different types of connections (API key, Oauth…). and possibly bypassing transient network or server problems.
- Optimize Your Query:
- If your query is too complex or requests a large volume of data, try simplifying it. Reducing the amount of data requested can significantly decrease the response time. Focus on retrieving only the essential data needed for your application.
- Error Handlers:
- Utilize error handling strategies to manage timeouts more effectively. Boost.space provides comprehensive documentation on error handling, which can be a valuable resource. For more detailed information on error handling, visit the Boost.space Error Handlers Documentation.
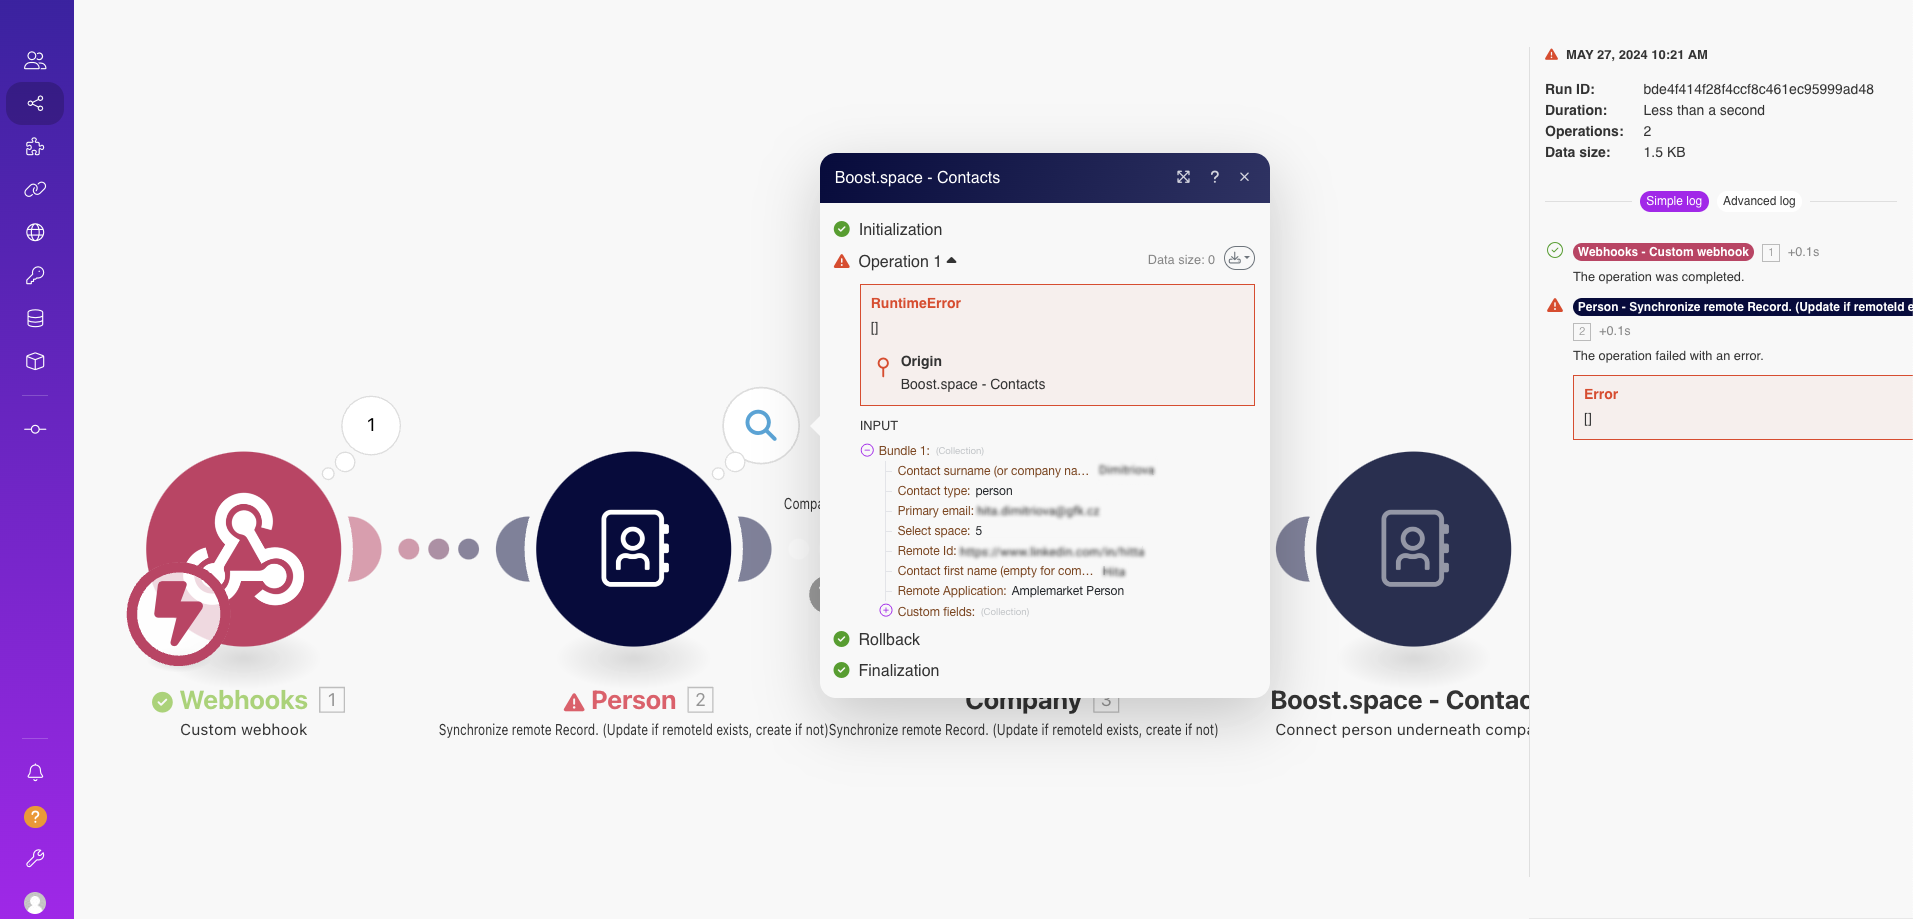
“Closed Bracket” Error in Boost.space: Incorrect Data Type Setting
In the Boost.space system, the “Closed Bracket” error, indicated by “[]”, typically arises when there is a mismatch in data type formatting. One common instance of this error occurs when date inputs do not match the required format. For Boost.space, the required date format is YYYY-MM-DD.
Causes of the “Closed Bracket” Error
This error can occur due to various reasons, including:
- Incorrect Data Format:
- For example, if a date is provided in a format other than YYYY-MM-DD, such as MM/DD/YYYY or DD-MM-YYYY, the system will not recognize it, resulting in a “Closed Bracket” error.
- Low Priority API TokenA secure code used to authenticate and authorize access to API endpoints, enabling users to connect with third-party applications.:
- Another instance where this error might appear is related to the priority of the API tokenA secure code used to authenticate and authorize access to API endpoints, enabling users to connect with third-party applications.. A low-priority API token may not have sufficient privileges, causing the operation to fail.
Solutions for the “Closed Bracket” Error
To resolve this error, consider the following solutions:
- Correct the Input Data Format:
- Ensure that all input data, especially dates, adhere to the required format of YYYY-MM-DD. This might involve transforming the data before inputting it into Boost.space.
Example:
- Incorrect: 12/31/2023
- Correct: 2023-12-31
Utilize FunctionsFunctions you can use in Boost.space Integrator - create, update, delete, get, search. for Data Transformation:
- Boost.space provides various functions that can help in transforming data into the required format during mapping. You can leverage these functions to automatically convert data into the correct format. For more detailed information on how to use these functions, visit the Boost.space General Functions Documentation.
- Increase the Priority of the API Token:
- If the error is due to a low-priority API token, you will need to increase the priority of the token. This can be done in the Boost.space dashboard under API TokensA secure code used to authenticate and authorize access to API endpoints, enabling users to connect with third-party applications..
Steps to Increase API Token Priority:
- Navigate to Boost.space -> API Tokens.
- Locate the relevant API token and adjust its priority settings to a higher level.
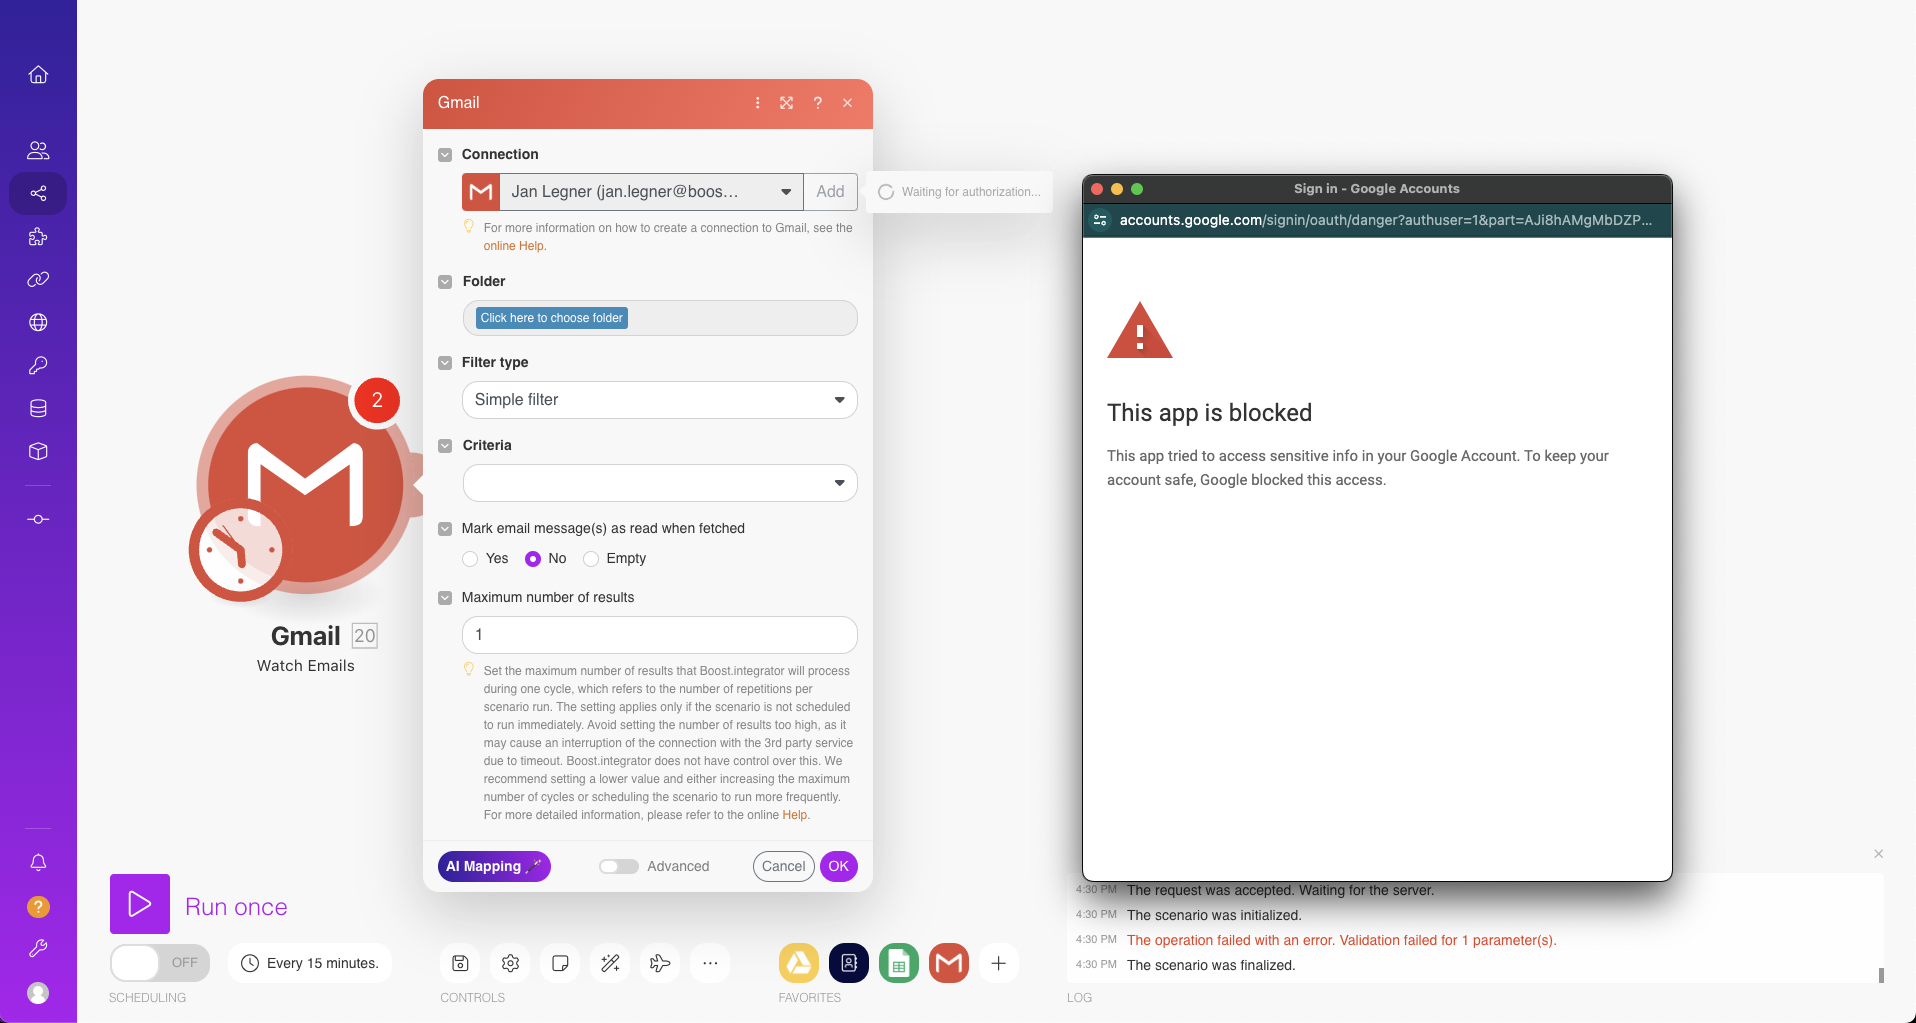
Connection Failed -> Client ID and Secret
In the Boost.space system, the “Connection failed -> Client ID and Secret” error can occur when attempting to establish a connection in the Integrator with a target application. This issue is particularly relevant for applications like Gmail that require a specific type of connection. The error might also occur when creating a global connection from Boost.space is still in progress or when dealing with a new application for which a global OAuth connection has not yet been established.
Causes of the “Connection Failed -> Client ID and Secret” Error
This error typically arises due to one of the following reasons:
- Incomplete or Incorrect Connection Setup:
- The target application may require a specific connection setup that has not been properly configured.
- Application-Specific Connection Requirements:
- Some applications, such as Gmail, have unique connection requirements that differ from the standard global connection setup in Boost.space.
- Missing or Incorrect Client ID and Secret:
- The Client ID and Client Secret are essential for establishing a secure connection. If these credentials are missing or incorrect, the connection attempt will fail.
Solutions for the “Connection Failed -> Client Id and Secret” Error
To resolve this error, follow these steps:
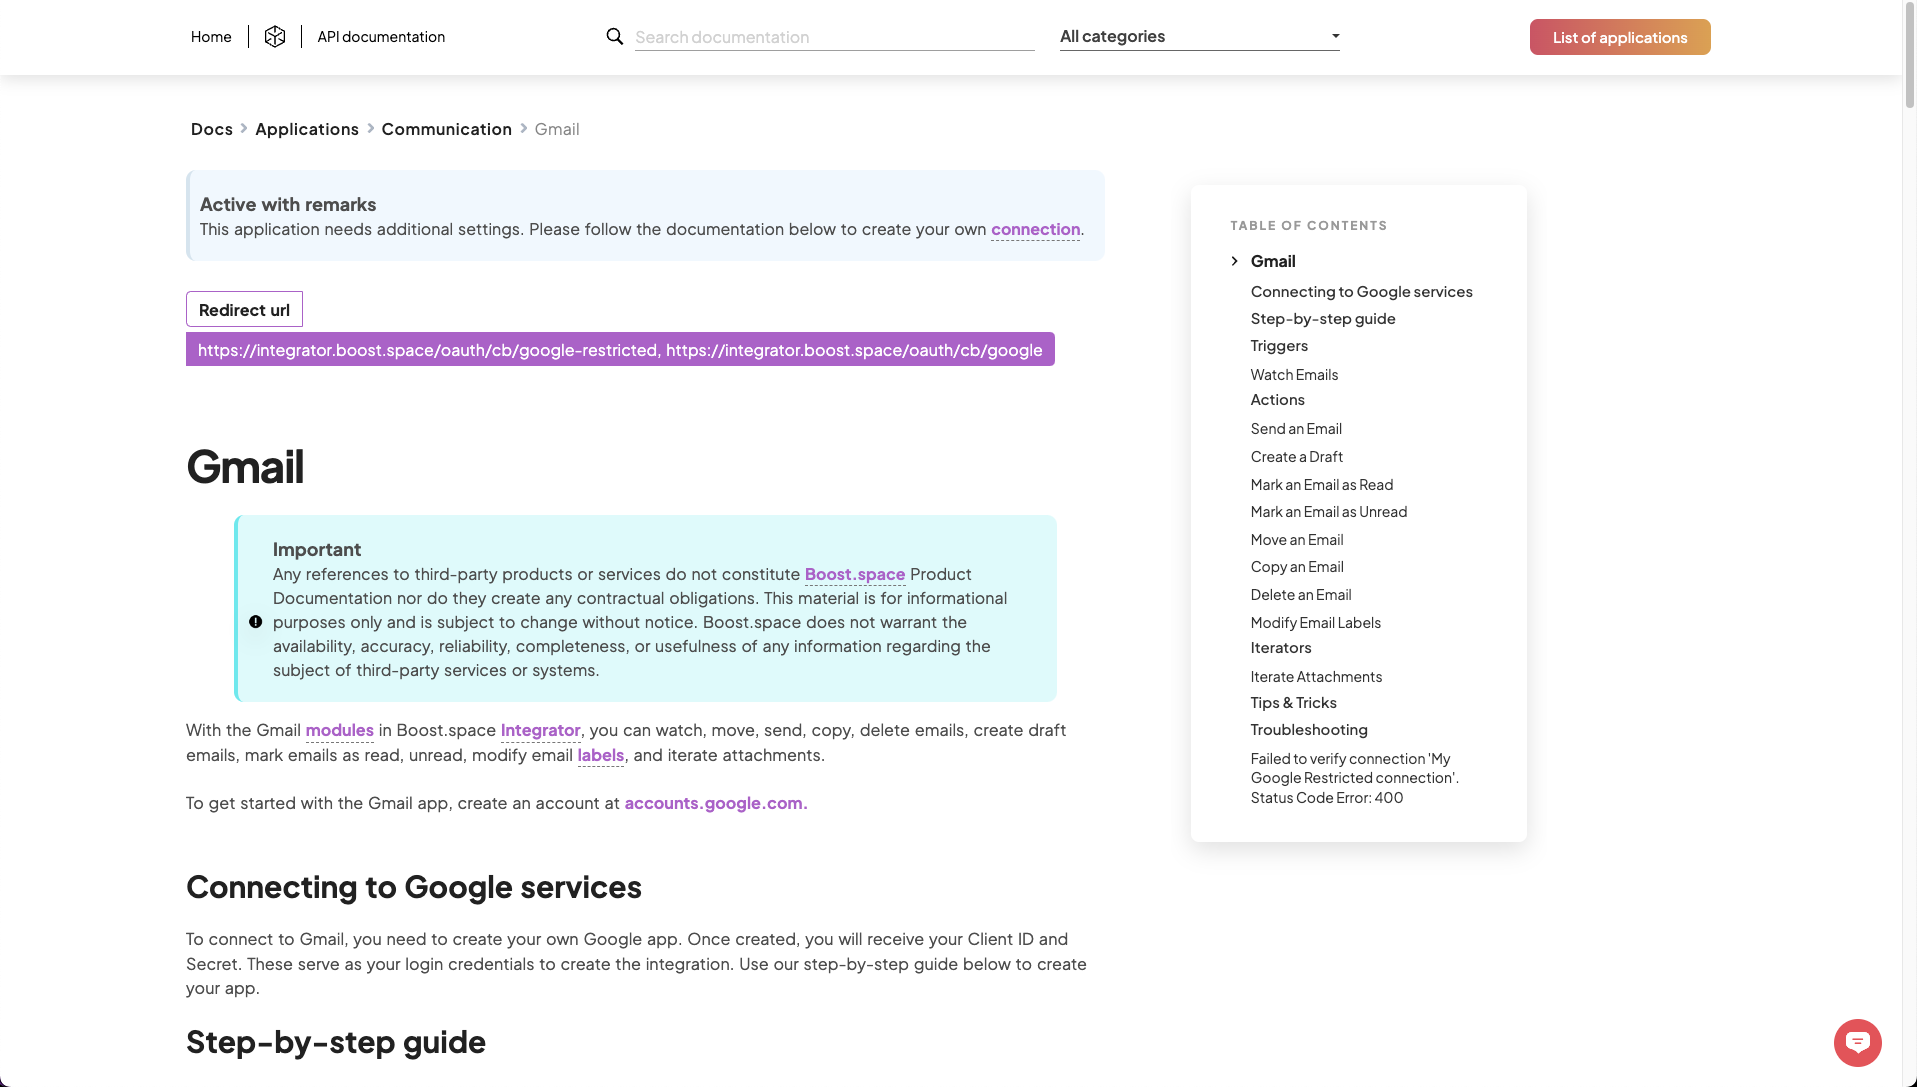
1. Check Documentation for Connection Status:
- First, refer to the Boost.space documentation to check the status of the application you are trying to connect. The status can be:
- Active: The connection setup is straightforward and supported.
- Active with Remarks: The connection is supported but may have additional steps or considerations.
- Contact Us: Further assistance is needed from Boost.space support.
For applications with the status Active with Remarks or Contact Us, additional steps are required.
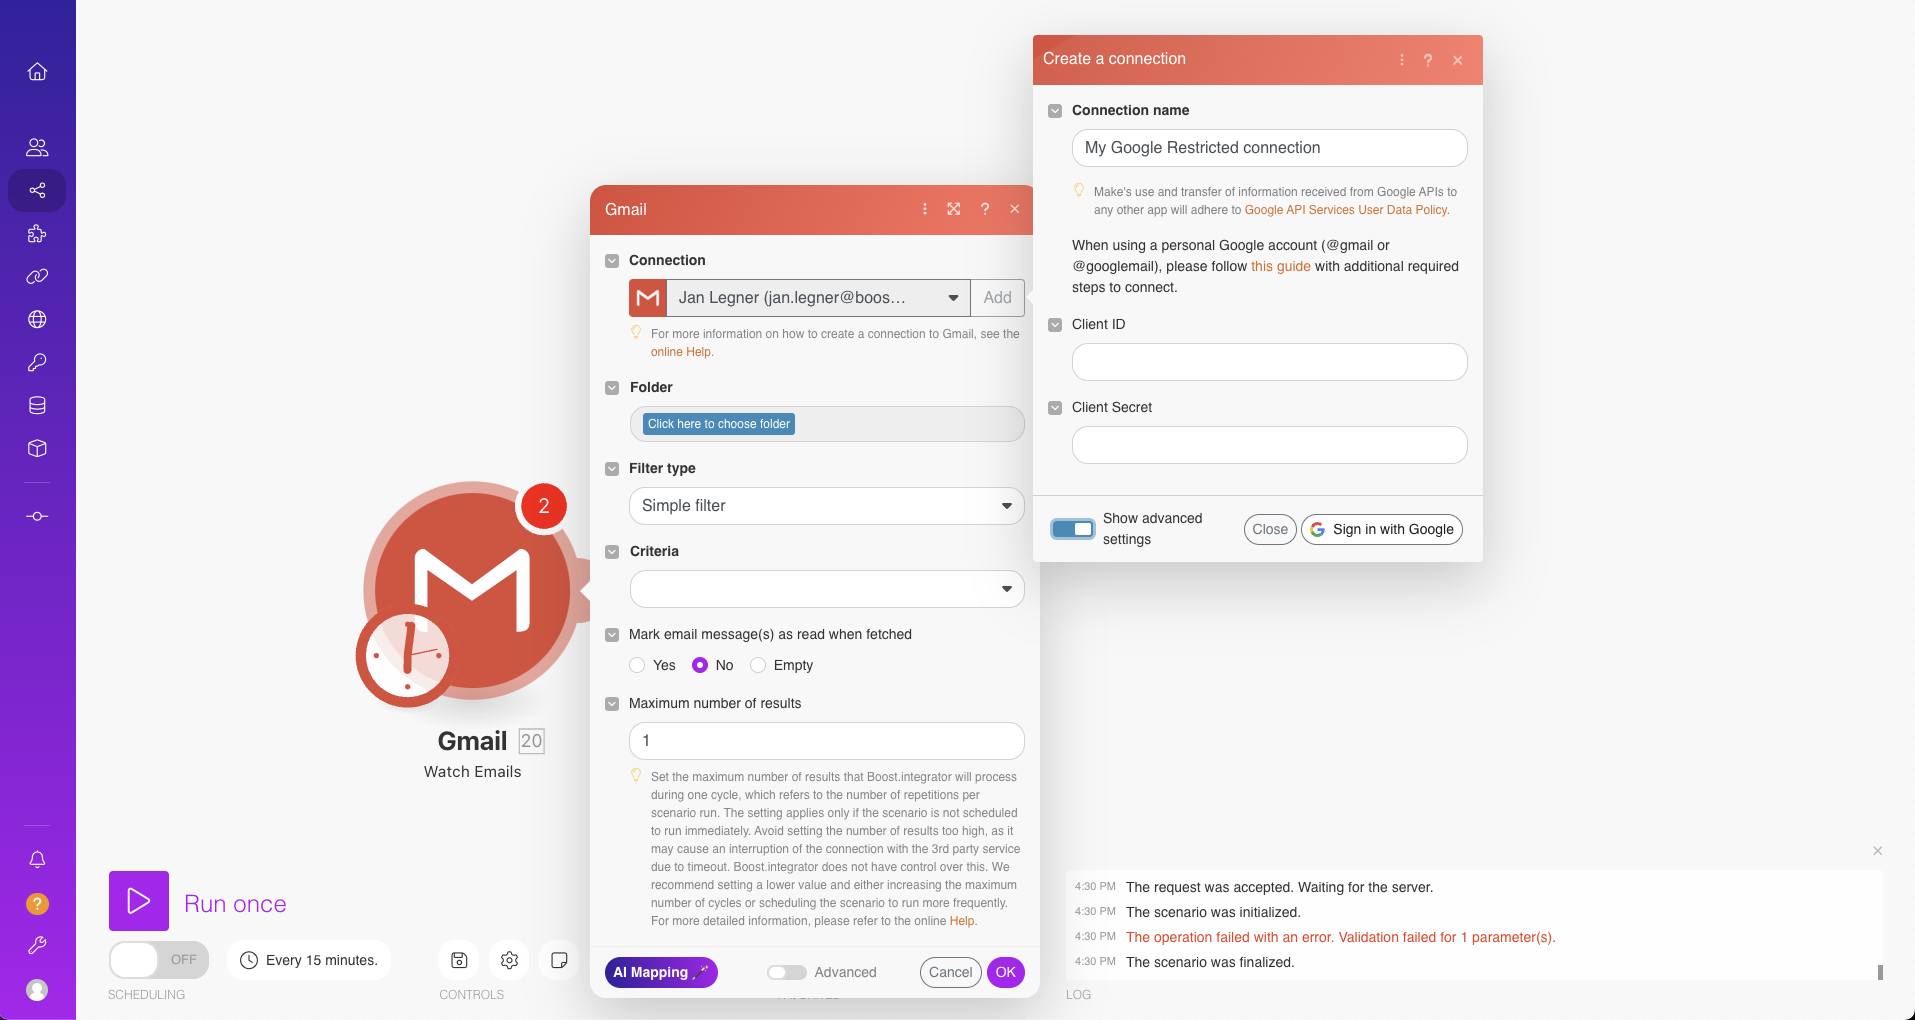
2. Use Advanced Settings to Enter Client ID and Secret:
-
- When creating the connection, check the “Show advanced settings” option. This allows you to manually enter the Client ID and Client Secret, along with any other necessary details for the target application.
3. Generate Client ID and Secret:
-
-
- In most cases, you will need to generate a Client ID and Client Secret within the target application. This is usually done by creating an internal application within the target platform, which will then provide the necessary credentials.
- For detailed instructions on how to set up a connection for applications with the status Active with Remarks, refer to the step-by-step guide in the Boost.space documentation. Visit our website, find the application you are trying to connect, and follow the specific guide for that application. This guide typically includes the necessary steps to generate the Client ID and Secret and configure the connection.
-
4. Consult Target Application Documentation:
-
-
- If there is no specific guide available in the Boost.space documentation, refer to the documentation of the target application. This documentation will provide the necessary steps to create an internal application and generate the required credentials.
-
If you will need further help, please do not hesitate to contact us directly at [email protected].