| Active with remarks |
|---|
| This application needs additional settings. Please follow the documentation below to create your own connection. |
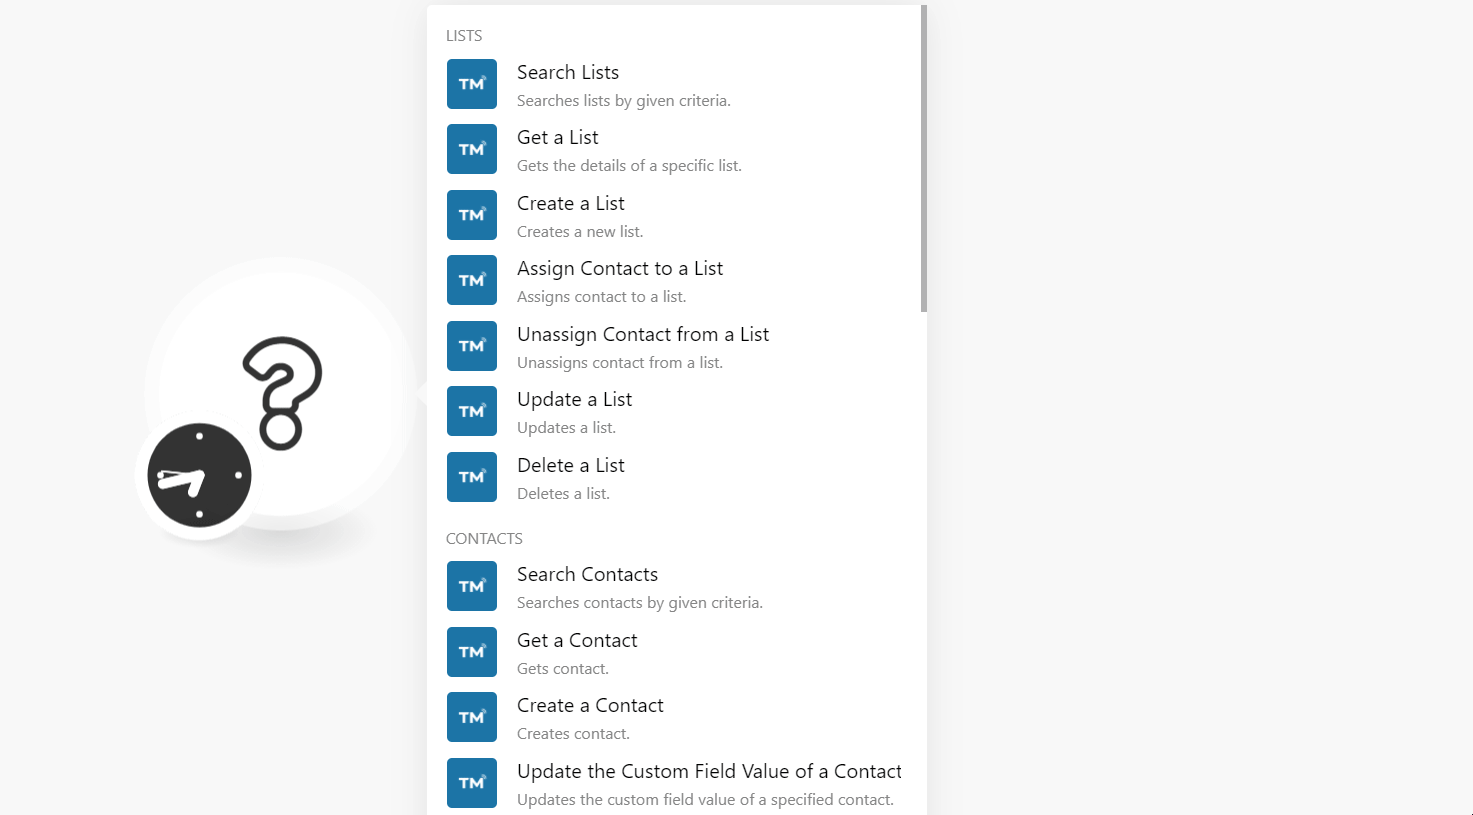
The TextMagic modules allow you to monitor, add, update, list. and delete the calls, contacts, custom fields, lists, and messages from your TextMagic account.
Prerequisites
-
A TextMagic account
In order to use TextMagic with Boost.space Integrator, it is necessary to have a TextMagic account. If you do not have one, you can create a TextMagic account at textmagic.com.
![[Note]](https://docs.boost.space/wp-content/themes/bsdocs/docs-parser/HTML/css/image/note.png) |
Note |
|---|---|
|
The module dialog fields that are displayed in bold (in the Boost.space Integrator scenario, not in this documentation article) are mandatory! |
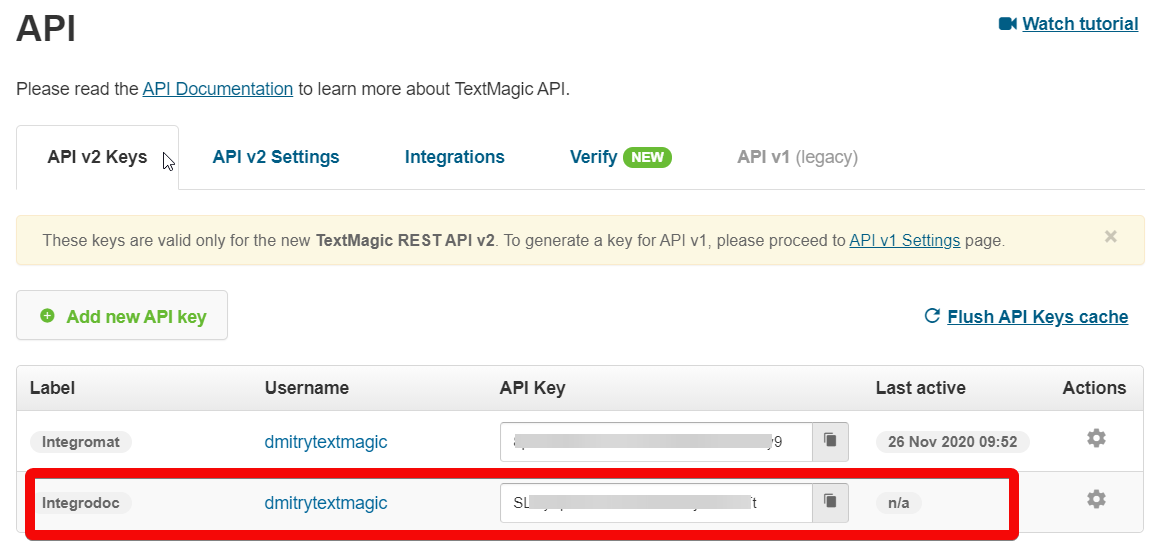
To connect your TextMagic account to Boost.space Integrator you need to obtain the API Key from your TextMagic account and insert it in the Create a connection dialog in the Boost.space Integrator module.
1. Log in to your TextMagic account.
2. Click Accounts > API > Add new API key.

3. Enter your app name and click Generate new key.
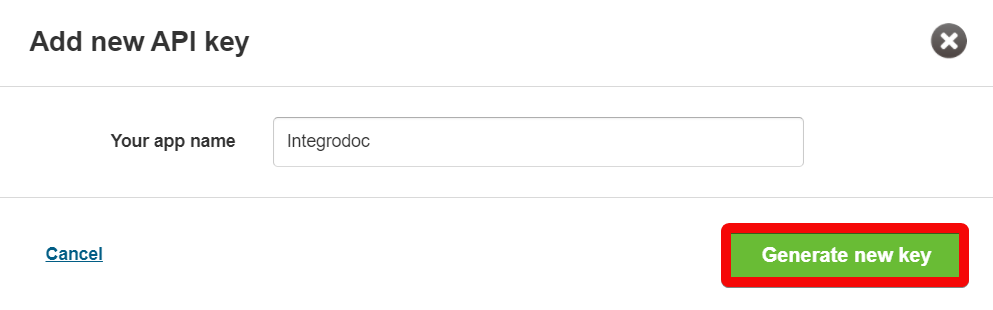
4. Copy the API Key to your clipboard.
5. Go to Boost.space Integrator and open the TextMagic module’s Create a connection dialog.
6. In the Connection name field, enter a name for the connection.
7. In the Username field, enter your TextMagic account’s username, You can find the username at Account > Account Settings.
8. In the API Key field, enter the API key copied in step 4, and click Continue.
The connection has been established.
Searches lists by given criteria.
|
Connection |
|
|
Limit |
Set the maximum number of lists Boost.space Integrator should return during one execution cycle. |
|
List IDs |
Add the List IDs you want to search. |
|
Query |
Enter a keyword or phrase to search the lists that match the specified query. |
|
Only Mine |
Select whether you want to search only the lists related to the current user. |
|
Only Default |
Select whether you want to search only the default lists related to the current user. |
|
Order By |
Select or map the option in which you want to order the lists:
|
|
Direction |
Select or map the direction in which you want to list the results:
|
Gets the details of a specific list.
|
Connection |
|
|
List ID |
Select or map the List ID whose details you want to retrieve. |
Creates a new list.
|
Connection |
|
|
List Name |
Enter the name for the list. |
|
Shared |
Select whether the list is shared. |
|
Favorited |
Select whether the list is marked as favorite. |
|
Is Default |
Select whether this is the default list for new contacts. |
Assigns contacts to a list.
|
Connection |
|
|
List ID |
Select or map the List ID to which you want to assign the contact. |
|
Contact ID |
Select or map the Contact ID which you want to assign to the list. |
Unassigns contact from a list.
|
Connection |
|
|
List ID |
Select or map the List ID from which you want to unassign the contact. |
|
Contact ID |
Select or map the Contact ID which you want to unassign from the list. |
Updates a list.
|
Connection |
|
|
List ID |
Select or map the List ID whose details you want to update. |
|
Name |
Enter a new name for the list. |
|
Shared |
Select whether the list is shared. |
|
Favorited |
Select whether the list is marked as favorite. |
|
Is Default |
Select whether this is the default list for new contacts. |
Deletes a list.
|
Connection |
|
|
List ID |
Select or map the List ID you want to delete. |
Searches contacts by given criteria.
|
Connection |
|
|
Limit |
Set the maximum number of contacts Boost.space Integrator should return during one execution cycle. |
|
Contact IDs |
Add the Contact IDs you want to search. |
|
Shared |
Select whether you want to search the shared contacts. |
|
List ID |
Select or map the List ID whose contacts you want to search. |
|
Include Blocked |
Select whether you want to include the blocked contacts in the results. |
|
Query |
Enter a keyword or phrase to search the contacts that match the specified query. |
|
Local |
Select whether you want to include the local phone numbers of the contacts in the results. |
|
Exact Match |
Select whether you want to search only the contacts that exactly match the search criteria. |
|
Order By |
Select or map the option in which you want to order the contacts:
|
|
Direction |
Select or map the direction in which you want to list the results:
|
Gets contact.
|
Connection |
|
|
Contact ID |
Select or map the Contact ID whose details you want to retrieve. |
Creates contact.
|
Connection |
|
|
Phone |
Enter the contact’s phone number. For example, |
|
List ID |
Select or map the List ID to which you want to assign the contact. |
|
First Name |
Enter (map) the contact’s first name. |
|
Last Name |
Enter (map) the contact’s last name. |
|
|
Enter (map) the contact’s email address. |
|
Company Name |
Enter (map) the contact’s company name. |
|
Favorited |
Select whether you want to mark the contact as favorite. |
|
Blocked |
Select whether you want to block the contact. |
|
Type of Phone |
Select or map the contact’s phone number type:
|
|
Custom Field Values |
Add the custom fields and their values for the contact. |
|
Local |
Select whether the contact’s phone number is local. |
|
Country |
Enter the contact’s phone number’s two-character country code. For example, |
Updates the custom field value of a specified contact.
|
Connection |
|
|
Custom Field ID |
Select or map the Custom Field ID which you want to update for the contact. |
|
Contact ID |
Select or map the Contact ID whose values you want to update. |
|
Value |
Enter the new value for the custom field. |
Updates contact.
|
Connection |
|
|
Contact ID |
Select or map the Contact ID whose value you want o update. |
|
Phone |
Enter the contact’s phone number. For example, |
|
List ID |
Select or map the List ID to which you want to assign the contact. |
|
First Name |
Enter (map) the contact’s first name. |
|
Last Name |
Enter (map) the contact’s last name. |
|
|
Enter (map) the contact’s email address. |
|
Company Name |
Enter (map) the contact’s company name. |
|
Favorited |
Select whether you want to mark the contact as favorite. |
|
Blocked |
Select whether you want to block the contact. |
|
Type of Phone |
Select or map the contact’s phone number type:
|
|
Custom Field Values |
Add the custom fields and their values for the contact. |
|
Local |
Select whether the contact’s phone number is local. |
|
Country |
Enter the contact’s phone number’s two-character country code. For example, |
Deletes contact.
|
Connection |
|
|
Contact ID |
Select or map the Contact ID you want to delete. |
Gets all custom fields.
|
Connection |
|
|
Limit |
Set the maximum number of custom fields Boost.space Integrator should return during one execution cycle. |
Gets a custom field.
|
Connection |
|
|
Custom Field ID |
Select or map the Custom Field ID whose details you want to retrieve. |
Creates a new custom field.
|
Connection |
|
|
Name |
Enter the custom field name. |
Updates a custom field.
|
Connection |
|
|
Custom Field ID |
Select or map the Custom Field ID whose details you want to update. |
|
Name |
Enter the custom field name. |
Deletes a custom field.
|
Connection |
|
|
Custom Field ID |
Select or map the Custom Field ID you want to delete. |
|
Note |
|---|---|
|
You do not have to add the webhooks in the TextMagic as it is automatically done for you once you add and save an instant trigger module to your scenario. |
Triggers when a new incoming message is received.
|
Webhook Name |
Enter a name for the webhook. |
|
Connection |
Gets all messages.
|
Connection |
|
|
Limit |
Set the maximum number of outgoing messages Boost.space Integrator should return during one execution cycle. |
Gets a message.
|
Connection |
|
|
Message ID |
Select or map the Message ID whose details you want to retrieve. |
Sends a message.
|
Connection |
|
|
Text |
Enter the message text. |
|
Template ID |
Select or map the Template ID for the message. |
|
Contacts |
Select or map the contacts to whom you want to send the message. You should specify at least one of the Phones, Contacts, Lists fields. |
|
Lists |
Add the lists to which you want to send the message. |
|
Phones |
Add the phone numbers to which you want to send the message. |
|
Sending Date Time |
Enter the date and time when you want to send the message. |
|
Cut Extra |
Select whether you want the sending method to cut extra characters which do not fit supplied partsCount or return 400 Bad request response instead. |
|
Parts Count |
Enter the maximum number of parts you can divide the message into. You can divide the message into a maximum of six parts. |
|
Reference ID |
Enter the custom message Reference ID. |
|
From |
Enter (map) the Sender ID from which you want to send the message. The value should be either a phone number or an alphanumeric sender ID. If specified Sender ID is not allowed for some destinations, a fallback default Sender ID will be used to ensure delivery. |
|
Rrule |
Enter the iCal RRULE parameter to create recurrent scheduled messages. Send time is mandatory as the start point of sending. See the Rrule generator for format details. |
|
Create Chat |
Select whether you want to create a new chat with recipients. |
|
TTS |
Select whether you want to send a text-to-speech message. |
|
Local |
Select whether you want to consider the phone numbers as local. |
|
Country |
Enter the contact’s phone number’s two-character country code. For example, |
|
Destination |
Select or map the message destination:
|
|
Resources |
Enter the file name from the MMS attachment response if you are sending the MMS message. |
Deletes a message.
|
Connection |
|
|
Message ID |
Select or map the Message ID you want to delete. |
|
Note |
|---|---|
|
You do not have to add the webhooks in the TextMagic as it is automatically done for you once you add and save an instant trigger module to your scenario. |
Triggers when someone calls your TextMagic number.
|
Webhook Name |
Enter a name for the webhook. |
|
Connection |
Triggers when you miss an incoming call to your Textmagic number.
|
Webhook Name |
Enter a name for the webhook. |
|
Connection |
Changes the forwarding number.
|
Connection |
|
|
Number ID |
Select or map the Number ID which you want to change. |
|
Forwarding Number |
Enter the new number you want to change. |
|
Note |
|---|---|
|
You do not have to add the webhooks in the TextMagic as it is automatically done for you once you add and save an instant trigger module to your scenario. |
Triggers when someone unsubscribed from your communication.
|
Webhook Name |
Enter a name for the webhook. |
|
Connection |
Allows retrieving additional information about a phone number.
|
Connection |
|
|
Phone |
Enter the phone number of whose carrier you want to lookup. |
|
Country |
Enter the two-character country code to which the phone number belongs. For example, |
Allows retrieving additional information about a phone number.
|
Connection |
|
|
Email Address |
Enter (map) the email address you want to lookup. |
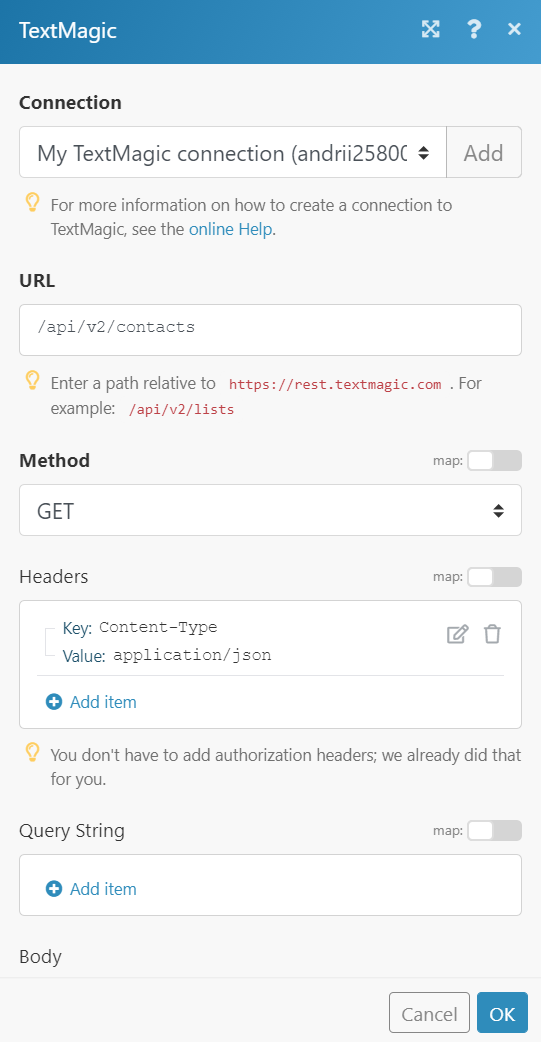
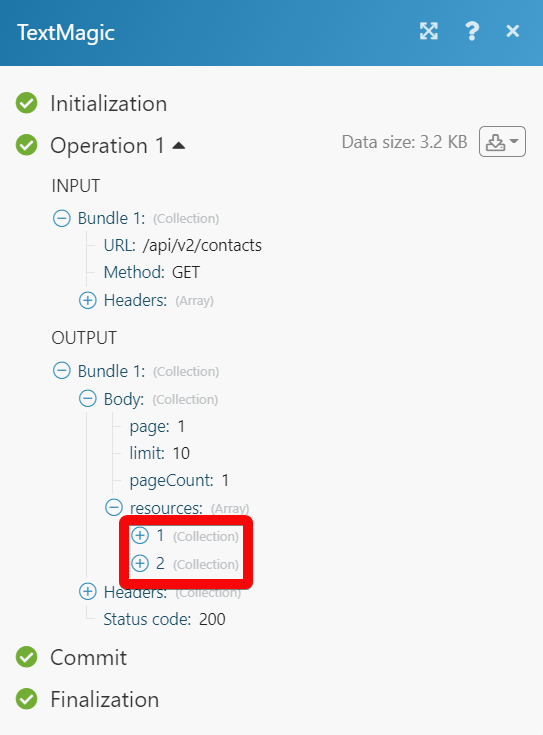
Performs an arbitrary authorized API call.
|
Connection |
||||
|
URL |
Enter a path relative to
|
|||
|
Method |
Select the HTTP method you want to use: GET to retrieve information for an entry. POST to create a new entry. PUT to update/replace an existing entry. PATCH to make a partial entry update. DELETE to delete an entry. |
|||
|
Headers |
Enter the desired request headers. You don’t have to add authorization headers; we already did that for you. |
|||
|
Query String |
Enter the request query string. |
|||
|
Body |
Enter the body content for your API call. |