| Active |
|---|
| This application does not need additional settings. So you can make connection only by using your login credentials or by following the instructions below . |
The Zoho Invoice modules allow you to create, update, list, and/or delete items, price lists, contacts, estimates, invoices, payments, credit notes, expenses, projects, time entries in your Zoho Invoice account.
Prerequisites
- A Zoho Invoice account
In order to use Zoho Invoice with Boost.space Integrator, it is necessary to have a Zoho Invoice account. If you do not have one, you can create a Zoho Invoice account at www.zoho.com/invoice/signup.
![[Note]](https://docs.boost.space/wp-content/themes/bsdocs/docs-parser/HTML/css/image/note.png) |
Note |
|---|---|
| The module dialog fields that are displayed in bold (in the Boost.space Integrator scenario, not in this documentation article) are mandatory! |
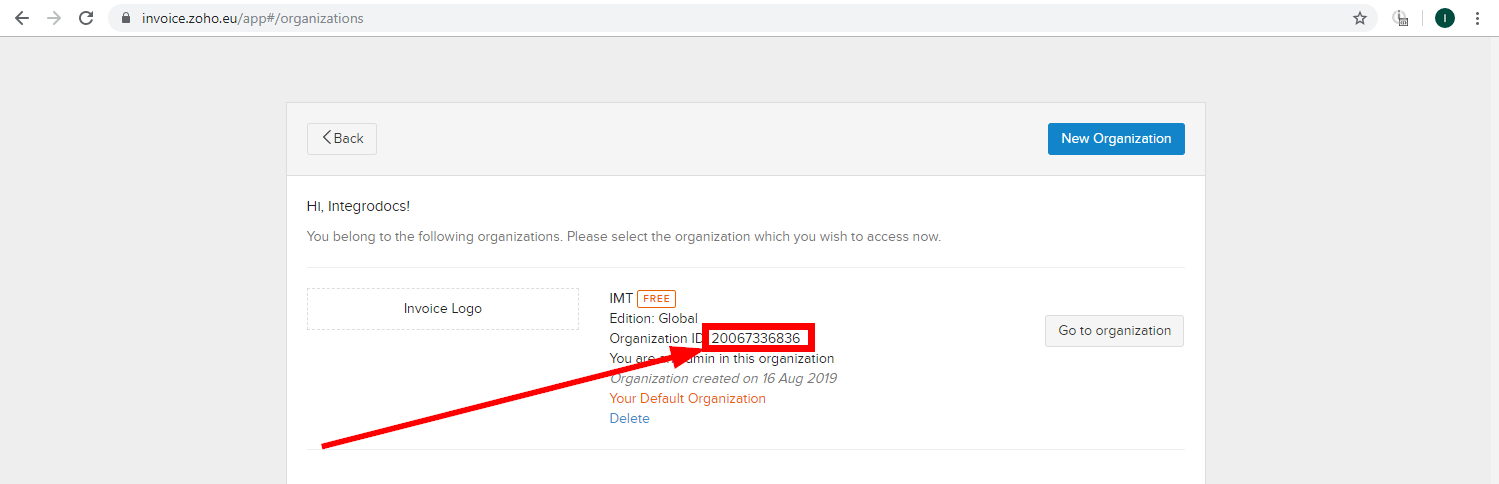
To connect your Zoho Invoice account to Boost.space Integrator, you need to obtain your organization ID and region.
- Log into your Zoho Invoice Account.
- Open your profile menu in the top-right corner.
- Click on the Manage button next to the My Organizations section.
- Copy the Organization ID to the clipboard.
- Go to Boost.space Integrator and open the Zoho Invoice module’s Create a connection dialog.
- Enter the Organization ID you have copied in step 4 to the respective field.
- Select the region of your Zoho Invoice account. If the URL of your account is e.g.
https://invoice.zoho.eu, then select the EU option. - Click the Continue button.
Confirm the dialog by clicking the Accept button.
The connection has been established.
Triggers when an item is created or updated.
| Connection | Establish a connection to your Zoho Invoice account. |
| Watch | Select which kind of item updates you want to watch for:
|
| Tax | Select the tax applicable for the item you want to watch for. |
| Filter By | Select the status applicable for the item. |
| Sort Column | Select the column by which you want to sort the items:
|
| Limit | The maximum number of items Boost.space Integrator should return during one scenario execution cycle. |
Creates a new item.
Required Permissions: ZohoInvoice.settings.CREATE
| Connection | Establish a connection to your Zoho Invoice account. |
| Name | Select a new name for the item. |
| Rate | Select the price of the item. |
| Description | Enter the details of the item. |
| Unit | Select the number of items. |
| Stock Keeping Unit Value | Select the quantity of the items keeping as stock. |
| Add Tax ID | Select the Tax ID applicable for the item. |
| Product Type | Select the type of item:
|
| Item Tax Preferences | Add the tax preferences for the item:
|
Updates the details of an existing item.
Required Permissions: ZohoInvoice.settings.UPDATE
| Connection | Establish a connection to your Zoho Invoice account. |
| Item ID | Select the Item ID of the item you want to update. |
| Name | Enter a new name for the item. |
| Rate | Select or enter a new price for the item. |
| Description | Enter new details for the item. |
| Unit | Enter the quantity of the item. |
| Add Tax ID | Select the Tax ID applicable for the item. |
| Stock Keeping Unit Value | Select the quantity of the items keeping as stock. |
| Product Type | Select the type of item:
|
| Item Tax Preferences | Add the tax preferences for the item:
|
Gets the list of all active items with pagination.
Required Permissions: ZohoInvoice.settings.READ
| Connection | Establish a connection to your Zoho Invoice account. |
| Filter | Select the option to search the item you want to list:
OR Enter the first few letters of the item to search. |
| Tax | Select the tax applicable to the item you want to list. |
| Filter By | Select the option to filter the item you want to list:
|
| Sort Column | Select the option to sort the item:
|
| Limit | The maximum number of items Boost.space Integrator should return during one scenario execution cycle. |
Fetches details of an existing item.
| Connection | Establish a connection to your Zoho Invoice account. |
| Item ID | Select the Item ID whose details you want to retrieve. |
Deletes an existing item. Items that are part of a transaction cannot be deleted.
| Connection | Establish a connection to your Zoho Invoice account. |
| Item ID | Select the Item ID you want to delete. |
Marks an item as active or inactive.
| Connection | Establish a connection to your Zoho Invoice account. |
| Item ID | Select the Item ID you want to mark active or inactive. |
| Select Active or Inactive | Select the action to mark the item:
|
Triggers when a contact is created or updated.
| Connection | Establish a connection to your Zoho Invoice account. |
| Watch | Select which contacts you want to watch for:
|
| Filter By | Select the option to filter the contacts you want to watch:
|
| Sort Column | Select the option to sort the contacts by columns:
|
| Limit | The maximum number of contacts Boost.space Integrator should return during one scenario execution cycle. |
Creates a contact with given information.
| Connection | Establish a connection to your Zoho Invoice account. |
| Contact Name | Enter the contact name.
Contact name can either be a company name or a person name. |
| Currency ID | Select the currency of the contact. |
| Company Name | Enter the company name of the contact. |
| Net Payment Terms | Enter the payment terms applicable for the contact. |
| Website | Enter the website URL of the contact. |
| Language Code | Select the language code of the contact. |
| Remark | Enter any comments for the payment made by the contact. |
| Facebook Profile Account | Enter the Facebook account URL of the contact. |
| Twitter Profile Account | Enter the Twitter account URL of the contact. |
| Attention | Enter the contact name residing in the address. |
| Address | Enter the address of the contact. |
| Street 2 | Enter the street name of the contact. |
| City | Enter the city name of the contact. |
| State | Enter the state name of the contact. |
| ZIP | Enter the zip code of the contact’s address. |
| Country | Enter the country name of the contact. |
| Fax | Enter the fax number of the contact. |
| Phone | Enter the phone number of the contact. |
| Attention | Enter the contact name residing in the shipping address. |
| Address | Enter the address of the contact. |
| Street 2 | Enter the street name of the contact. |
| City | Enter the city name of the contact. |
| State | Enter the state name of the contact. |
| ZIP | Enter the zip code of the contact’s address. |
| Country | Enter the country name of the contact. |
| Fax | Enter the fax information of the contact. |
| Phone | Enter the phone number of the contact. |
| Contact Persons | Add the contact persons for the contact:
|
Update an existing contact. To delete a contact person remove it from the contact persons list.
| Connection | Establish a connection to your Zoho Invoice account. |
| Contact Name | Select the contact name you want to update. |
| Currency ID | Select the Currency ID of the contact. |
| Company Name | Enter the company name of the contact. |
| Net Payment Terms | Enter the payment terms applicable for the contact. |
| Website | Enter the website URL of the contact. |
| Language Code | Select the language code of the contact. |
| Remark | Enter any comments for the payment made by the contact. |
| Facebook Profile Account | Enter the Facebook account URL of the contact. |
| Twitter Profile Account | Enter the Twitter account URL of the contact. |
| Attention | Enter the contact person name residing in the address. |
| Address | Enter the address of the contact. |
| Street 2 | Enter the street name of the contact. |
| City | Enter the city name of the contact. |
| State | Enter the state name of the contact. |
| ZIP | Enter the zip code of the contact’s address. |
| Country | Enter the country name of the contact. |
| Fax | Enter the fax number of the contact. |
| Phone | Enter the phone number of the contact. |
| Attention | Enter the shipping address of the contact. |
| Address | Enter the address of the contact. |
| Street 2 | Enter the street name of the contact. |
| City | Enter the city name of the contact. |
| State | Enter the state name of the contact. |
| ZIP | Enter the zip code of the contact’s address. |
| Country | Enter the country name of the contact. |
| Fax | Enter the fax number of the contact. |
| Phone | Enter the phone number of the contact. |
| Contact Persons | Add the contact person’s information for the contact:
|
Lists all contacts with pagination.
| Connection | Establish a connection to your Zoho Invoice account. |
| Filter | Select the option by which to search the contacts you want to list:
OR Enter the first few letters of the contact name to search. |
| Filter By | Select the option by which to filter the contacts you want to list.
|
| Sort Column | Select the option by which column to sort the contacts.
|
| Limit | The maximum number of contacts Boost.space Integrator should return during one scenario execution cycle. |
Gets details of a contact.
| Connection | Establish a connection to your Zoho Invoice account. |
| Contact ID | Select the Contact ID you want to retrieve. |
Deletes an existing contact.
| Connection | Establish a connection to your Zoho Invoice account. |
| Contact ID | Select the Contact ID you want to delete. |
Marks a contact as active or inactive.
| Connection | Establish a connection to your Zoho Invoice account. |
| Contact ID | Select the Contact ID you want to make active or inactive. |
| Select Active or Inactive | Select the action you want to mark the contact:
|
Creates a contact person for the contact.
| Connection | Establish a connection to your Zoho Invoice account. |
| Contact ID | Select the Contact ID of the contact person. |
| First Name | Select the first name of the contact person. |
| Last Name | Select the last name of the contact person. |
| Salutation | Select the applicable salutation of the contact person. |
| Enter the email address of the contact person. | |
| Phone | Enter the phone number of the contact person. |
| Mobile | Enter the mobile number of the contact person. |
| Skype ID | Enter the Skype ID of the contact person. |
| Department | Enter the department of the contact person. |
| Enable Portal | Select Yes if this contact person can access the portal:
|
Update details of an existing contact person.
| Connection | Establish a connection to your Zoho Invoice account. |
| Contact ID | Select the Contact ID of the contact person you want to update. |
| Contact Person ID | Select the Contact Person ID you want to update. |
| First Name | Select the first name of the contact person. |
| Last Name | Select the last name of the contact person. |
| Salutation | Select the applicable salutation of the contact person. |
| Enter the email address of the contact person. | |
| Phone | Enter the phone number of the contact person. |
| Mobile | Enter the mobile number of the contact person. |
| Skype ID | Enter the Skype ID of the contact person. |
| Department | Enter the department of the contact person. |
| Enable Portal | Select Yes if this contact person can access the portal:
|
List all contact persons with pagination.
| Connection | Establish a connection to your Zoho Invoice account. |
| Contact ID | Select the Contact ID of the contact person you want to list. |
| Limit | The maximum number of contact persons Boost.space Integrator should return during one scenario execution cycle. |
Get the details of a contact person.
| Connection | Establish a connection to your Zoho Invoice account. |
| Contact ID | Select the Contact ID of the contact person whose details you want to retrieve. |
| Contact Person ID | Select the Contact Person ID whose details you want to retrieve. |
Delete an existing contact person.
| Connection | Establish a connection to your Zoho Invoice account. |
| Contact ID | Select the Contact ID of the contact person you want to delete. |
| Contact Person ID | Select the Contact Person ID you want to delete. |
Marks a contact person as primary for contact.
| Connection | Establish a connection to your Zoho Invoice account. |
| Contact ID | Select the Contact ID of the contact person which you want to make the primary contact. |
| Contact Person ID | Select the Contact Person ID you want to mark as primary contact. |
Triggers when an estimate is created or updated.
| Connection | Establish a connection to your Zoho Invoice account. |
| Watch | Select which kind of estimate you want to watch for:
|
| Select Customer | Select the customer whose estimate you want to watch. |
| Select Item | Select the item of the customer whose estimates you want to watch. |
| Expiry Date | Select the expiry date of the estimate. |
| Date on the Estimate | Select date of the estimate. |
| Status | Select the status of the estimate:
|
| Filter by | Select the option by which to filter the estimates you want to watch:
|
| Sort Column | Select the option by which to sort the estimates you want to watch:
|
| Limit | The maximum number of estimates Boost.space Integrator should return during one scenario execution cycle. |
Creates an estimate for your customer.
| Connection | Establish a connection to your Zoho Invoice account. |
| Customer ID | Select the Customer ID whose estimate you want to create. |
| Contact Persons | Select the contact person of the customer to send the estimate. |
| Line Items | Add the line items of the estimate:
|
| Send | Select Yes if you want to send the estimate to the contact person:
|
| Ignore Auto Number Generation | Select Yes if you want to ignore auto number generation for this estimate:
|
| Estimate Number | Enter the estimate serial number. |
| Reference Number | Enter the transaction reference number of the estimate. |
| Date | Select the date of the estimate. |
| Expiry Date | Select the expiry date of the estimate. |
| Exchange Rate | Enter the foreign currency exchange rate applicable for the estimate. |
| Discount | Enter the discount applicable on the estimate.
Discount applied to the invoice. It can be in percentage (%) or in amount. For example, 12.5% or 190. |
| Discount Before Tax | Specify how the discount is applied for the estimate and the discount amount before applying the taxes. |
| Discount Type | Select the type of discount applied for the estimate:
|
| Custom Body | Enter the message for the email to be sent with the estimate. |
| Custom Subject | Enter the subject of the email to be sent with the estimate. |
| Salesperson Name | Select the salesperson name. |
| Notes | Enter any additional information about the estimate you want to convey. |
| Terms | Specify the terms and conditions of the estimate. |
| Shipping Charge | Enter the shipping charges applied for the invoice. |
| Adjustment | Enter the amount adjustments made to the invoice. |
| Adjustment Description | Enter the details of the adjustment made to the invoice. For example, rounding off. |
Updates an existing estimate. To delete a line item just remove it from the line items list.
| Connection | Establish a connection to your Zoho Invoice account. |
| Customer ID | Select the Customer ID whose estimates you want to update. |
| Estimate ID | Select the Estimate ID you want to update. |
| Contact Persons | Select the contact person of the customer to send the estimate. |
| Line Items | Add the line items of the estimate:
|
| Send | Select Yes if you want to send the estimate to the contact person:
|
| Ignore Auto Number Generation | Select Yes if you want to ignore auto number generation for this estimate:
|
| Estimate Number | Enter the estimate serial number. |
| Reference Number | Enter the transaction reference number of the estimate. |
| Date | Select the date of the estimate. |
| Expiry Date | Select the expiry date of the estimate. |
| Exchange Rate | Enter the foreign currency exchange rate applicable for the estimate. |
| Discount | Enter the discount applicable on the estimate.
Discount applied to the invoice. It can be in percentage (%) or in amount. For example, 12.5% or 190. |
| Discount Before Tax | Specify how the discount is applied for the estimate and the discount amount before applying the taxes. |
| Discount Type | Select the discount type applied for the estimate:
|
| Custom Body | Enter the message for the email to send with the estimate. |
| Custom Subject | Enter the new subject of the email to send with the estimate. |
| Salesperson Name | Select the new salesperson name for the estimate. |
| Notes | Enter any additional information about the estimate you want to mention. |
| Terms | Specify the terms and conditions of the estimate. |
| Shipping Charge | Enter the shipping charges applied for the invoice. |
| Adjustment | Enter the amount adjustments made to the invoice. |
| Adjustment Description | Enter the details of the adjustment made to the invoice. For example, rounding off. |
List all estimates with pagination.
| Connection | Establish a connection to your Zoho Invoice account. |
| Filter | Select the option by which to search the estimate you want to list:
OR Enter the first few letters of the estimate to search. |
| Select Customer | Select the customer whose item estimate you want to list. |
| Select Item | Select the item whose estimate you want to list. |
| Expiry Date | Select the expiry date of the estimate. |
| Date on the Estimate | Select the date mentioned on the estimate you want to list. |
| Status | Select the status of the estimate you want to list:
|
| Filter By | Select the option by which to filter the estimate you want to list:
|
| Sort Column | Select the option by which to sort the estimate you want to list:
|
| Limit | The maximum number of estimates Boost.space Integrator should return during one scenario execution cycle. |
Get the details of an estimate.
| Connection | Establish a connection to your Zoho Invoice account. |
| Estimate ID | Select the Estimate ID whose details you want to retrieve. |
| Accept | Select the format of the estimate you want to retrieve:
|
Deletes an existing estimate.
| Connection | Establish a connection to your Zoho Invoice account. |
| Estimate ID | Select the Estimate ID you want to delete. |
Marks a draft estimate as sent, accepted, or declined.
| Connection | Establish a connection to your Zoho Invoice account. |
| Estimate ID | Select the Estimate ID you want to change. |
| Select Sent, Accepted, and Declined | Select the action you want to make to the estimate:
|
Triggers when an invoice is created or updated.
| Connection | Establish a connection to your Zoho Invoice account. |
| Watch | Select which kind of invoices you want to watch for:
|
| Select Item | Select the item of the customer whose invoice you want to watch. |
| Status | Select the status of the invoice:
|
| Filter By | Select the option by which to filter the invoices you want to watch:
|
| Sort Column | Select the option by which to sort the invoices by column:
|
| Limit | The maximum number of invoices Boost.space Integrator should return during one scenario execution cycle. |
Creates an invoice for your customer.
| Connection | Establish a connection to your Zoho Invoice account. | |||
| Customer ID | Select the Customer ID whose item invoice you want to create. | |||
| Contact Persons | Select the contact person associated with the invoice. | |||
| Line Items | Add the line items of the invoice:
|
|||
| Send | Select Yes if you want to send the invoice to the contact person:
|
|||
| Ignore Auto Number Generation | Select Yes if you want to ignore auto number generation for this estimate:
|
|||
| Invoice Number | Enter the invoice number. | |||
| Reference Number | Enter the transaction reference number of the invoice. | |||
| Template ID | Enter the Template ID of the PDF associated with the invoice. | |||
| Date | Enter the invoice date. | |||
| Payment Terms | Enter the payment terms in days. For example, 15, 30, 45.
|
|||
| Discount | Enter the discount applicable on the invoice.
Discount applied to the invoice. It can be in percentage (%) or in amount. For example, 12.5% or 190. |
|||
| Discount Before Tax | Specify how the discount is applied for the invoice and the discount amount before applying the taxes. | |||
| Discount Type | Select the discount applied for the invoice:
|
|||
| Inclusive Tax | Select Yes if the discount is including tax:
|
|||
| Exchange Rate | Enter the foreign currency exchange rate applicable for the invoice. | |||
| Salesperson Name | Select the salesperson responsible for the invoice. | |||
| Payment Gateways | Add the payment gateway to make an online payment for the invoice.
|
|||
| Allow Partial Payments | Select Yes if partial payments are allowed for the invoice:
|
|||
| Custom Body | Enter the message for the email of the sent invoice. | |||
| Custom Subject | Enter the subject of the email of the sent invoice. | |||
| Notes | Enter any additional information about the invoice you want to convey. | |||
| Terms & Condition | Specify the terms and conditions of the invoice. | |||
| Shipping Charge | Enter the shipping charges applied to the invoice. | |||
| Adjustment | Enter the amount adjustments made to the invoice. | |||
| Adjustment Description | Enter the details of the adjustments made to the invoice. For example, rounding off. |
|||
| Reason | Enter the description for the attachment of the email. | |||
| Custom Fields | Add the custom fields for the invoice. You can add multiple items. For example, address. |
Updates an existing invoice. To delete a line item, remove it from the line items list.
| Connection | Establish a connection to your Zoho Invoice account. |
| Customer ID | Select the Customer ID whose item invoice you want to update. |
| Invoice ID | Select the Invoice ID you want to update. |
| Contact Persons | Select the contact person for the invoice. |
| Line Items | Add the line items of the invoice:
|
| Ignore Auto Number Generation | Select Yes if you want to ignore auto number generation for this invoice:
|
| Invoice Number | Enter the invoice number. |
| Reference Number | Enter the transaction reference number of the invoice. |
| Template ID | Enter the Template ID of the PDF associated with the invoice. |
| Date | Enter the invoice date. |
| Payment Terms | Enter the payment terms in days. For example, 15, 30, 45.
Note: Invoice due date is calculated based on these days. |
| Discount | Enter the discount applicable on the invoice.
It can be in percentage (%) or in amount. For example, 12.5% or 190. |
| Discount Before Tax | Specify how the discount is applied for the estimate and the discount amount before applying the taxes. |
| Discount Type | Select the type of discount applied for the invoice:
|
| Inclusive Tax | Select Yes if the discount is including tax:
|
| Exchange Rate | Enter the foreign currency exchange rate applicable for the invoice. |
| Salesperson Name | Enter the salesperson responsible for the invoice. |
| Payment Gateways | Add the payment gateway to make an online payment for the invoice.
|
| Allow Partial Payments | Select Yes if partial payments are allowed for the invoice:
|
| Custom Body | Enter the message for the email for the sent invoice. |
| Custom Subject | Enter the subject of the email for the sent invoice. |
| Notes | Enter any additional information about the invoice you want to convey. |
| Terms | Specify the terms and conditions of the invoice. |
| Shipping Charge | Enter the shipping charges applied for the invoice. |
| Adjustment | Enter the amount adjustments made to the invoice. |
| Adjustment Description | Enter the details of the adjustments made to the invoice. For example, rounding off. |
| Reason | Enter the description for the attachment of the email. |
| Custom Fields | Add the custom fields for the invoice. You can add multiple items. For example, address. |
List all invoices with pagination.
| Connection | Establish a connection to your Zoho Invoice account. |
| Filter | Select the option by which to search the invoice you want to list:
OR Enter the first few letters of the invoice to search. |
| Select Item | Select the item whose invoice you want to list. |
| Status | Select the status of the invoice:
|
| Filter By | Select the option by which to filter the invoices you want to list:
|
| Sort Column | Select the option by which columns to sort the invoices:
|
| Limit | The maximum number of invoices Boost.space Integratorshould return during one scenario execution cycle. |
Get the details of an invoice.
| Connection | Establish a connection to your Zoho Invoice account. |
| Invoice ID | Select the Invoice ID whose details you want to retrieve. |
Select the format to print:
|
Delete an existing invoice. Invoices which have payment or credits note applied cannot be deleted.
| Connection | Establish a connection to your Zoho Invoice account. |
| Invoice ID | Select the Invoice ID you want to delete. |
Marks an invoice as sent, void, or draft.
| Connection | Establish a connection to your Zoho Invoice account. |
| Invoice ID | Select the Invoice ID you want to change the status. |
| Select Sent, Void, or Draft | Select the new status for the invoice:
|
Emails an invoice to the customer. Input JSON string is not mandatory. If input JSON string is empty, mail will be sent with default mail content.
| Connection | Establish a connection to your Zoho Invoice account. |
| Invoice ID | Select the Invoice ID you want to email. |
| To Emails | Add the email address of the person to receive the invoice. |
| Send From Organization’s Email ID | Select Yes if you want to send the invoice from the company email address.
|
| CC Emails | Add the email address that should be in the CC. |
| Subject | Enter the subject of the email. |
| Body/Content | Enter the message to be included in the email. |
Creates a new recurring invoice.
| Connection | Establish a connection to your Zoho Invoice account. |
| Customer ID | Select the Customer ID whose recurring invoice you want to create. |
| Recurrence Name | Enter the recurring profile name given by the user for the invoice. |
| Recurrence Frequency | Enter the interval at which the recurring invoice is generated. |
| Line Items | Add the line items of the recurring invoice:
|
| Reference Number | Enter the order number of the recurring invoice. |
| Start Date | Enter the start date of the recurring invoice. |
| End Date | Enter the expiry date of the recurring invoice. |
Updates a recurring invoice.
| Connection | Establish a connection to your Zoho Invoice account. |
| Customer ID | Enter the Customer ID whose recurring invoice you want to update. |
| Recurrence Name | Enter a new recurring profile name given by the user for the invoice. |
| Reference Number | Enter the order number of the recurring invoice. |
| Start Date | Enter the start date of the recurring invoice. |
| End Date | Enter the expiry date of the recurring invoice. |
| Recurrence Frequency | Enter the interval at which the recurring invoice is generated. |
| Line Items | Add the line items of the recurring invoice:
|
Gets the details of a recurring invoice.
| Connection | Establish a connection to your Zoho Invoice account. |
| Recurring Invoice ID | Select the Recurring Invoice ID whose details you want to retrieve. |
Lists the details of all recurring invoices.
| Connection | Establish a connection to your Zoho Invoice account. |
| Search Text | Enter the details of the recurring invoice you want to list.
For example, invoice number, purchase order, or customer name. |
| Filter By | Select the option by which to filter the recurring invoices you want to list:
|
| Sort Column | Select the option by which column to sort the recurring invoices:
|
| Limit | The maximum number of recurring invoices Boost.space Integrator should return during one scenario execution cycle. |
Deletes an existing recurring invoice.
| Connection | Establish a connection to your Zoho Invoice account. |
| Recurring Invoice ID | Select the Recurring Invoice ID you want to delete. |
Stops or resumes an active recurring invoice.
| Connection | Establish a connection to your Zoho Invoice account. |
| Recurring Invoice ID | Select the Recurring Invoice ID you want to stop or resume. |
| Select Stop or Resume | Select the action item for the recurring invoice:
|
Creates a new credit note.
| Connection | Establish a connection to your Zoho Invoice account. |
| Customer ID | Select the Customer ID for whom you want to raise a credit note. |
| Contact Persons | Select the contact person associated with the credit note. |
| Date | Select the date on which you are raising the credit note. |
| Line Items | Add the line items included in the credit note:
|
| Credit Note Number | Enter the credit note number. |
| Exchange Rate | Enter the foreign currency exchange rate applicable for the customer. |
| Reference Number | Enter the reference number generated for the payment. |
| Salesperson Name | Enter the salesperson name for the credit note. |
| Shipping Charge | Enter the shipping charges applied for the credit note. |
| Adjustment | Enter the amount adjustments made to the credit note. |
| Adjustment Description | Enter the details of the adjustments made to the credit note. For example, rounding off. |
| Notes | Enter any additional information about the credit note for the customer. |
| Terms & Condition | Specify the terms and conditions of the credit note. |
| Template ID | Enter the Template ID of the credit note template used. |
| Ignore Auto Number Generation | Select Yes if you want to provide your own credit note number for this credit note:
|
| Invoice ID | Select the Invoice ID applicable for the credit note. |
Updates details of an existing credit note.
| Connection | Establish a connection to your Zoho Invoice account. |
| Credit Note ID | Select the Credit Note ID you want to update. |
| Customer ID | Select the Customer ID for whom the credit note is raised. |
| Date | Select the date on which the credit note is raised. |
| Exchange Rate | Enter the foreign currency exchange rate applicable for the customer. |
| Line Items | Add the line items included in the credit note:
|
| Credit Note Number | Enter the credit note number. |
| Reference Number | Enter the reference number generated for the payment. |
| Salesperson Name | Enter the salesperson name for the credit note. |
| Shipping Charge | Enter the shipping charges applied for the credit note. |
| Adjustment | Enter the amount adjustments made to the credit note. |
| Adjustment Description | Enter the details of the adjustments made to the credit note. For example, rounding off. |
| Notes | Enter any additional information about the credit note for the customer. |
| Terms&Condition | Specify the terms and conditions of the credit note. |
| Template ID | Enter the Template ID of the credit note template used. |
| Ignore Auto Number Generation | Select Yes if you want to provide your own credit note number for this credit note:
|
List all the credit notes.
| Connection | Establish a connection to your Zoho Invoice account. |
| Filter | Select the option by which to search the invoice you want to list:
OR Enter the first few letters of the credit note to search. |
| Customer ID | Select the Customer ID whose credit note details you want to list. |
| Item ID | Select the Item ID generated for the item for which refund is made. |
| Status | Select the status of the credit note:
|
| Filter By | Select the option by which to filter the credit note you want to list:
|
| Sort Column | Select the option by which to sort the credit note by column:
|
| Search | Search the credit note you want to list by credit note number, customer name, or credit note reference number. |
| Limit | The maximum number of credit notes Boost.space Integrator should return during one scenario execution cycle. |
Gets details of an existing credit note.
| Connection | Establish a connection to your Zoho Invoice account. |
| Credit Note ID | Select the Credit Note ID whose details you want to retrieve. |
| Accept | Select the format in which you want to retrieve the details of the credit note:
|
Deletes an existing credit note.
| Connection | Establish a connection to your Zoho Invoice account. |
| Credit Note ID | Select the Credit Note ID you want to delete. |
Emails a credit note.
| Connection | Establish a connection to your Zoho Invoice account. |
| Credit Note ID | Select the Credit Note ID that you want to email. |
| To | Enter the email address to whom the credit note has to send. |
| Subject | Enter the subject of the email. |
| Body | Enter the message of the email. |
| CC | Enter the email address to be included in the CC. |
| Customer ID | Select the Customer ID for whom the credit note is raised. |
Refunds credit note amount.
| Connection | Establish a connection to your Zoho Invoice account. |
| Credit Note ID | Select the Credit Note ID that you want to refund. |
| Date | Select the date on which the credit note is raised. |
| Amount | Enter the amount to be refunded. |
| Refund Mode | Select the method of refund:
|
| Exchange Rate | Enter the foreign currency exchange rate applicable for the customer. |
| Description | Enter the details of the refund that you want to notify the customer. |
Triggers when an expense is created or updated.
| Connection | Establish a connection to your Zoho Invoice account. |
| Watch | Select which kind of expenses you want to watch for:
|
| Sort Column | Select the option by which column to sort the expenses:
|
| Filter By | Select the option to filter the expenses you want to watch:
|
| Limit | The maximum number of expenses Boost.space Integrator should return during one scenario execution cycle. |
Creates billable or non-billable expense.
| Connection | Establish a connection to your Zoho Invoice account. |
| Amount | Enter the amount of the expense. |
| Reference Number | Enter the reference number of the expense. |
| Account ID | Select an Account ID for the expense. |
| Date | Select the date of the expense. |
| Tax ID | Select the Tax ID applicable for the expense. |
| Tax Inclusive | Select Yes if the expense amount is including tax:
|
| Line Items | Add the line items of the expense:
|
| Billable | Select Yes if the expense amount is billable.
|
| Description | Enter the details of the expense. |
| Customer ID | Select the Customer ID of the expense. |
| Project ID | Select the Project ID of the associated customer. |
| Currency ID | Select the Currency ID of the customer. |
| Exchange Rate | Enter the foreign currency exchange rate applicable for the expense. |
| Mileage Type | Select the mileage expense type if the expense is for travel. |
| Start Reading | Enter the start reading of the odometer for creating the mileage expense. |
| End Reading | Enter the end reading of the odometer for creating the mileage expense. |
| Distance | Enter the distance travelled. |
| Mileage Rate | Enter the mileage rate applicable for the expense. |
| Mileage Unit | Select the unit of the distance travelled. For example, km, and mile. |
| Employee ID | Select the Employee ID of the employee submitting the expense. |
Update an existing expense.
| Connection | Establish a connection to your Zoho Invoice account. |
| Expense ID | Select the Expense ID you want to update. |
| Amount | Enter the amount of the expense. |
| Reference Number | Enter the reference number of the expense. |
| Account ID | Select an Account ID for the expense. |
| Date | Select the date of the expense. |
| Tax ID | Select the Tax ID applicable for the expense. |
| Tax Inclusive | Select Yes if the expense amount is including tax:
|
| Line Items | Add the line items of the expense:
|
| Billable | Select Yes if the expense amount is billable.
|
| Description | Enter the details of the expense. |
| Customer ID | Select the Customer ID of the expense. |
| Project ID | Select the Project ID of the associated customer. |
| Currency ID | Select the Currency ID of the customer. |
| Exchange Rate | Enter the foreign currency exchange rate applicable for the expense. |
| Mileage Type | Select the mileage expense type if the expense is for travel. |
| Distance | Enter the distance travelled. |
| Mileage Rate | Enter the mileage rate applicable for the expense. |
| Mileage Unit | Select the unit of the distance travelled. For example, km, and mile. |
| Start Reading | Enter the start reading of the odometer for creating the mileage expense. |
| End Reading | Enter the end reading of the odometer for creating the mileage expense. |
| Employee ID | Select the Employee ID of the employee submitting the expense. |
List all the expenses with pagination.
| Connection | Establish a connection to your Zoho Invoice account. |
| Filter | Select the option by which to search the expenses you want to list:
OR Enter the first few letters of any information about the expense to search. |
| Sort Column | Select the option by which column to sort the expenses:
|
| Filter By | Select the option by which to filter the expenses you want to list:
|
| Search Text | Search the credit note you want to list by expense number, customer name, or credit note reference number. |
| Limit | The maximum number of expenses Boost.space Integrator should return during one scenarioexecution cycle. |
Gets the detail of the expense.
| Connection | Establish a connection to your Zoho Invoice account. |
| Expense ID | Select the Expense ID whose details you want to retrieve. |
Deletes an existing expense.
| Connection | Establish a connection to your Zoho Invoice account. |
| Expense ID | Select the Expense ID you want to delete. |
List expense categories along with pagination.
| Connection | Establish a connection to your Zoho Invoice account. |
| Filter By | Select the option by which to filter the expense categories you want to list:
|
| Limit | The maximum number of expense categories Boost.space Integrator should return during one scenario execution cycle. |
Creates a new expense category.
| Connection | Establish a connection to your Zoho Invoice account. |
| Category Name | Enter the new expense category name. |
| Description | Enter the details of the expenses. |
Creates a new recurring expense.
| Connection | Establish a connection to your Zoho Invoice account. |
| Recurrence Name | Enter the recurrence expense name. |
| Account ID | Select the Account ID of the recurring expense. |
| Start Date | Select the start date of the recurrence expense. |
| End Date | Select the expiry date of the recurrence expense. |
| Recurrence Frequency | Enter the interval at which the recurring expense is generated:
|
| Line Items | Add the line items of the recurring expense:
|
| Description | Enter the details of the recurring expense. |
| Amount | Enter the amount of the recurring expense. |
| Tax ID | Select the Tax ID applicable for the recurring expense. |
| Tax Inclusive | Select Yes if the expense amount is including tax:
|
| Billable | Select Yes if the expense amount is billable:
|
| Customer ID | Select the Customer ID of the expense. |
| Project ID | Select the Project ID of the associated customer. |
| Currency ID | Select the Currency ID of the customer. |
| Exchange Rate | Enter the foreign currency exchange rate applicable for the expense. |
Updates an existing recurring expense.
| Connection | Establish a connection to your Zoho Invoice account. |
| Recurring Expense ID | Select the Recurring Expense ID you want to update. |
| Recurrence Name | Enter the recurrence expense name. |
| Account ID | Select the Account ID of the recurring expense. |
| Start Date | Select the start date of the recurrence expense. |
| End Date | Select the expiry date of the recurrence expense. |
| Recurrence Frequency | Enter the interval at which the recurring expense is generated:
|
| Line Items | Add the line items of the recurring expense:
|
| Description | Enter the details of the recurring expense. |
| Amount | Enter the amount of the recurring expense. |
| Tax ID | Select the Tax ID applicable for the recurring expense. |
| Tax Inclusive | Select Yes if the expense amount is including tax:
|
| Billable | Select Yes if the expense amount is billable:
|
| Customer ID | Select the Customer ID of the expense. |
| Currency ID | Select the Currency ID of the customer. |
| Exchange Rate | Enter the foreign currency exchange rate applicable for the expense. |
Lists all the expenses with pagination.
| Connection | Establish a connection to your Zoho Invoice account. |
| Filter | Select the option by which to search the recurring expenses you want to list:
OR Enter the first few letters of any information about the expense to search. |
| Status | Select the status of the recurring expense you want to list:
|
| Sort Column | Select the option by which column to sort the recurrence expenses:
|
| Filter By | Select the option by which to filter the recurring expenses you want to list:
|
| Search Text | Search the recurring expense by account name, description, customer name or vendor name. |
| Limit | The maximum number of recurring expenses Boost.space Integrator should return during one scenario execution cycle. |
Gets the details of the recurring expense.
| Connection | Establish a connection to your Zoho Invoice account. |
| Recurring Expense ID | Select the Recurring Expense ID whose details you want to retrieve. |
Deletes an existing recurring expense.
| Connection | Establish a connection to your Zoho Invoice account. |
| Recurring Expense ID | Select the Recurring Expense ID you want to delete. |
Triggers when a project is created.
| Connection | Establish a connection to your Zoho Invoice account. |
| Customer ID | Select the Customer ID whose projects you want to watch for. |
| Filter By | Select the option by which to filter the projects you want to watch:
|
| Sort Column | Select the option by which column to sort the projects:
|
| Limit | The maximum number of projects Boost.space Integrator should return during one scenario execution cycle. |
Creates a new project.
| Connection | Establish a connection to your Zoho Invoice account. |
| Project Name | Enter the new project name. |
| Customer ID | Select the Customer ID of the customer whose project you are creating. |
| Description | Enter the details of the project. |
| Billing Type | Select the billing method of the project:
|
| Budget Type | Select the budget type of the project:
|
| Tasks | Add the task items of the project:
|
| Users | Add the users to the project:
|
Updates details of a project.
| Connection | Establish a connection to your Zoho Invoice account. |
| Project ID | Select the Project ID you want to update. |
| Project Name | Enter the new project name. |
| Customer ID | Select the Customer ID of the customer whose project you are creating. |
| Description | Enter the details of the project. |
| Billing Type | Select the billing method of the project:
|
| Budget Type | Select the budget type of the project:
|
| Tasks | Add the task items of the project:
|
| Users | Add the users to the project:
|
List all projects with pagination.
| Connection | Establish a connection to your Zoho Invoice account. |
| Project ID | Select the Project ID whose details you want to list. |
| Customer ID | Select the Customer ID whose project details you want to list. |
| Filter By | Select the option by which to filter the projects you want to list:
|
| Sort Column | Select the option by which column to sort the projects:
|
Gets the details of a project.
| Connection | Establish a connection to your Zoho Invoice account. |
| Project ID | Select the Project ID whose details you want to retrieve. |
Deletes an existing project.
| Connection | Establish a connection to your Zoho Invoice account. |
| Project ID | Select the Project ID you want to delete. |
Marks project active or inactive.
| Connection | Establish a connection to your Zoho Invoice account. |
| Project ID | Select the Project ID you want to make changes to. |
| Select Active or Inactive | Select the action to apply to the projects:
|
Creates a new payment.
| Connection | Establish a connection to your Zoho Invoice account. |
| Customer ID | Select the Customer ID whose payment you want to create. |
| Invoices | Add the invoices associated with the payment:
|
| Payment Mode | Select the method of payment:
|
| Amount | Enter the amount of the payment. |
| Date on Payment Mode | Select the date on which the payment is made. |
| Reference Number | Enter the reference number generated for the payment. |
| Description | Enter the details of the payment. |
| Exchange Rate | Enter the foreign currency exchange rate applicable for the customer invoices and payment. |
| Bank Charges | Enter the bank charges if any are applicable for this payment. |
Updates an existing payment information.
| Connection | Establish a connection to your Zoho Invoice account. |
| Customer ID | Select the Customer ID whose payment you want to update. |
| Payment ID | Select the Payment ID you want to update. |
| Invoices | Add the invoices associated with the payment:
|
| Payment Mode | Select the method of payment:
|
| Amount | Enter the amount of the payment. |
| Date on Payment Made | Select the date on which payment is made. |
| Reference Number | Enter the reference number generated for the payment. |
| Description | Enter the details of the payment. |
| Exchange Rate | Enter the foreign currency exchange rate applicable for the customer. |
| Bank Charges | Enter the bank charges if any applicable for this payment. |
List all the payments made by your customer.
| Connection | Establish a connection to your Zoho Invoice account. |
| Filter | Select the option to search the payment you want to list:
OR Enter the first few letters of any information about the expense to search. |
| Date | Select the date on the payment you want to list. |
| Filter By | Select the option by which to filter the payment based on their status:
|
| Search Text | Search the payments you want to list by reference number, customer name, or payment description. |
| Limit | The maximum number of payments Boost.space Integratorshould return during one scenario execution cycle. |
Gets the details of an existing payment.
| Connection | Establish a connection to your Zoho Invoice account. |
| Payment ID | Select the Payment ID whose details you want to retrieve. |
Deletes an existing payment.
| Connection | Establish a connection to your Zoho Invoice account. |
| Payment ID | Select the payment ID of the payment to delete. |
List all the refunds pertaining to an existing customer payment.
| Connection | Establish a connection to your Zoho Invoice account. |
| Payment ID | Select the Payment ID whose refunds you want to list. |
| Limit | The maximum number of payment refunds Boost.space Integrator should return during one scenario execution cycle. |
Refund the excess amount paid by the customer.
| Connection | Establish a connection to your Zoho Invoice account. |
| Payment ID | Select the Payment ID of the payment you want to refund. |
| Date | Select the date of the payment. |
| Amount | Enter the amount to be refund. |
| Refund Mode | Select the method of refund:
|
| Reference Number | Enter the reference number generated for the payment. |
| Exchange Rate | Enter the foreign currency exchange rate applicable for the customer. |
| Description | Enter the details of refund. |
Creates a new price list.
| Connection | Establish a connection to your Zoho Invoice account. |
| Name | Enter the name of the price list. |
| Pricebook Type | Select the pricebook type for the price list:
|
| Increase | Select to increase the item prices by percentage. |
| Rounding Type | Select the option to round off the payment:
|
| Currency ID | Select the Currency ID applicable for this price list. |
| Pricebook Items | Add the pricebook items:
|
Updates an existing price list.
| Connection | Establish a connection to your Zoho Invoice account. |
| Pricebook ID | Select the Pricebook ID whose price list you want to update. |
| Name | Enter a new name of the price list. |
| Currency ID | Select the Currency ID applicable for this price list. |
| Pricebook Type | Select the pricebook type for the price list:
|
| Increase | Select Yes if you want to increase the price for the items in the price list:
|
| Rounding Type | Select the option to round off the payment:
|
Gets the list of all the price lists with pagination.
| Connection | Establish a connection to your Zoho Invoice account. |
| Limit | The maximum number of price lists Boost.space Integrator should return during one scenario execution cycle. |
Fetches the details of an existing price list.
| Connection | Establish a connection to your Zoho Invoice account. |
| Pricebook ID | Select the Pricebook ID of the price list item you want to retrieve. |
Deletes a price list.
| Connection | Establish a connection to your Zoho Invoice account. |
| Pricebook ID | Select the Pricebook ID of the price list you want to delete. |
Logs time entries.
| Connection | Establish a connection to your Zoho Invoice account. |
| Project ID | Select the project ID whose task time entries you want to log. |
| Task ID | Select the Task ID for which you want to log the time entry. |
| Log Date | Select the date on which the user spent working on the task. |
| Select Log Time or Begin & End Time | Select the action for the time entry to update:
Logs the time the user spent on the task.
Time the user started working on the task and the time user has stopped working on the task. |
| Billable | Select Yes if the time entry is billable:
|
| Notes | Enter the details of the work done. |
Updates logged time entry.
| Connection | Establish a connection to your Zoho Invoice account. |
| Project ID | Select the Project ID whose time entries you want to update. |
| Time Entry ID | Select the Time Entry ID you want to update. |
| Task ID | Select the Task ID of the task whose time entry you want to update. |
| User ID | Select the User ID assigned to the task whose time entry you want to update. |
| Select Log Time or Begin & End Time | Select the action for the time entry to update:
|
| Log Date | Logs the date the user spent working on the task. |
| Billable | Select Yes if the time entry is billable:
|
| Notes | Enter the details of the work done on the task. |
List all time entries with pagination.
| Connection | Establish a connection to your Zoho Invoice account. |
| Filter By | Select the kind of time entries you want to list:
|
| Project ID | Select the Project ID whose assigned user entries you want to list. |
| User ID | Select the User ID whose time entries you want to list. |
| Sort Column | Select the option to sort the time entries by columns:
|
| Limit | The maximum number of time entries Boost.space Integrator should return during one scenario execution cycle. |
Gets details of a time entry.
| Connection | Establish a connection to your Zoho Invoice account. |
| Time Entry ID | Select the Time Entry ID whose details you want to retrieve. |
Deletes a logged time entry.
| Connection | Establish a connection to your Zoho Invoice account. |
| Time Entry ID | Select the Time Entry ID you want to delete. |
Updates the details of an existing task.
| Connection | Establish a connection to your Zoho Invoice account. |
| Project ID | Select the Project ID whose task you want to update. |
| Task ID | Select the Task ID you want to update. |
| Task Name | Select a new task name. |
| Description | Enter the details of the task. |
| Rate | Enter the new rate of the task. |
| Budget Hours | Select the new budget hours allocated for the task. |
Deletes a task added to a project.
| Connection | Establish a connection to your Zoho Invoice account. |
| Project ID | Select the Project ID whose task you want to delete. |
| Task ID | Select the Task ID to you want to delete. |
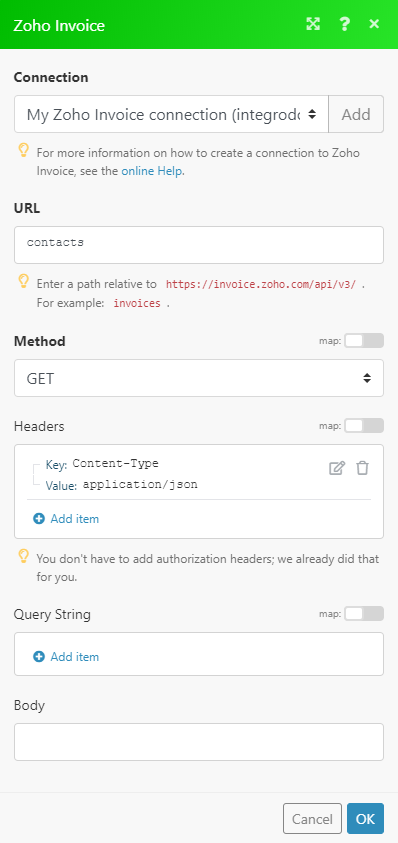
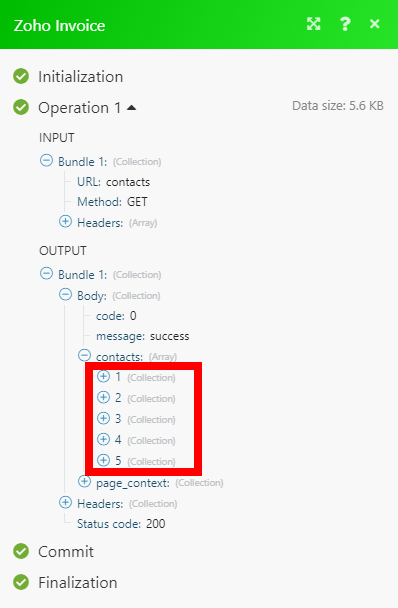
Allows you to perform a custom API call.
| Connection | Establish a connection to your Zoho Invoice account. |
| URL | Enter a path relative to https://invoice.zoho.com/api/v3/. E.g. contacts.
For the list of available endpoints, refer to the Zoho Invoice API Documentation. |
| Method | Select the HTTP method you want to use:
GET to retrieve information for an entry. POST to create a new entry. PUT to update/replace an existing entry. PATCH to make a partial entry update. DELETE to delete an entry. |
| Headers | Enter the desired request headers. You don’t have to add authorization headers; we already did that for you. |
| Query String | Enter the request query string. |
| Body | Enter the body content for your API call. |