The rocket.chat modules allow you to create, update, list, retrieve. and delete the channels, private groups, and messages in your rocket.chat account.
Prerequisites
-
A rocket.chat account
In order to use rocket.chat with Boost.space Integrator, it is necessary to have a rocket.chat account. If you do not have one, you can create a rocket .chat account at cloud.rocket.chat/trial.
![[Note]](https://docs.boost.space/wp-content/themes/bsdocs/docs-parser/HTML/css/image/note.png) |
Note |
|---|---|
|
The module dialog fields that are displayed in bold (in the Boost.space Integrator scenario, not in this documentation article) are mandatory! |
You can connect to rocket.chat using your username and password or with an auth code.
1. Go to Boost.space Integrator and open the rocket.chat module’s Create a connection dialog.
2. In the Connection name field, enter a name for the connection.
3. In the Workspace URL field, enter your rock.chat account’s URL address. For example, https://integrodev.rocket.chat.
4. Select the Auth Type to establish the connection:
-
Username and Password
-
Auth Code
5. In the Username and Password fields, enter your rocket.chat credentials.
6. In the Auth Code field, enter the authentication code details. This field is required if two-factor via OTP is enabled. If you have installed rocket.chat on the cloud then the link to obtain the code is https://open.rocket.chat/accounts/security. You have to login to your account. If you have installed rocket.chat on your server, then the link to obtain the code is https://<domain_name>.rocket.chat/accounts/security.
7. Click Continue.
The connection has been established.
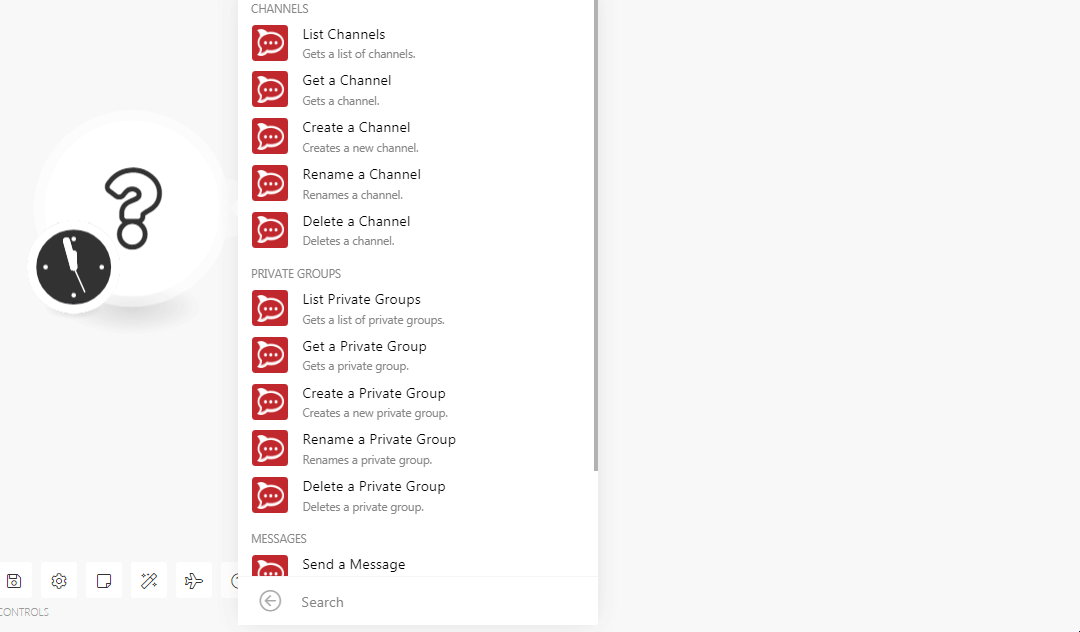
Get a list of channels.
|
Connection |
|
|
Limit |
Set the maximum number of channels Boost.space Integrator should return during one scenario execution cycle. |
Gets a channel.
|
Connection |
|
|
Identificator Type |
Select the option to choose the channel details:
|
|
Channel ID |
Select the Channel ID whose details you want to retrieve. |
|
Channel Name |
Select the channel whose details you want to retrieve. |
Creates a new channel.
|
Connection |
|
|
Channel Name |
Enter a name for the channel. |
|
Read Only |
Select whether the channel is read-only. The member can only view the messages but cannot send them. |
|
Members |
Add the members to the channels by entering their usernames. |
Renames a channel.
|
Connection |
|
|
Channel Name |
Enter a name for the channel. |
|
New Name |
Enter a new name for the channel. |
Deletes a channel.
|
Connection |
|
|
Identificator Type |
Select the option to choose the channel details:
|
|
Channel ID |
Select the Channel ID you want to delete. |
|
Channel Name |
Select the channel name you want to delete. |
Gets a list of private groups.
|
Connection |
|
|
Limit |
Set the maximum number of private groups Boost.space Integrator should return during one scenario execution cycle. |
Gets a private group.
|
Connection |
|
|
Identificator Type |
Select the option to choose the private group details:
|
|
Private Group ID |
Select the Private Group ID whose details you want to retrieve. |
|
Private Group Name |
Select the private group name whose details you want to retrieve. |
Creates a new private group.
|
Connection |
|
|
Group Name |
Enter a name for the group. |
|
Read Only |
Select whether the group is read-only. The member can only view the messages but cannot send them. |
|
Members |
Add the members to the channels by entering their usernames. |
Renames a private group.
|
Connection |
|
|
Group ID |
Select the Group ID whose name you want to update. |
|
New Name |
Enter a new name for the private group. |
Deletes a private group.
|
Connection |
|
|
Identificator Type |
Select the option to choose the private group details:
|
|
Private Group ID |
Select the Private Group ID you want to delete. |
|
Private Group Name |
Select the group name you want to delete. |
Post a new message to channel direct or a private group.
|
Connection |
|||||||||||||||||||||||||||||||||
|
Choose ID |
Select the option to send the messages:
|
||||||||||||||||||||||||||||||||
|
Message To |
Select the option to which you want to send the message:
|
||||||||||||||||||||||||||||||||
|
TM ID |
Enter the Message ID to create the thread. |
||||||||||||||||||||||||||||||||
|
Message Text |
Enter the message text which you want to send. |
||||||||||||||||||||||||||||||||
|
Alias |
Enter a message name to display when the message is received. |
||||||||||||||||||||||||||||||||
|
Emoji ID |
Enter the Emoji ID to display along with the message text. |
||||||||||||||||||||||||||||||||
|
Avatar |
Enter the URL address sender’s avatar in the message. |
||||||||||||||||||||||||||||||||
|
Attachments |
Add the attachments to the message:
|
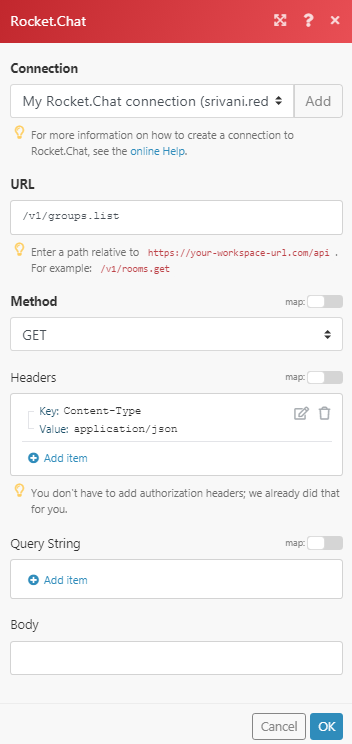
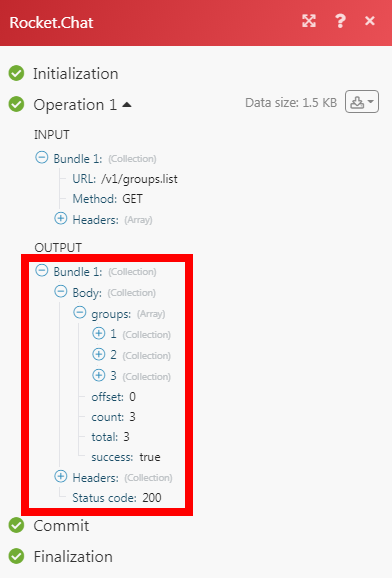
Performs an arbitrary authorized API call.
|
Connection |
||||
|
URL |
Enter a path relative to
|
|||
|
Method |
Select the HTTP method you want to use: GET to retrieve information for an entry. POST to create a new entry. PUT to update/replace an existing entry. PATCH to make a partial entry update. DELETE to delete an entry. |
|||
|
Headers |
Enter the desired request headers. You don’t have to add authorization headers; we already did that for you. |
|||
|
Query String |
Enter the request query string. |
|||
|
Body |
Enter the body content for your API call. |