Active with remarks
This application needs additional settings. Please follow the documentation below to create your own connection.

RudderStack

The RudderStack modules allow you to identify, track, and group users in your RudderStack account.

Getting Started with RudderStack

Prerequisites

  • A RudderStack account

In order to use RudderStack with Boost.space Integrator, you must have a RudderStack account. If you do not have one, you can create one at rudderstack.com.

[Note] Note

The module dialog fields that are displayed in bold (in the Boost.space Integrator scenario, not in this documentation article) are mandatory!

Connect RudderStack to Boost.space Integrator

  1. Log in to your RudderStack account.

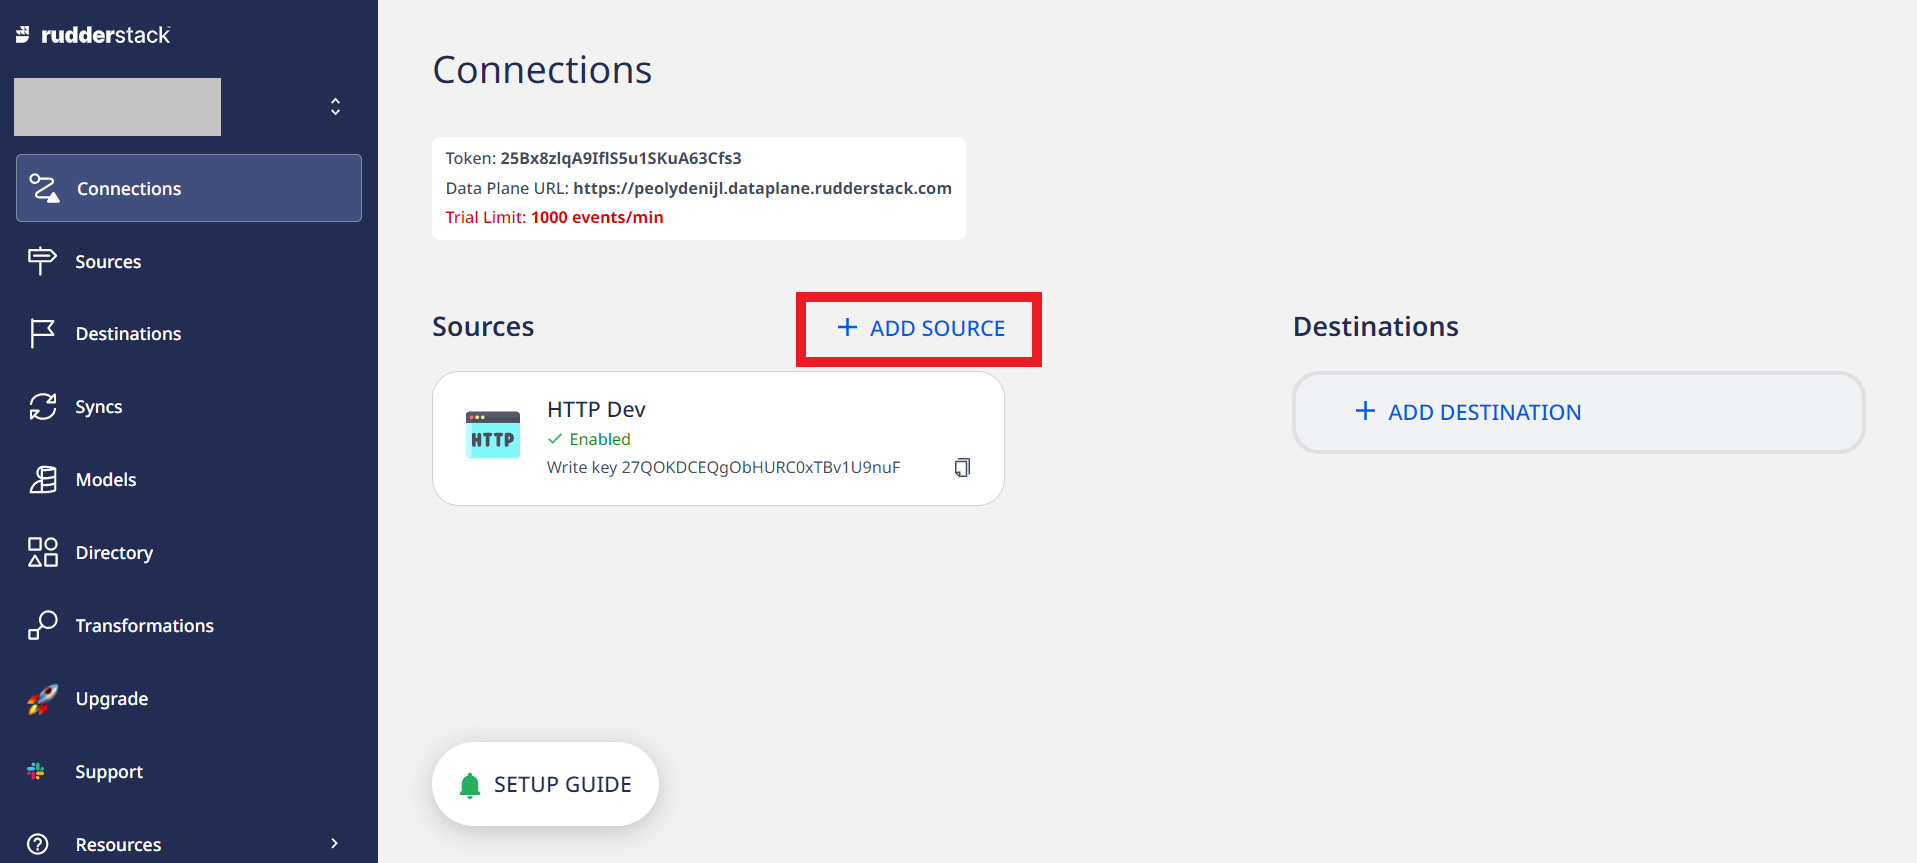
  2. Navigate to Connections, then click Add Source.

    rudderstack_1.png
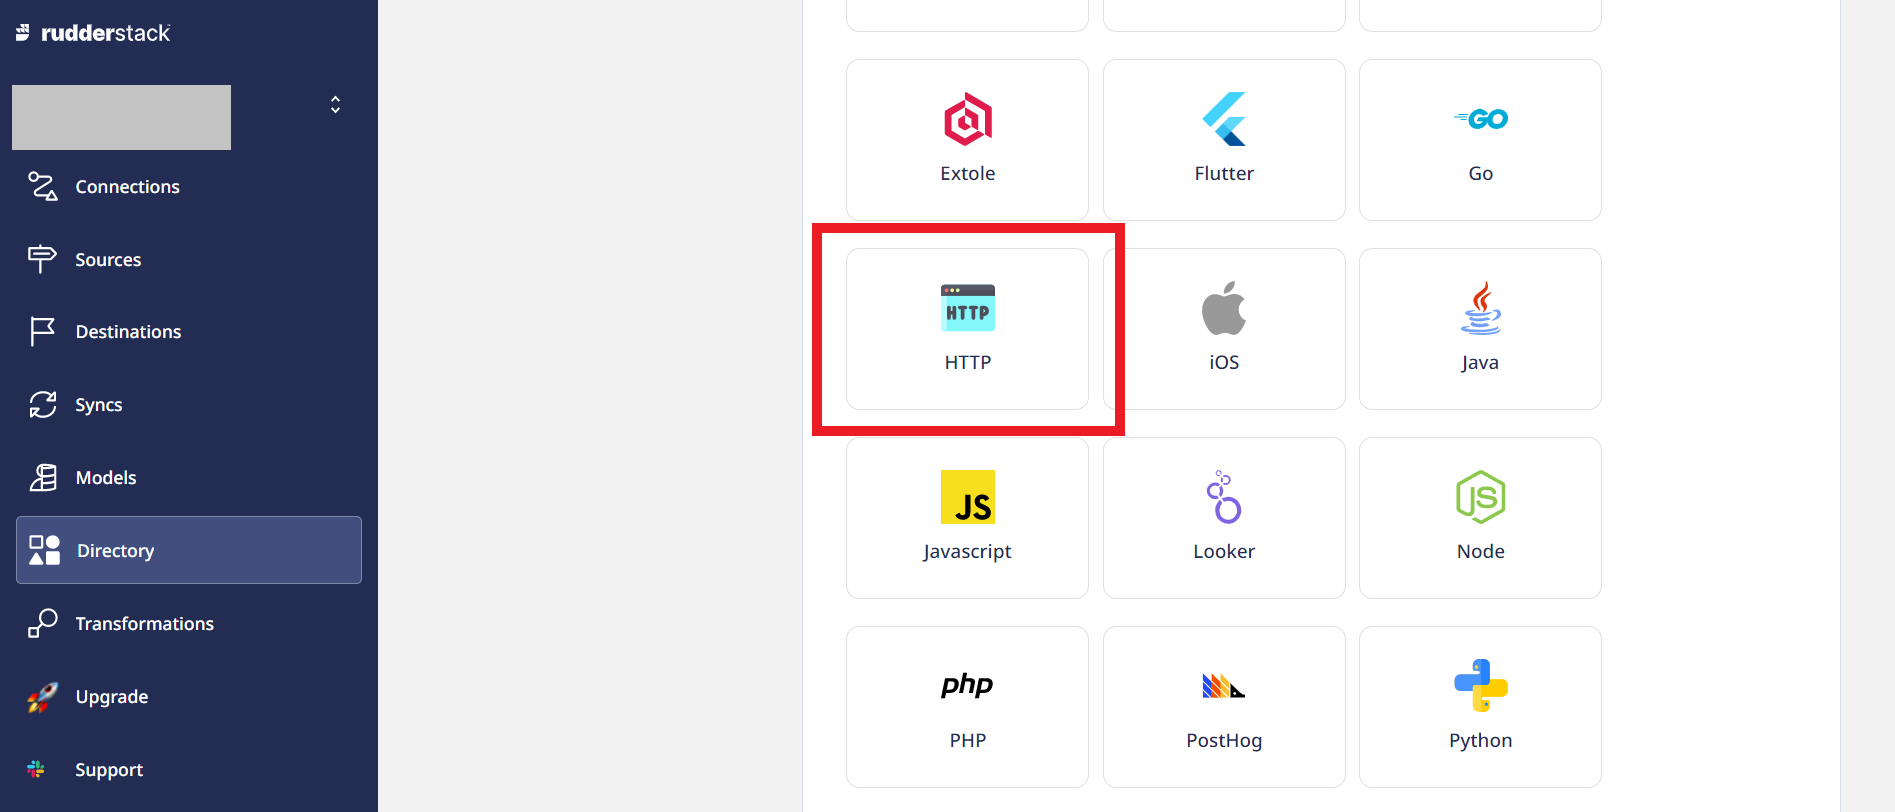
  3. Select HTTP from the list of sources.

    rudderstack_2.png
  4. Name your new source.

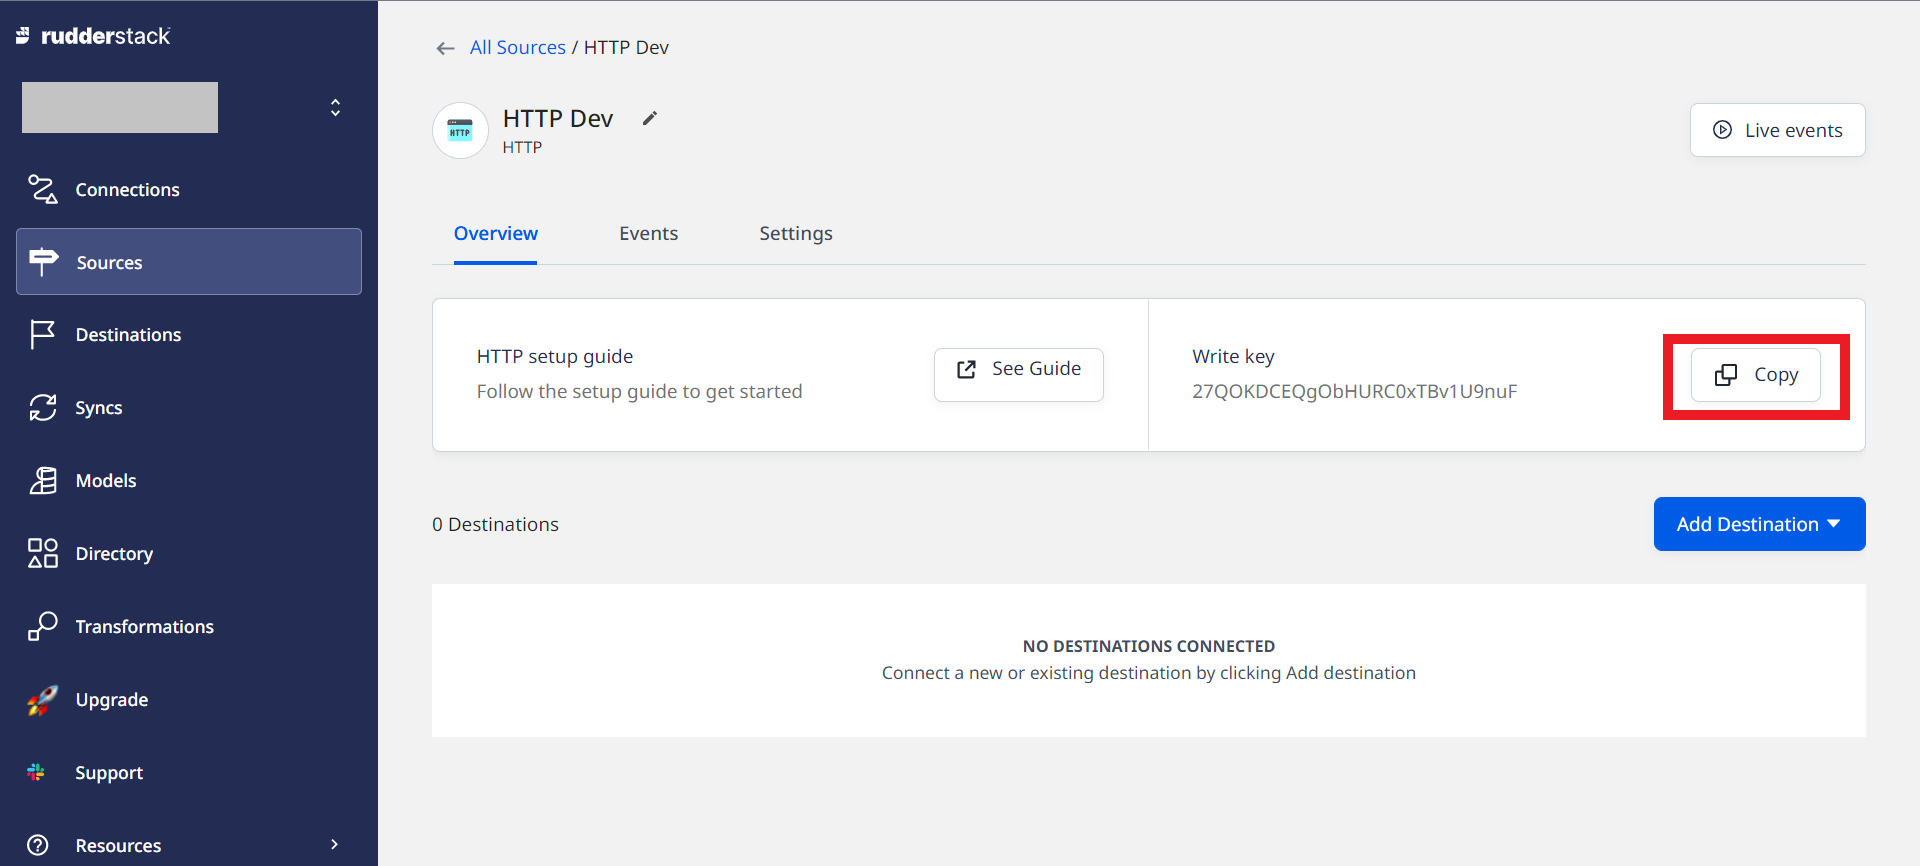
  5. Copy the source Write key to your clipboard.

    rudderstack_3.png
  6. Go back to Connections, and copy the Data Plane URL to your clipboard.

    rudderstack_4.png
  7. Go to Boost.space Integrator and choose the RudderStack module you want to use.

  8. Next to Connection, click Add.

  9. Name your connection, then enter the Data Plane URL and Source Write Key in their respective fields.

    rudderstack_5.png

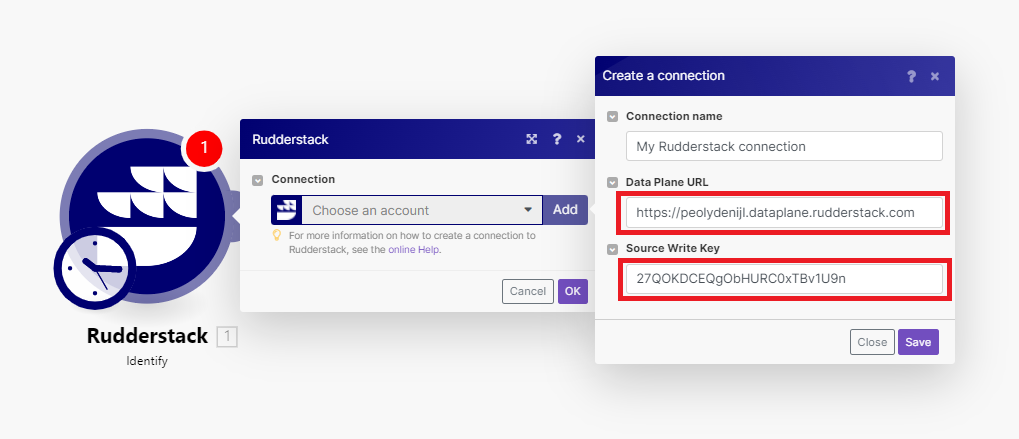
You have successfully established the connection.

Actions

Identify

Identifies a user.

Connection

Establish a connection to your RudderStack account.

User ID

Enter the id for a particular user in your database.

[Note] Note

Required, if Anonymous ID is not present.

Anonymous ID

Enter the user id for cases where there is no unique identifier for the user.

Timestamp

Enter the timestamp of the message’s arrival. See the list of supported date and time formats.

Traits

Add any additional traits of the user.

Address

Enter the user’s street address.

  • City

  • Country

  • Postal Code

  • State

  • Street

Age

Enter the user’s age.

Avatar

Enter the URL of the user’s avatar image.

Birthday

Enter the user’s date of birth. See list of supported date formats.

Company

Enter the user’s company details.

  • Name

  • Company ID

  • Employee Count

  • Industry

  • Plan

Created At

Enter the date of user’s account creation. See list of supported date formats.

Description

Enter the user’s description.

Email

Enter the user’s email address.

First Name

Enter the user’s first name.

Gender

Enter the user’s gender.

ID

Enter the user’s unique id.

Last Name

Enter the user’s last name.

Phone

Enter the user’s phone number.

Title

Enter the user’s title related to their position in their company.

Username

Enter the user’s username. This should be unique for every user.

Website

Enter the user’s website.

Custom Traits

Add any custom traits.

[Note] Note

The custom trait names should not match the trait names above.

Write Key

Enter the write key of the source. This will override the write key in the connection for this module.

Track

Records a user’s actions.

Connection

Establish a connection to your RudderStack account.

Event Name

Enter the name of the user action.

User ID

Enter the id for a particular user in your database.

[Note] Note

Required, if Anonymous ID is not present.

Anonymous ID

Enter an id for cases where there is no unique identifier for the user.

Timestamp

Enter the timestamp of the event. See the list of supported date and time formats.

Properties

Enter any additional properties associated with the event.

Currency

Enter the currency of the revenue as a result of the event, set in ISO 4127 format. If this is not set, the default value is USD.

Revenue

Enter the revenue amount as a result of an event. For example, a product worth $20.00 would be 20.00.

Value

Enter an abstract value associated with the event.

Custom Properties

Add any custom properties.

[Note] Note

The custom property names should not match the property names above.

Context

Select whether to activate any additional contextual fields. These fields give additional useful context about a particular event.

App

Enter information related to your app.

  • Name

  • Version

  • Build

Campaign

Enter information about your campaign.

  • Name

  • Source

  • Medium

  • Term

  • Content

Device

Enter information about the device from which you are capturing the event.

  • ID

  • Advertising ID

  • Manufacturer

  • Model

  • Name

  • Type

  • Version

IP

Enter the user’s IP address.

Library

Enter details about the RudderStack SDK you are using.

  • Name

  • Version

Locale

Enter the language of the device. For example, en-US.

Location

Enter the location.

  • City

  • Country

  • Latitude

  • Logitude

  • Region

  • Speed

Network

Enter information about the reachability of the device.

  • Bluetooth

  • Carrier

  • Cellular

  • WiFi

OS

Enter the operating system details of the device you are tracking.

  • Name

  • Version

Page

Enter any page information.

  • Path

  • Referrer

  • Search

  • Title

  • URL

Referrer

Enter any details about the referrer.

  • Type

  • Name

  • URL

  • Link

Screen

Enter the screen dimensions of the device.

  • Density

  • Height

  • Width

Timezone

Enter the timezone of the user you are tracking. For example, America/New_York.

Group or Account ID

Enter the group or account ID.

[Note] Note

This is useful in B2B use cases where you need to attribute your non-group calls to a company or account. It is relied on by several Customer Success and CRM tools.

Traits

Add any additional traits of the user.

Address

Enter the user’s street address.

  • City

  • Country

  • Postal Code

  • State

  • Street

Age

Enter the user’s age.

Avatar

Enter the URL of the user’s avatar image.

Birthday

Enter the user’s date of birth. See list of supported date formats.

Company

Enter the user’s company details.

  • Name

  • Company ID

  • Employee Count

  • Industry

  • Plan

Created At

Enter the date of user’s account creation. See list of supported date formats.

Description

Enter the user’s description.

Email

Enter the user’s email address.

First Name

Enter the user’s first name.

Gender

Enter the user’s gender.

ID

Enter the user’s unique id.

Last Name

Enter the user’s last name.

Phone

Enter the user’s phone number.

Title

Enter the user’s title related to their position in their company.

Username

Enter the user’s username. This should be unique for every user.

Website

Enter the user’s website.

User Agent

Enter the user agent of the device you are tracking.

Write Key

Enter the write key of the source. This will override the write key in the connection for this module.

Group

Associates an individual user with a group.

Connection

Establish a connection to your RudderStack account.

Group ID

Enter the id of the group, as present in your database.

User ID

Enter the id for a particular user in your database.

[Note] Note

Required, if Anonymous ID is not present.

Anonymous ID

Enter the user id for cases where there is no unique identifier for the user.

Timestamp

Enter the timestamp of the message’s arrival. See the list of supported date and time formats.

[Note] Note

If the event just happened, leave it out and we’ll use the server’s time. If you’re importing data from the past, make sure you to provide a timestamp.

Traits

Add any additional traits of the group.

Address

Enter the group’s street address.

  • City

  • Country

  • Postal Code

  • State

  • Street

Avatar

Enter the URL of the group’s avatar image.

Created At

Enter the date of the group’s account creation. See list of supported date formats.

Description

Enter the group’s description.

Email

Enter the group’s email address.

Employees

Enter the number of employees in the group. This is typically used for companies.

ID

Enter the group’s id.

Industry

Enter the name of the industry that the group is a part of.

Name

Enter the group’s name.

Phone

Enter the phone number associated with the group.

Plan

Enter the plan that the group is subscribed to.

Website

Enter the group’s website.

Custom Traits

Add any custom traits.

[Note] Note

The custom trait names should not match the trait names above.

Write Key

Enter the write key of the source. This will override the write key in the connection for this module.