
| Active with remarks |
|---|
| This application needs additional settings. Please follow the documentation below to create your own connection. |
![[Important]](https://docs.boost.space/wp-content/themes/bsdocs/docs-parser/HTML/css/image/important.png)
With the Gmail modules in Boost.space Integrator, you can watch, move, send, copy, delete emails, create draft emails, mark emails as read, unread, modify email labels, and iterate attachments.
To get started with the Gmail app, create an account at accounts.google.com.
Connecting to Google services
To connect to Gmail, you need to create your own Google app. Once created, you will receive your Client ID and Secret. These serve as your login credentials to create the integration. Use our step-by-step guide below to create your app.
Step-by-step guide
By following this tutorial you will be able to create your Gmail connection.
NOTE! – In the field “authorised domains” type: boost.space and celonis.com
NOTE! – In the field “Authorised redirect URLs” type: https://integrator.boost.space/oauth/cb/google and https://integrator.boost.space/oauth/cb/google-restricted
| Connection | Establish a connection to your Google account. |
| Folder | Select the email folder you want to watch. |
| Filter type | Select the Simple filter option to filter emails by selecting Criteria,or the Gmail filter option to filter emails by entering Query. |
| Query | Use Gmail search syntax. For example, to search for messages in theSocial category that include an attachment, use category:social has:attachment. For more information, visit the Search operators you can use with the Gmail page.
If you want to search messages that include an icon of a specific color, please use the following for your search query (specifically what comes after the colon):
|
| Mark email message(s) as read when fetched | Select whether or not you want to mark retrieved emails as read. |
| Maximum number of results | Set the maximum number of results that Boost.space Integrator will work with during one cycle. |
| Connection | Connecting Gmail to Boost.space Integrator |
| To | Enter the email address of the recipient(s) using the Add recipient button. |
| Subject | Enter the email subject. |
| Content | Enter the email content (message body). HTML tags are allowed. |
| Attachments | Add an attachment using the Add an attachment button. You can map a file from the previous modules. Set Content-ID (e.g., ii_jrc3r9mw1) if you want to attach inline images (embedded into content). You can put anything here, for example, “ii_jrc3r9mw1.” This allows you to create an ID for the attachment, which you can then use in HTML like this: <img src="cid:ii_jrc3r9mw1"> More information about working with files. |
| Copy recipients | Add the copy recipient(s). (CC:) |
| Blind copy recipients | Add the blind copy recipient(s). (BCC:) |
| Connection | Connecting Gmail to Boost.space Integrator |
| Folder | Select the Gmail folder you want to create a draft. |
| To | Enter the email address of the recipient(s) using the Add recipient button. |
| Subject | Enter the email subject. |
| Content | Enter the email content (message body). HTML tags are allowed. |
| Attachments | Add an attachment using the Add an attachment button. You can map a file from the previous modules. More information about working with files. |
| Copy recipients | Add the copy recipient(s). (CC:) |
| Blind copy recipients | Add the blind copy recipient(s). (BCC:) |
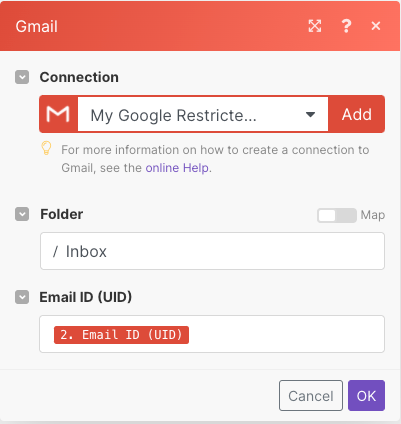
| Connection | Connecting Gmail to Boost.space Integrator |
| Folder | Select the Gmail folder that contains the email. |
| Email ID (UID) | Enter or map the Email ID. |
| Connection | Connecting Gmail to Boost.space Integrator |
| Folder | Select the Gmail folder that contains the email. |
| Email ID (UID) | Enter or map the Email ID of the email you want to mark as unread. |
| Connection | Connecting Gmail to Boost.space Integrator |
| Folder | Select the Gmail source folder that contains the email you want to move. |
| Destination folder | Select the Gmail target folder you want to move the email to. |
| Email ID (UID) | Enter or map the Email ID of the email you want to move. |
| Connection | Connecting Gmail to Boost.space Integrator |
| Folder | Select the Gmail source folder that contains the email you want to copy. |
| Destination folder | Select the Gmail target folder you want to copy the email to. |
| Email ID (UID) | Enter or map the Email ID of the email you want to move. |
| Connection | Connecting Gmail to Boost.space Integrator |
| Gmail Message ID | Enter or map the Email ID of the email you want to delete. |
| Permanently | Permanently removes the message instead of moving it to the trash folder. |
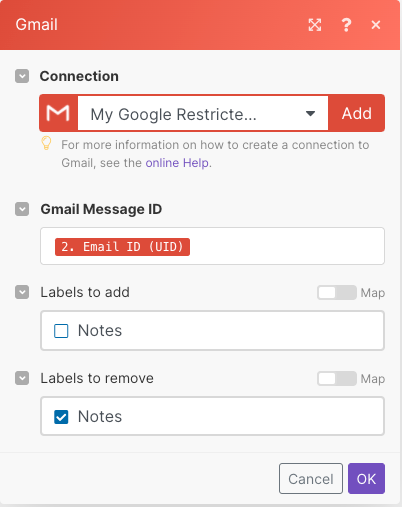
| Connection | Connecting Gmail to Boost.space Integrator |
| Gmail Message ID | Enter or map the Email ID of the email you want to delete. |
| Labels to add | Select the label you want to add to the selected email message. |
| Labels to remove | Select the label you want to remove from the selected email message. |
Label to add and Label to remove fields load only user-created labels.
For more information on Iterators, see Iterator.
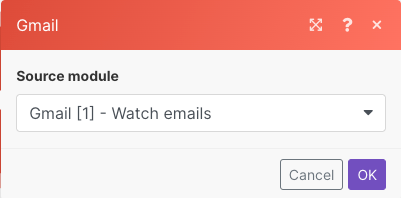
| Source module | Select the module you want to iterate attachments from. You can further process attachments using Dropbox>Upload a file, for example. |
To insert your default signature and company logo into Gmail’s Send an email module:
1. First, you will need to use the Watch emails module to retrieve an email that contains your signature and logo. Then, copy the HTML content from the output bundle as shown below:
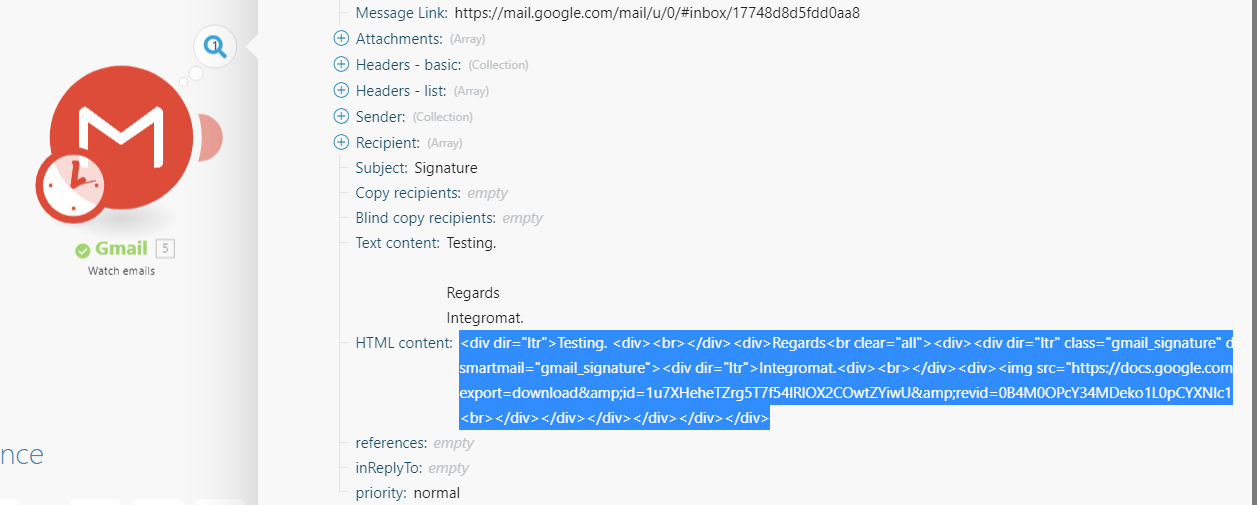
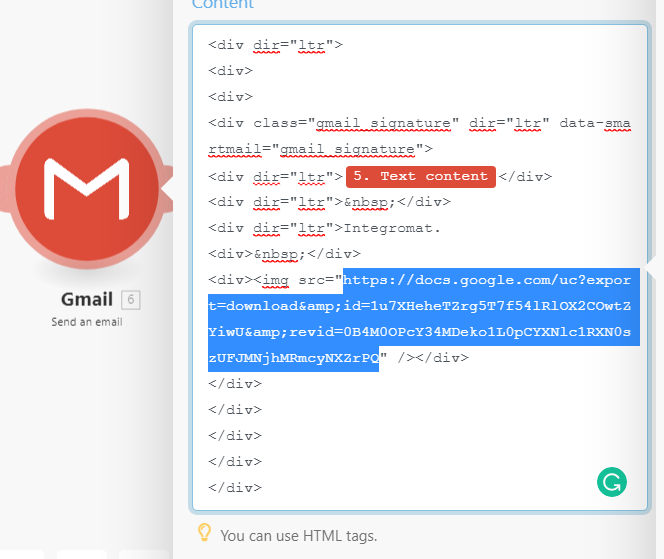
2. Then, in the body field of the Send an email module, copy and paste the HTML content, or edit until you are left with a similar HTML code:
<div dir="ltr"> <div> <div> <div class="gmail_signature" dir="ltr" data-smartmail="gmail_signature"> <div dir="ltr">{{5.text}}</div> <div dir="ltr"> </div> <div dir="ltr">Boost.space Integrator. <div> </div> <div><img src="https://docs.google.com/uc?export=download&id=1u7XHeheTZrg5T7f54lRlOX2COwtZYiwU&revid=0B4M0OPcY34MDeko1L0pCYXNlc1RXN0szUFJMNjhMRmcyNXZrPQ" /></div> </div> </div> </div> </div> </div>
3. After you have adjusted the code, proceed to map the text content in the body field from the relevant elements in the appropriate HTML field.
Your connection has expired and is no longer valid. You need to reauthorize the connection.
This error affects non-Google Workspace accounts. For more details please refer to the Google OAuth documentation.
Due to Google’s updated security policy, unpublished apps can only have a 7-day authorization period. After the OAuth security token expires, the connection is no longer authorized and any module relying on it will fail.
Solution
Option 1:
To avoid weekly reauthorization, you can update the publishing status of your project.
If you update your project to the In production status, you will not be required to reauthorize the connection weekly.
Change the status of your project by following these steps:
- Log in to the Google Cloud console.
- Navigate to the Oauth consent screen.
- Click the Publish app button next to your app.
- If you see the notice Needs verification, you can choose whether to go through the Google verification process for the app or to connect to your unverified app. Currently connecting to unverified apps works in Boost.space Integrator, but we cannot guarantee the Google will allow connections to unverified apps for an indefinite period.
For more information regarding publishing statuses, refer to the Publishing status section of Google’s Setting up your OAuth consent screen help and our Community page.
Option 2
If you keep your project in the Testing status, you will be required to reauthorize your connection in Boost.space Integrator every week.
Reauthorize your Google connection by following these steps:
- Log in to Boost.space Integrator.
- Go to Connections.
- Find your Google connection and click Reauthorize button.