
| Active |
|---|
| This application does not need additional settings. So you can make connection only by using your login credentials or by following the instructions below . |
The Blogger modules allow you to watch, create, delete, revert, update, and publish the posts in your Blogger account.
Prerequisites
-
A Google account
In order to use Blogger with Boost.space Integrator, it is necessary to have a Blogger account. You can login to Blogger using your Google account, you can create a google account at google.com.
![[Caution]](https://docs.boost.space/wp-content/themes/bsdocs/docs-parser/HTML/css/image/caution.png) |
Caution |
|---|---|
|
The module dialog fields that are displayed in bold (in the Boost.space Integrator scenario, not in this documentation article) are mandatory! |
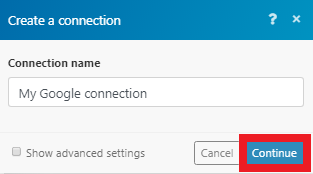
1. Go to Boost.space Integrator and open the Blogger module’s Create a Connectiondialog.

2. In the Connection name field, enter a name for the connection and click Continue.
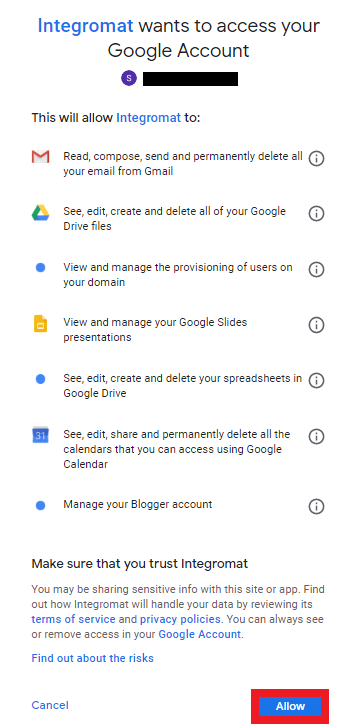
3. Select the account to login and confirm the dialog by clicking Allow.
The connection has been established.
Triggers when a new post is added or an existing post is updated.
|
Connection |
|
|
Blog |
Select the blog where you want to create the post. |
|
Status |
Select the status of the post:
|
|
Limit |
Enter the maximum number of posts Boost.space Integrator should return during one scenario execution cycle. |
Creates and publishes a new post or creates a new post as a draft.
|
Connection |
|
|
Blog |
Select the blog where you want to create the post. |
|
Title |
Enter a name for the post. |
|
Content |
Enter the post content. |
|
Status |
Select the status of the post:
|
|
Date Published |
Enter the date and time when this post was published. |
|
Labels |
Enter the labels when the post was published. |
|
Name |
Enter the name for the post to geotag with a location. |
|
Latitude |
Enter the latitude of the location. |
|
Longitude |
Enter the longitude of the location. |
|
Span |
Enter the span details for the location’s viewport. |
Permanently removes a post (the deleted post cannot be restored anymore).
|
Connection |
|
|
Blog |
Select the blog where you want to create the post. |
|
Post ID |
Enter the Post ID you want to delete. |
Publishes a draft post.
|
Connection |
|
|
Blog |
Select the blog where you want to create the post. |
|
Post ID |
Enter the Post ID you want to publish. |
Reverts a published post to draft state.
|
Connection |
|
|
Blog |
Select the blog where you want to create the post. |
|
Post ID |
Enter the Post ID you want to revert. |
Updates a published post.
|
Connection |
|
|
Blog |
Select the blog where you want to create the post. |
|
Post ID |
Enter the Post ID you want to update. |
|
Title |
Enter a name for the post. |
|
Content |
Enter the post content. |
|
Status |
Select the status of the post:
|
|
Date Published |
Enter the date and time when this post was published. |
|
Labels |
Enter the labels when the post was published. |
|
Name |
Enter the name for the post to geotag with a location. |
|
Latitude |
Enter the latitude of the location. |
|
Longitude |
Enter the longitude of the location. |
|
Span |
Enter the span details for the location’s viewport. |
The Update a post action does not allow to edit a draft (a post that’s in progress). You can only update published posts.
The Blogger interface enables to download posts only assigned to one specific status. Blogger distinguishes three post statuses:
-
Post in progress (draft status)
-
Published post (live status)
-
Scheduled post (scheduled status)
If you’d like to monitor posts in more statuses, you’ll need to create a separate scenario for each status.