The Beaconstac modules allow you to monitor, create, update, and retrieve the QR codes in your Beaconstac account.
Prerequisites
-
A Beaconstac account – create an account at beaconstac.com/.
![[Note]](https://docs.boost.space/wp-content/themes/bsdocs/docs-parser/HTML/css/image/note.png) |
Note |
|---|---|
|
The module dialog fields that are displayed in bold (in the Boost.space Integrator scenario, not in this documentation article) are mandatory! |
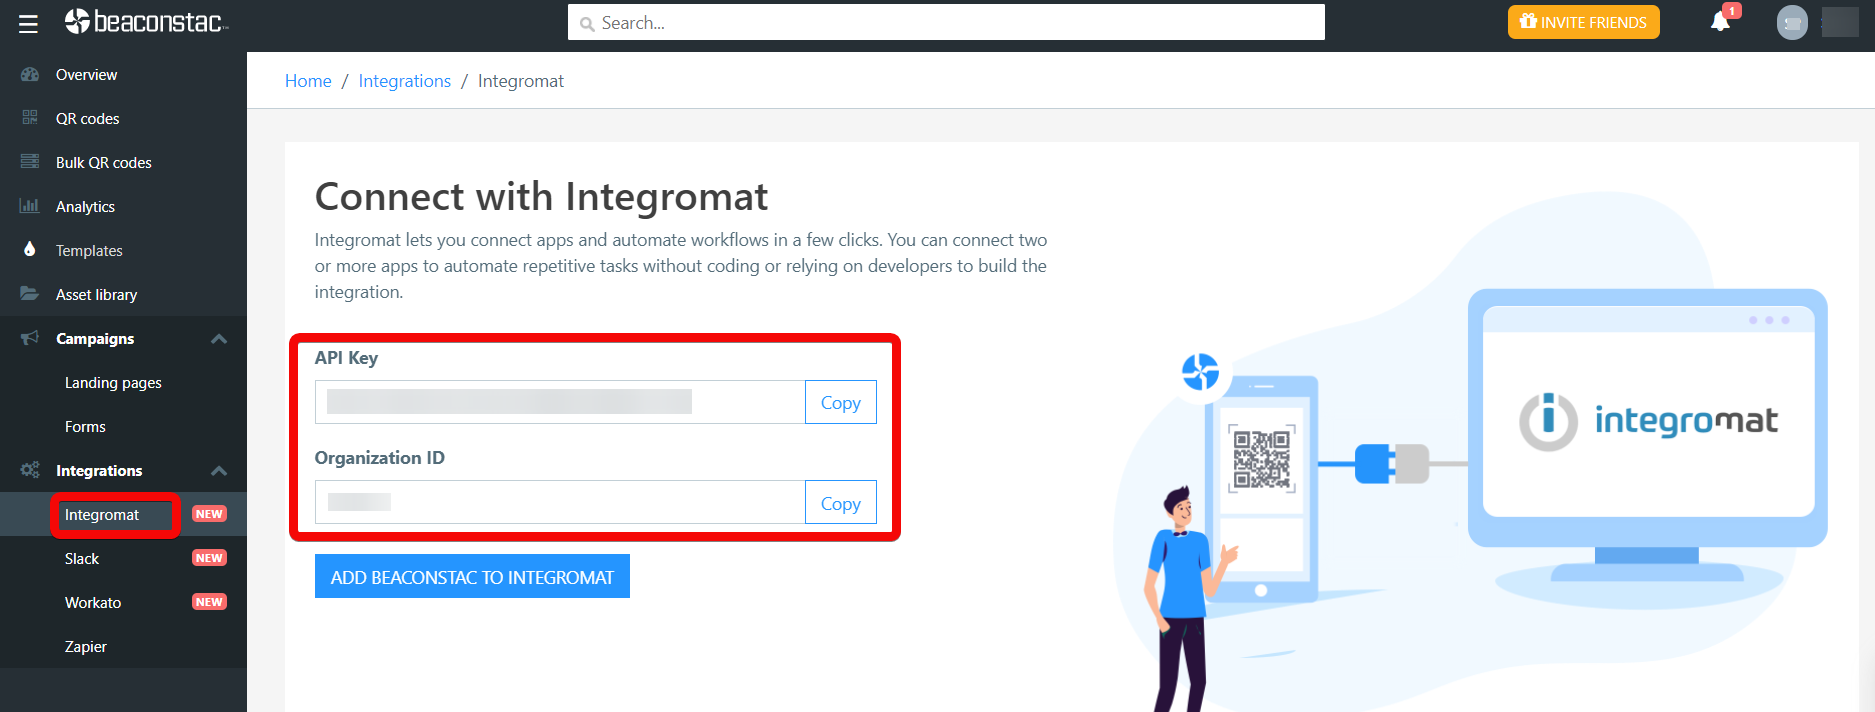
To connect your Beaconstac account to Boost.space Integrator you need to obtain the API Key, and Organization ID from your Beaconstac account and insert it in the Create a connection dialog in the Boost.space Integrator module.
1. Log in to the Beaconstac account.
2. From the left menu, click Integrations and copy the API key and Organization ID to your clipboard.

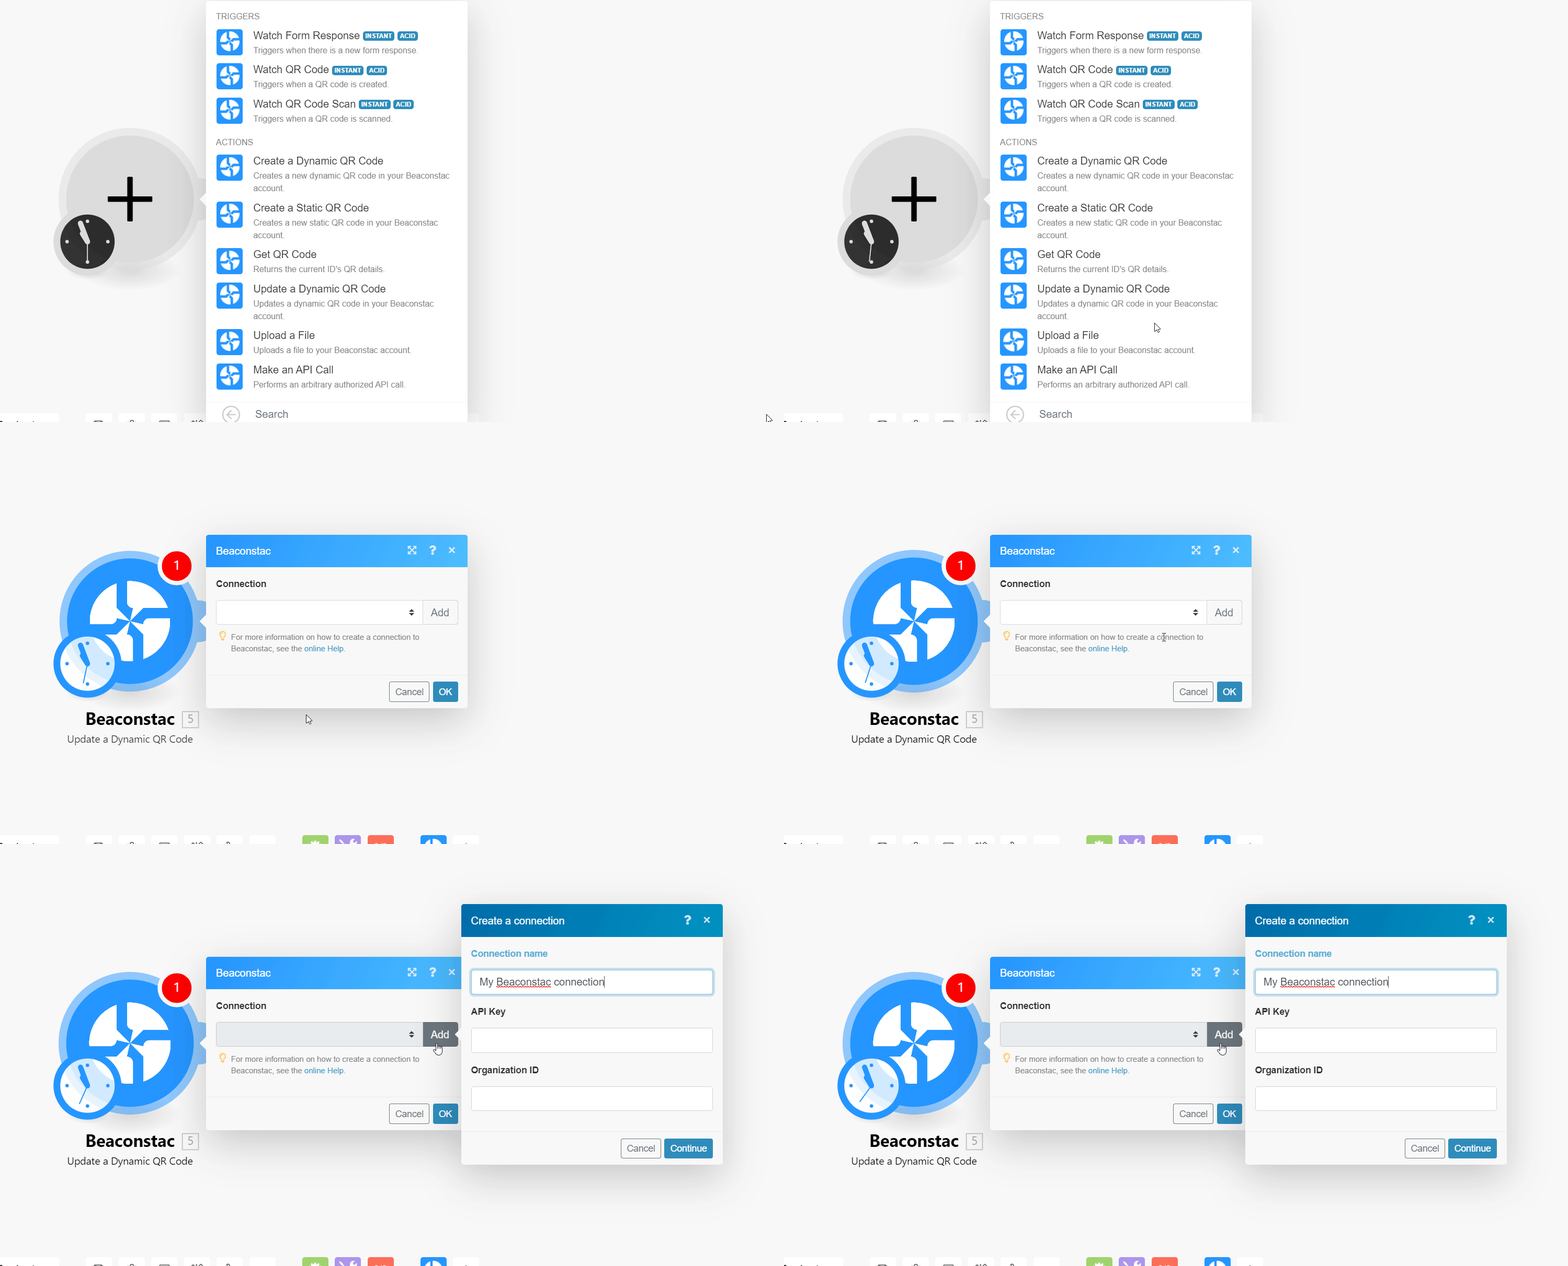
3. Log in to your Boost.space Integrator account, and add a module from the Beaconstac app into an Boost.space Integrator scenario.
4. Click Add next to the Connection field.

5. In the Connection name field, enter a name for the connection.
6. In the API Key and Organization ID fields, enter the values copied in step 2 in the respective fields, and click Continue.
The connection has been established.
Triggers when there is a new form response.
![[Note]](https://docs.boost.space/wp-content/themes/bsdocs/docs-parser/HTML/css/image/note.png) |
Note |
|---|---|
|
Boost.space Integrator automatically creates a webhook in Beconstac once you add an instant trigger to your scenario. |
|
Webhook Name |
Enter a name for the webhook. |
|
Connection |
|
|
Select From |
Select or map the form whose responses you want to watch. |
Triggers when a QR code is created.
![[Note]](https://docs.boost.space/wp-content/themes/bsdocs/docs-parser/HTML/css/image/note.png) |
Note |
|---|---|
|
Boost.space Integrator automatically creates a webhook in Beconstac once you add an instant trigger to your scenario. |
|
Webhook Name |
Enter a name for the webhook. |
|
Connection |
Creates a new dynamic QR code in your Beaconstac account.
|
Connection |
|
|
QR Name |
Enter (map) a QR name. |
|
Campaign Type |
Select or map the Campaign Type:
|
|
Fallback URL |
Enter (map) the app’s fallback URL address. |
|
Android URL |
Enter (map) the app’s Android URL address to access it from an Android device. |
|
iPhone URL |
Enter (map) the app’s iPhone URL address to access it from an iPhone device. |
|
iPad URL |
Enter (map) the app’s iPad URL address to access it from an iPad device. |
|
Select Form |
Select or map the form for which you want to create the QR code. |
|
Select Page |
Select or map the landing page for which you want to create the QR code. |
|
Enter PDF URL |
Enter (map) the PDF URL address for which you want to create the QR code. |
|
Website URL |
Enter (map) the website URL address for which you want to create the QR code. |
|
Location |
Select the checkbox to provide the location of the QR code. |
|
Design |
Select or map the option to choose the design for QR code:
|
|
Select Templates |
Select or map the template you want to apply for the QR code. |
|
Color |
Select or map the color you want to apply for the QR code. |
|
Margin |
Enter (map) the margin you want to apply for the QR code. Enter a value between 1 and 100. |
|
Background Image URL |
Enter (map) the background image URL address for the QR code. |
|
Logo Image URL |
Enter (map) the logo image URL address for the QR code. |
|
Google Analytics Code |
Enter (map) the Google Analytics code for the QR code. |
|
Google Conversion ID |
Enter (map) the Google Conversion ID for the QR code. |
|
Facebook Pixel ID |
Enter (map) the Facebook Pixel ID for the QR code. |
|
Organization |
Enter (map) the organization applicable for the QR code. |
|
Tags |
Enter (map) the tags for the QR code separated by a comma. |
|
Start Date |
Enter (map) the start date of the QR code. |
|
End Date |
Enter (map) the end date of the QR code. |
|
Age Gate |
Enter (map) the age date details for the QR code. |
Creates a new static QR code in your Beaconstac account.
|
Connection |
|
|
QR Name |
Enter (map) a QR name. |
|
Campaign Type |
Select or map the Campaign Type:
|
|
Fallback URL |
Enter (map) the app’s fallback URL address. |
|
Android URL |
Enter (map) the app’s Android URL address to access it from an Android device. |
|
iPhone URL |
Enter (map) the app’s iPhone URL address to access it from an iPhone device. |
|
iPad URL |
Enter (map) the app’s iPad URL address to access it from an iPad device. |
|
Select Form |
Select or map the form for which you want to create the QR code. |
|
Select Page |
Select or map the landing page for which you want to create the QR code. |
|
Enter PDF URL |
Enter (map) the PDF URL address for which you want to create the QR code. |
|
Website URL |
Enter (map) the website URL address for which you want to create the QR code. |
|
Location |
Select the checkbox to provide the location of the QR code. |
|
Design |
Select or map the option to choose the design for QR code:
|
|
Select Templates |
Select or map the template you want to apply for the QR code. |
|
Color |
Select or map the color you want to apply for the QR code. |
|
Margin |
Enter (map) the margin you want to apply for the QR code. Enter a value between 1 and 100. |
|
Background Image URL |
Enter (map) the background image URL address for the QR code. |
|
Logo Image URL |
Enter (map) the logo image URL address for the QR code. |
|
Google Analytics Code |
Enter (map) the Google Analytics code for the QR code. |
|
Google Conversion ID |
Enter (map) the Google Conversion ID for the QR code. |
|
Facebook Pixel ID |
Enter (map) the Facebook Pixel ID for the QR code. |
|
Organization |
Enter (map) the organization applicable for the QR code. |
|
Tags |
Enter (map) the tags for the QR code separated by a comma. |
|
Start Date |
Enter (map) the start date of the QR code. |
Returns the current ID’s QR code.
|
Connection |
|
|
QR Code ID |
Enter (map) a QR Code ID whose details you want to retrieve. |
Updates a dynamic QR code in your Beaconstac account.
|
Connection |
|
|
QR Name |
Enter (map) a QR name. |
|
QR Code ID |
Enter (map) the QR Code ID whose details you want to update. |
|
Campaign Type |
Select or map the Campaign Type:
|
|
Fallback URL |
Enter (map) the app’s fallback URL address. |
|
Android URL |
Enter (map) the app’s Android URL address to access it from an Android device. |
|
iPhone URL |
Enter (map) the app’s iPhone URL address to access it from an iPhone device. |
|
iPad URL |
Enter (map) the app’s iPad URL address to access it from an iPad device. |
|
Select Form |
Select or map the form for which you want to create the QR code. |
|
Select Page |
Select or map the landing page for which you want to create the QR code. |
|
Enter PDF URL |
Enter (map) the PDF URL address for which you want to create the QR code. |
|
Website URL |
Enter (map) the website URL address for which you want to create the QR code. |
|
Location |
Select the checkbox to provide the location of the QR code. |
|
Design |
Select or map the option to choose the design for QR code:
|
|
Select Templates |
Select or map the template you want to apply for the QR code. |
|
Color |
Select or map the color you want to apply for the QR code. |
|
Margin |
Enter (map) the margin you want to apply for the QR code. Enter a value between 1 and 100. |
|
Background Image URL |
Enter (map) the background image URL address for the QR code. |
|
Logo Image URL |
Enter (map) the logo image URL address for the QR code. |
|
Google Analytics Code |
Enter (map) the Google Analytics code for the QR code. |
|
Google Conversion ID |
Enter (map) the Google Conversion ID for the QR code. |
|
Facebook Pixel ID |
Enter (map) the Facebook Pixel ID for the QR code. |
|
Organization |
Enter (map) the organization applicable for the QR code. |
|
Tags |
Enter (map) the tags for the QR code separated by a comma. |
|
Start Date |
Enter (map) the start date of the QR code. |
|
End Date |
Enter (map) the end date of the QR code. |
|
Age Gate |
Enter (map) the age date details for the QR code. |
Uploads a file to your Beaconstac account.
|
Connection |
|
|
Type File URL |
Enter (map) the URL address of the file you want to upload. |
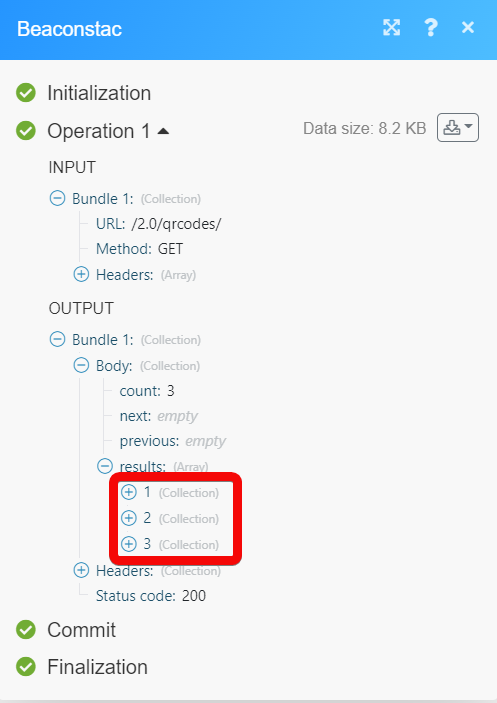
Performs an arbitrary authorized API call.
|
Connection |
|
|
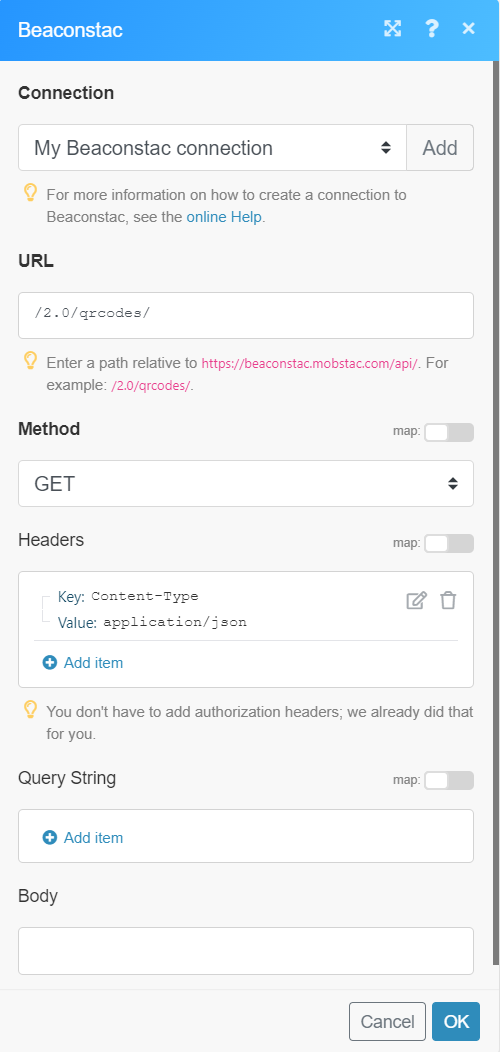
URL |
Enter a path relative to For the list of available endpoints, refer to the Beaconstac API Documentation. |
|
Method |
Select the HTTP method you want to use:
|
|
Headers |
Enter the desired request headers. You don’t have to add authorization headers; we already did that for you. |
|
Query String |
Enter the request query string. |
|
Body |
Enter the body content for your API call. |

