To use any of the modules, you need to connect your SendGrid account to Boost.space Integrator. If you do not have a SendGrid account yet, you can create one at SendGrid.com
To connect your SendGrid account to Boost.space Integrator, follow the general instructions for connecting to any web service. When creating a scenario, you will be asked to provide an API Key. To get your API Key, log in to your SendGrid account and follow the instructions below.
1. Go to Settings in the menu on the left, and open the API Keys dialog.
2. Click on the Create API Key button in the top-right corner.
3. Create the API Key with Full Access permissions.
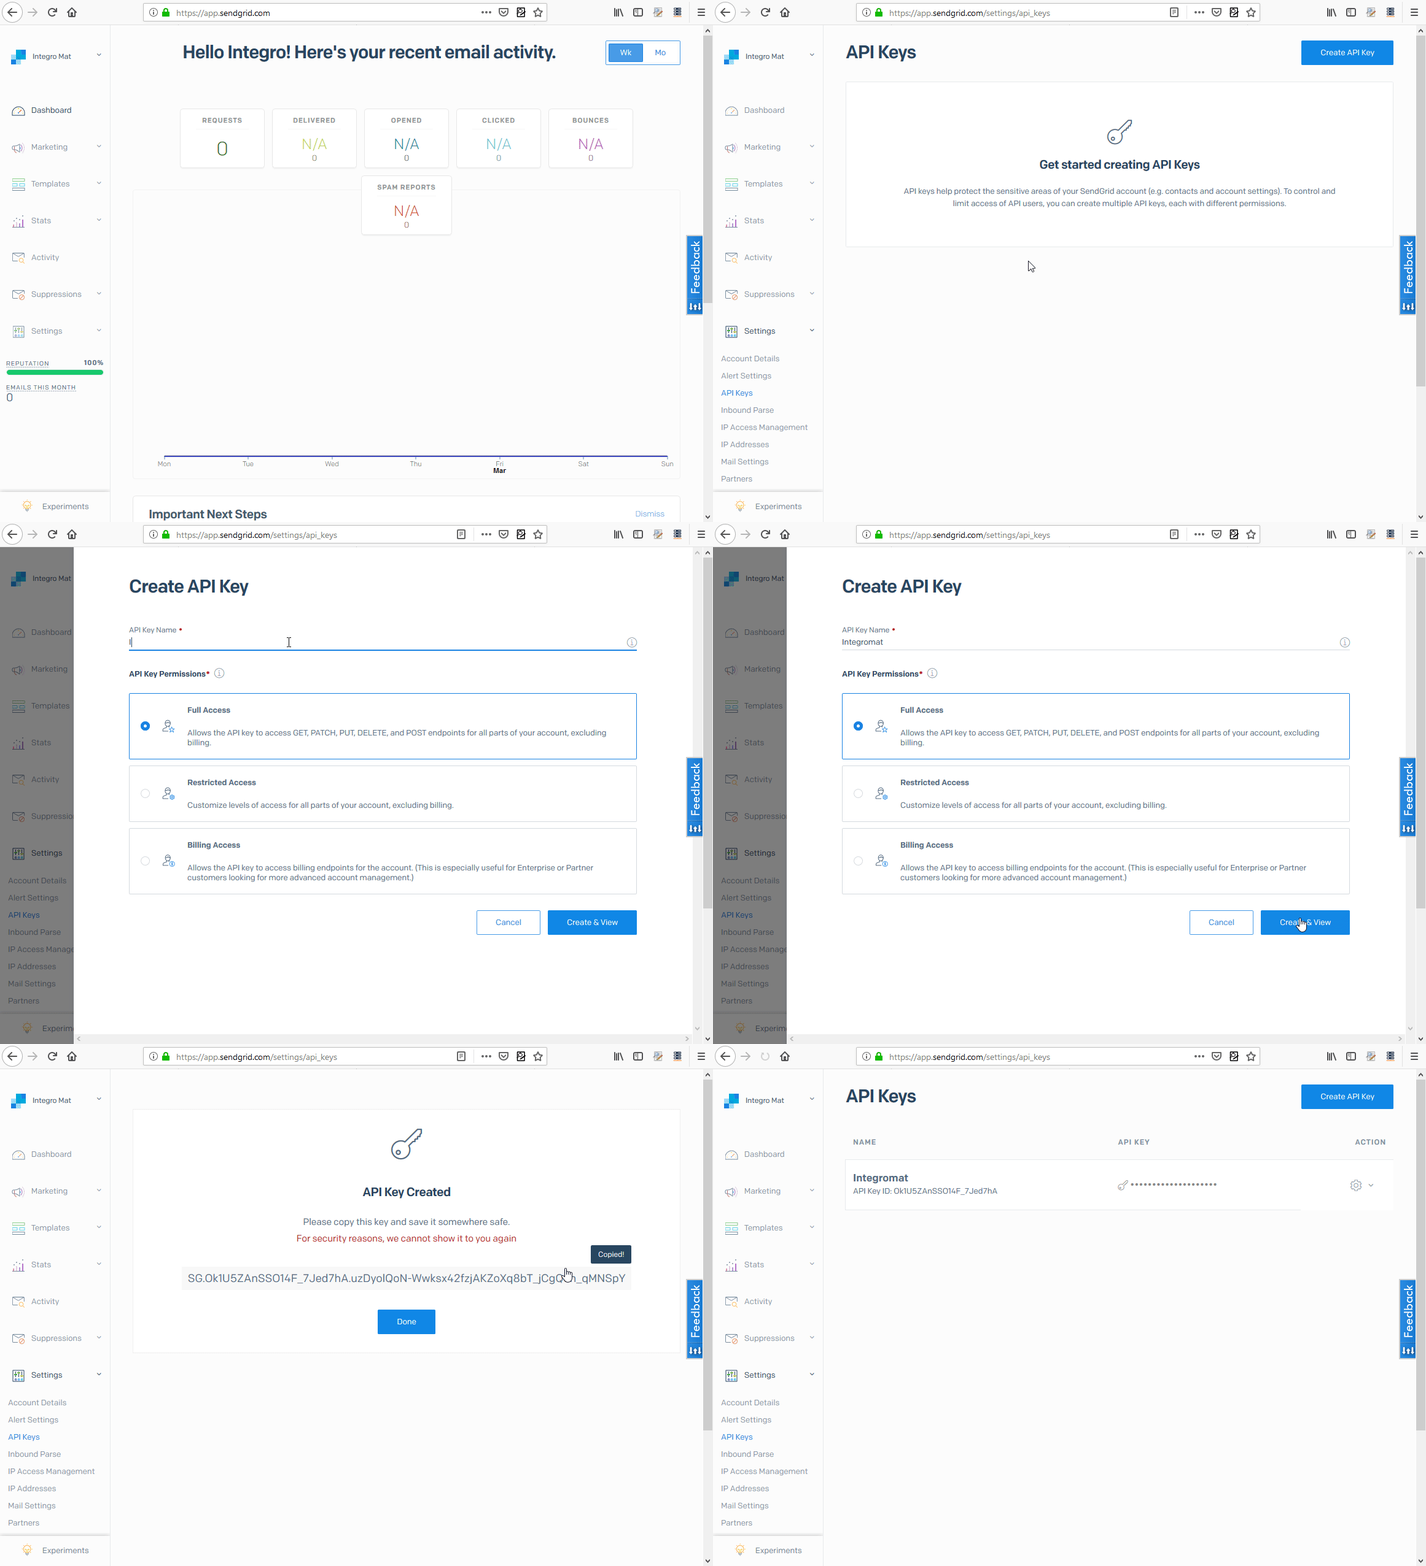
4. Copy the API Key to the clipboard and save it somewhere else.
5. Paste the API Key to the API Key field in the Create a connection dialog of the desired module and click the Continue button.
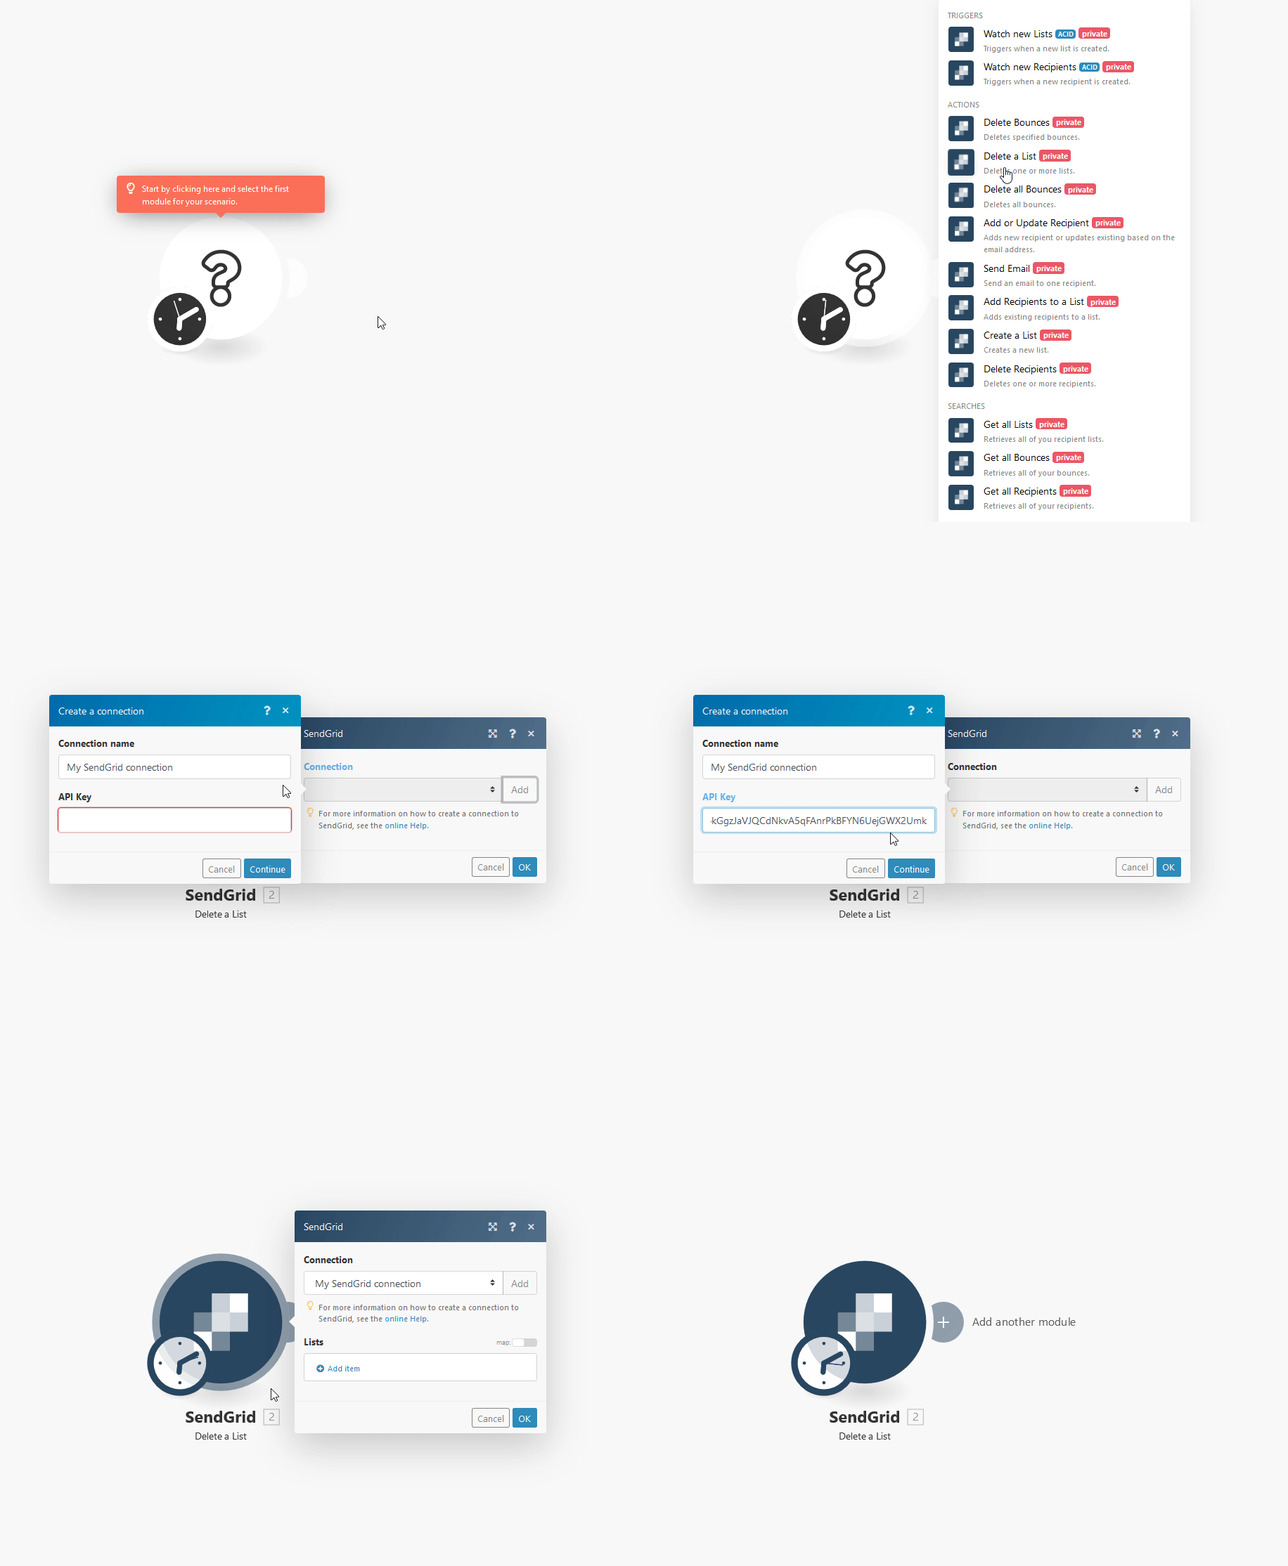
6. The connection is now established. You can continue creating your scenario.
Returns contact details when a new contact is created or an existing contact is updated.
|
Connection |
|
|
Watch |
Create + Update Triggers when a contact is created or update. Create Triggers when a contact is created. |
|
Limit |
Set the maximum number of contacts Boost.space Integrator will return during one execution cycle. |
Creates a new contact list.
|
Connection |
|
|
Name |
Enter the name for your new list. |
This module adds or updates a contact.
|
Connection |
||||
|
List |
Select the lists you want to add the contact to. |
|||
|
Email address |
Enter the email address of the new contact or the contact you want to update.
|
|||
|
First name |
Enter the new/updated recipient’s first name. |
|||
|
Last name |
Enter the new/updated recipient’s last name. |
|||
|
Alternate Emails |
Add at most 5 additional email addresses. |
|||
|
Address Line 1 |
Enter the first lines of the address. |
|||
|
Address Line 2 |
Enter the second, optional, line of the address. |
|||
|
City |
Enter the city of the contact. |
|||
|
State Province Region |
Enter the state, province, or region of the contact’s address. |
|||
|
Postal code |
Enter the postal code, Eircode, PIN code or ZIP code of the contact’s address. |
|||
|
Country |
Enter the country of the contacts address. It can be full name or abbreviation. |
|||
|
Phone number |
Enter the contact’s phone number. |
|||
|
|
Enter a Whatsapp account of the contact. |
|||
|
Line |
Enter the landline phone number. |
|||
|
|
Enter the contact’s Facebook address. |
|||
|
Unique Name |
Enter the unique name for the contact. |
|||
|
Contact ID |
Enter or select the contact whose email you want to update. |
The module retrieves all of your contact lists.
|
Connection |
|
|
Number of lists |
Set the number of returned contact lists. |
Retrieves all of your marketing campaigns’ contacts.
|
Connection |
|
|
Number of contacts to return |
Set the number of returned contacts. |
Deletes the list and optionally also deletes contacts associated with the list.
|
Connection |
|
|
List ID |
Map or select the list you want to delete. |
|
Delete Contacts |
Enable this option to also delete the contacts that are in the list you want to delete. |
Deletes specified contacts or all contacts at once.
|
Connection |
|
|
Delete all or Specific contacts |
Select whether you want to specify the contact(s) to be deleted or delete all contacts. |
|
Contact IDs |
Add (and map) IDs of contacts you want to delete. |
|
Delete All Contacts |
Enable this option to delete all contacts. |
Removes contacts from the specified list. It does not delete the contact.
|
Connection |
|
|
List ID |
Map or select the list you want to remove the contact(s) from. |
|
Contact IDs |
Add the IDs of contacts you want to remove from the list. |
![[Note]](https://docs.boost.space/wp-content/themes/bsdocs/docs-parser/HTML/css/image/note.png) |
Note |
|---|---|
|
Legacy modules are for users, who started to use these SendGrid modules before July 2019. Legacy modules do not work for new users as they don’t have the required scopes within the API key. |
When a new list is created, the List ID, Name, and Recipient Count are returned.
|
Connection |
|
|
Limit |
Set the maximum number of lists Boost.space Integrator will work with during one execution cycle. |
Retrieves contact details when a new contact is created in the selected list.
|
Connection |
|
|
List ID |
Select the list you want to watch for new recipients. |
|
Limit |
Set the maximum number of lists Boost.space Integrator will work with during one execution cycle. |
This module allows you to create a list for your contacts.
|
Connection |
|
|
Name |
Enter the name for your new list. |
This module adds or updates a Marketing Campaign’scontact.
The rate limit is three requests every 2 seconds. You can upload 1000 contacts per request. So the maximum upload rate is 1500 recipients per second.
|
Connection |
|
|
Email address |
Enter the email address of the new contact or the contact you want to update. If the contact with the entered email address is found, it will be updated. |
|
First name |
Enter the new/updated recipient’s first name. |
|
Last name |
Enter the new/updated recipient’s last name. |
Adds a contact to a list.
|
Connection |
|
|
List ID |
Enter (select from the drop-down menu or map) the ID of the list you want to add the contact to. The List ID can be retrieved, for example, using the Get All Lists search module. |
|
Recipients |
Add (select from the drop-down menu or map) the contacts you want to add to the list. The Recipient ID can be retrieved, for example, using the Get All Recipients search module. |
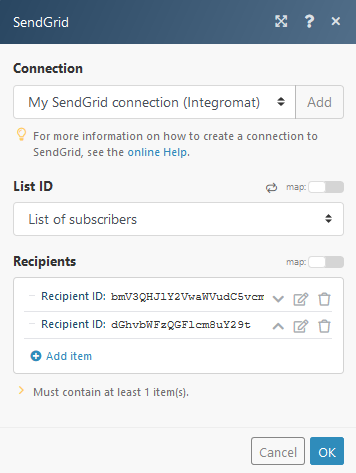
The module retrieves all of your contact lists.
|
Connection |
|
|
Number of lists |
Set the number of returned contact lists. |
Retrieves all of your marketing campaigns’ contacts.
|
Connection |
|
|
List ID |
Select the list you want to retrieve recipients from. |
|
Number of recipients |
Set the number of returned contacts. |
Deletes a contact list.
|
Connection |
|
|
Lists |
Add the IDs of the list(s) you want to delete. The List ID can be retrieved, for example, using the Get All Lists search module. |
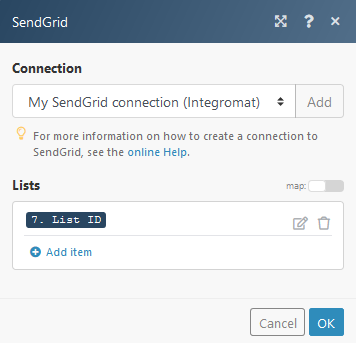
This module allows you to delete one or more recipients.
|
Connection |
|
|
Recipients |
Select the recipient you want to delete. |
Deletes recipient from a selected list.
|
Connection |
|
|
List ID |
Select the list you want to delete the recipient from. |
|
Recipient ID |
Select the recipient or enter (map) the ID of the recipient you want to delete from the list. |
|
Connection |
|
|
Start time |
Set the start of the time range when a bounce was created (inclusive). |
|
End time |
Set the end of the time range when a bounce was created (inclusive). |
|
Number of bounces |
Set the number of returned bounces. |
Removes a specific email address from your bounce list.
A bounced email is when the message is undeliverable and then returned to the server that sent it.
|
Connection |
|
|
Emails |
Add the emails you want to remove from the Bounceslist. |
Deletes all email addresses from the bounce list.
There are several causes for blocked emails, for example: your mail server IP address is on an ISP block list or blocked by an ISP, or if the receiving server flags the message content.
Retrieves all email addresses that are currently on your block list.
|
Connection |
|
|
Start Time |
Enter the start date and time of the range when a blocked email was created (inclusive). |
|
End Time |
Enter the end date and time of the range when a blocked email was created (inclusive). |
|
Number of blocked emails to return |
Set the maximum number of email addresses Boost.space Integrator will return during one execution cycle. |
Retrieves block details.
|
Connection |
|
|
Email address |
Enter the blocked email address you want to retrieve details about. |
Removes all or specified emails from the block list.
|
Connection |
|
|
Delete All or Specific |
Select whether you want to delete all or specific emails. If the Delete Specific Emails option is selected, specify email addresses you want to delete in the Email address field below. |
Returns all globally suppressed email addresses.
|
Connection |
|
|
Start Time |
Enter the start date and time of the range when a suppressed email was created (inclusive). |
|
End Time |
Enter the end date and time of the range when a suppressed email was created (inclusive). |
|
Number of emails to return |
Set the maximum number of email addresses Boost.space Integrator will return during one execution cycle. |
Checks whether a specified email belongs to global suppressions.
|
Connection |
|
|
|
Enter the email you want to check. |
Adds email addresses to the global suppressions.
|
Connection |
|
|
Recipient Emails |
Enter the emails you want to add to global unsubscribes. |
Removes an email from global suppressions.
|
Connection |
|
|
|
Enter the email you want to delete from global unsubscribes. |
|
Connection |
|
|
From |
Email Address Enter the email address of the sender. Name Enter the name of the sender. |
|
Send to |
Add recipient email addresses. The maximum number of email addresses is 1000. |
|
Use SendGrid Transactional template? |
Select whether you want to use the SendGrid template or not. If you select Yes,the Template IDmust be provided. You can retrieve the Template ID via SendGrid – Templates – Transactional. 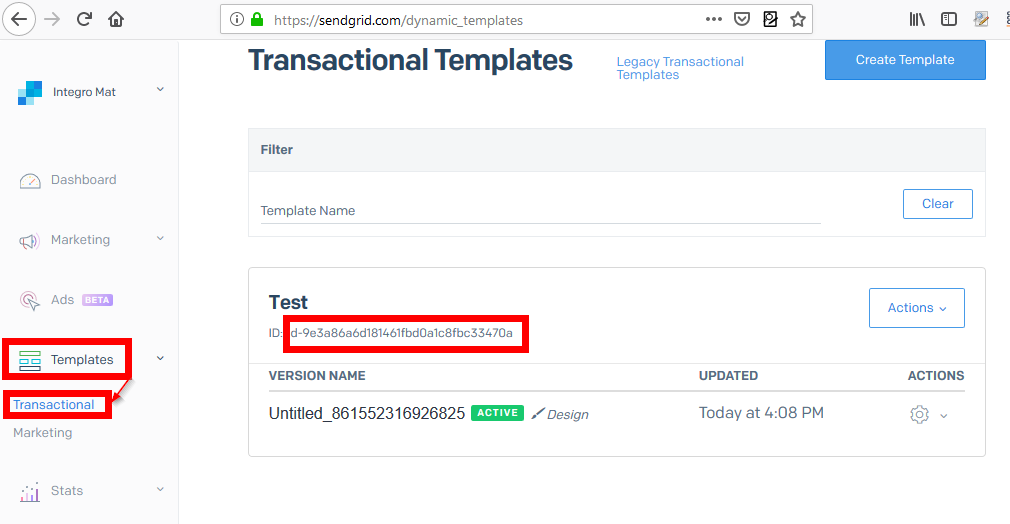 |
|
Map JSON or fill Keys and Values |
Enables you to enter data in the template dynamically. Select whether you want to specify data using JSON or by entering Key and Value pairs. |
|
Dynamic Template Data |
Enter JSON or define key and value pairs. For more information about specifying dynamic template data please refer to the Using Handlebars documentation. |
|
Subject |
Enter the subject for the email. |
|
Content type |
Select the MIME type of the email content. |
|
Content |
Enter the content of the email you want to send. |
|
Attachments |
Add the file(s) you want to attach. For inline images enter the Content ID. |
|
Send at |
Enter the time and date when the email should be sent. Scheduling more than 72 hours in advance is not allowed. |
|
Copy recipient |
Enter the copy recipient(s). CC – carbon copy. The maximum is 999 recipients. |
|
Blind copy recipient |
Enter the blind copy recipient(s). BCC – blind carbon copy. The maximum is 999 recipients. |
|
Reply To |
Enter the email address and name that will be used for the email reply. |
|
Headers |
Add custom headers if needed. |
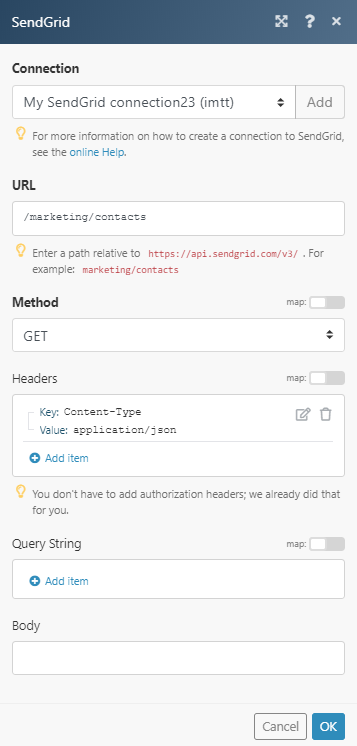
Allows you to perform a custom API call.
|
Connection |
||||
|
URL |
Enter a path relative to
|
|||
|
Method |
Select the HTTP method you want to use:
|
|||
|
Headers |
Enter the desired request headers. You don’t have to add authorization headers; we already did that for you. |
|||
|
Query String |
Enter the request query string. |
|||
|
Body |
Enter the body content for your API call. |
![[Important]](https://docs.boost.space/wp-content/themes/bsdocs/docs-parser/HTML/css/image/important.png)
![[Caution]](https://docs.boost.space/wp-content/themes/bsdocs/docs-parser/HTML/css/image/caution.png)
