| Active with remarks |
|---|
| This application needs additional settings. Please follow the documentation below to create your own connectionUnique, active service acces point to a network. There are different types of connections (API key, Oauth…).. |
The Kartra modulesThe module is an application or tool within the Boost.space system. The entire system is built on this concept of modularity. (module - Contacts) allow you to create, add, remove, retrieve and list the leads, sequence, tags, subscriptions, and events in your Kartra account.
Prerequisites
-
A Kartra account
In order to use Kartra with Boost.spaceCentralization and synchronization platform, where you can organize and manage your data. IntegratorPart of the Boost.space system, where you can create your connections and automate your processes., it is necessary to have a Kartra account. If you do not have one, you can create a Kartra account at home.kartra.com/home.
![[Note]](https://docs.boost.space/wp-content/themes/bsdocs/docs-parser/HTML/css/image/note.png) |
Note |
|---|---|
|
The moduleThe module is an application or tool within the Boost.space system. The entire system is built on this concept of modularity. (module - Contacts) dialog fields that are displayed in bold (in the Boost.space Integrator scenarioA specific connection between applications in which data can be transferred. Two types of scenarios: active/inactive., not in this documentation article) are mandatory! |
To connect your Kartra account to Boost.space Integrator you need to obtain the API Key from your Kartra account and insert it in the Create a connection dialog in the Boost.space Integrator module.
-
Login to your Kartra account.
-
Click My Integrations > API > My API. Copy the API key and API password to a notepad or safe place
-
Go toBoost.space Integrator and open the Kartra module’s Create a connection dialog.
-
In the Connection name field, enter a name for the connection.
-
In the API KeyandAPI Passwordfields, enter the API Key and password copied in step 2. Click Continue.
The connection has been established.
Creates a new lead.
|
Connection |
|
|
Email Address |
Enter the email address of the lead. |
|
Phone |
Enter the phone number of the lead. |
|
Phone Country Code |
Enter the country code of the lead. |
|
First Name |
Enter the first name of the lead. |
|
Middle Name |
Enter the middle name of the lead. |
|
Last Name |
Enter the last name of the lead. |
|
Last Name 2 |
Enter any additional last name of the lead. |
|
IP |
Enter the IP address of the lead. |
|
Address |
Enter the contact company address of the lead. |
|
Zip |
Enter the lead’s or lead’s company area zip code. |
|
City |
Enter the lead’s or lead’s company city name. |
|
State |
Enter the lead’s or lead’s company state name. |
|
Country |
Enter the lead’s or lead’s company’s country name. |
|
Company |
Enter the lead’s company name. |
|
Lead Picture |
Enter the URL address of the lead’s profile image. |
|
Website |
Enter the lead’s company website URL address. |
|
|
Enter the lead’s or lead’s company Facebook page URL address. |
|
|
Enter the lead’s or lead’s company Twitter page URL address. |
|
|
Enter the lead’s or lead’s company LinkedIn page URL address. |
|
Google Plus |
Enter the lead’s or lead’s company Google Plus page URL address. |
|
Custom FieldsA feature in Boost.space that allows you to define and manage data within each module according to your specific needs. |
Add the custom fields. |
Retrieves a lead.
|
Connection |
|
|
|
Enter the email address of the lead whose details you want to retrieve. |
|
Lead ID |
Enter the Lead ID whose details you want to retrieve. |
Removes points from a lead.
|
Connection |
|
|
|
Enter the email address of the lead whose details you want to search. |
|
Lead ID |
Enter the Lead ID whose details you want to retrieve. |
Adds points to a lead.
|
Connection |
|
|
Email Address |
Enter the email address of the lead to whom you want to add the points. |
|
Add Points |
Enter the number of points you want to assign to the Lead. |
|
Expiration (days) |
Enter the number of days after which the points expire. A value of 0 means there is no expiry date for the points assigned to the lead. |
Removes points from a lead.
|
Connection |
|
|
Email Address |
Enter the email address of the lead whose points you want to remove. |
|
Remove Points |
Enter the number of points you want to remove from the Lead. |
Adds a tag to a lead.
|
Connection |
|
|
Email Address |
Enter the email address of the lead to whom you want to add the tag. |
|
Add Tag |
Select the tag you want to add to the lead. |
Removes a tag from a lead.
|
Connection |
|
|
Email Address |
Enter the email address of the lead to whom you want to remove the tag. |
|
Remove Tag |
Select the tag you want to remove from the lead. |
Adds a lead to a subscription list.
|
Connection |
|
|
Email Address |
Enter the email address of the lead whom you want to add to the list. |
|
Add to the List |
Select the list to which you want to add the lead. |
Adds a lead to a subscription list.
|
Connection |
|
|
Email Address |
Enter the email address of the lead whom you want to add to the sequence. |
|
Subscribe to the Sequence |
Select the sequence to which you want to add the lead. |
|
Step Order Number |
Enter the order number where the lead will be placed in the sequence. |
Adds a lead to a calendar.
|
Connection |
|
|
Email Address |
Enter the email address of the lead whom you want to add to the list. |
|
Calendar Name |
Enter the calendar name to which you want to add or subscribe to the lead. |
|
Class Name |
Enter the class name of the lead. |
|
Starting Date |
Enter the start date of the lead in the calendar. |
Removes lead from a list.
|
Connection |
|
|
Email Address |
Enter the email address of the lead whom you want to remove from a list. |
|
Remove from List |
Select the list from which you want to remove the lead. |
Removes a lead from a sequence.
|
Connection |
|
|
Email Address |
Enter the email address of the lead whom you want to remove from the sequence. |
|
Remove from Sequence |
Select the sequence from which you want to remove the lead. |
Removes a lead from a calendar.
|
Connection |
|
|
Email Address |
Enter the email address of the lead whom you want to remove from the sequence. |
|
Calendar Name |
Enter the calendar name from which you want to remove the lead. |
|
Class Name |
Enter the class name from which you want to remove the lead. |
Returns all lead’s transactions by lead’s e-mail.
|
Connection |
|
|
Email Address |
Enter the email address of the lead whose transaction details you want to retrieve. |
|
Limit |
Set the maximum number of transactions Boost.space Integrator should return during one scenario execution cycleA cycle is the operation and commit/rollback phases of scenario execution. A scenario may have one or more cycles (one is the default).. |
Checks the existence of a transaction.
|
Connection |
|
|
Transaction ID |
Enter (map) the Transaction ID which you check whether it exists or not. |
Returns all lead subscriptions by lead’s e-mail.
|
Connection |
|
|
Email Address |
Enter the email address of the lead whose subscription details you want to retrieve. |
Creates a new lead.
|
Connection |
|
|
Email Address |
Enter the email address of the lead. |
|
Phone |
Enter the phone number of the lead. |
|
Phone Country Code |
Enter the country code of the lead. |
|
First Name |
Enter the first name of the lead. |
|
Middle Name |
Enter the middle name of the lead. |
|
Last Name |
Enter the last name of the lead. |
|
Last Name 2 |
Enter any additional last name of the lead. |
|
IP |
Enter the IP address of the lead. |
|
Address |
Enter the contact company address of the lead. |
|
Zip |
Enter the lead’s or lead’s company area zip code. |
|
City |
Enter the lead’s or lead’s company city name. |
|
State |
Enter the lead’s or lead’s company state name. |
|
Country |
Enter the lead’s or lead’s company’s country name. |
|
Company |
Enter the lead’s company name. |
|
Lead Picture |
Enter the URL address of the lead’s profile image. |
|
Website |
Enter the lead’s company website URL address. |
|
|
Enter the lead’s or lead’s company Facebook page URL address. |
|
|
Enter the lead’s or lead’s company Twitter page URL address. |
|
|
Enter the lead’s or lead’s company LinkedIn page URL address. |
|
Google Plus |
Enter the lead’s or lead’s company Google Plus page URL address. |
|
Add Tag |
Select the tags you want to add to the lead. |
|
Add to List |
Select the list to which you want to add to the list. |
|
Add Points |
Enter the number of points you want to add to the list. |
|
Expiration (days) |
Enter the number of days after which the points will be automatically detected from the lead. |
|
Subscribe to Sequence |
Select the Sequence to which you want to subscribe to the lead. |
|
Step from Order |
Enter the order in the sequence where you want to place the lead. |
|
Calendar Name |
Enter (map) the calendar name to which you want to add or subscribe to the lead. |
|
Class Name |
Enter the class name of the lead. |
|
Starting Date |
Enter the start date of the lead in the calendar. |
|
Custom Fields |
Add the custom fields Key-value pair for the lead. |
Updates a lead.
|
Connection |
|
|
Email Address |
Enter the email address of the lead. |
|
Lead ID |
Select the Lead ID whose details you want to update. |
|
Phone |
Enter the phone number of the lead. |
|
Phone Country Code |
Enter the country code of the lead. |
|
First Name |
Enter the first name of the lead. |
|
Middle Name |
Enter the middle name of the lead. |
|
Last Name |
Enter the last name of the lead. |
|
Last Name 2 |
Enter any additional last name of the lead. |
|
IP |
Enter the IP address of the lead. |
|
Address |
Enter the contact company address of the lead. |
|
Zip |
Enter the lead’s or lead’s company area zip code. |
|
City |
Enter the lead’s or lead’s company city name. |
|
State |
Enter the lead’s or lead’s company state name. |
|
Country |
Enter the lead’s or lead’s company’s country name. |
|
Company |
Enter the lead’s company name. |
|
Lead Picture |
Enter the URL address of the lead’s profile image. |
|
Website |
Enter the lead’s company website URL address. |
|
|
Enter the lead’s or lead’s company Facebook page URL address. |
|
|
Enter the lead’s or lead’s company Twitter page URL address. |
|
|
Enter the lead’s or lead’s company LinkedIn page URL address. |
|
Google Plus |
Enter the lead’s or lead’s company Google Plus page URL address. |
|
Add Tag |
Select the tags you want to add to the lead. |
|
Add to List |
Select the list to which you want to add to the list. |
|
Add Points |
Enter the number of points you want to add to the list. |
|
Expiration (days) |
Enter the number of days after which the points will be automatically detected from the lead. |
|
Subscribe to Sequence |
Select the Sequence to which you want to subscribe to the lead. |
|
Step from Order |
Enter the order in the sequence where you want to place the lead. |
|
Calendar Name |
Enter (map) the calendar name to which you want to add or subscribe to the lead. |
|
Class Name |
Enter the class name of the lead. |
|
Starting Date |
Enter the start date of the lead in the calendar. |
|
Unsubscribe from Calendar Name |
Enter the calendar name from which you want to unsubscribe the lead. |
|
Unsubscribe from Class Name |
Enter the class name from which you want to unsubscribe the lead. |
|
Custom Fields |
Add the custom fields Key-value pair for the lead. |
TriggersEvery scenario has a trigger, an event that starts your scenario. A scenario must have a trigger. There can only be one trigger for each scenario. When you create a new scenario, the first module you choose is your trigger for that scenario. Create a trigger by clicking on the empty module of a newly created scenario or moving the... when new events happen in Kartra.
|
WebhookA webhook is a way for an app to send real-time information to a specific URL in response to certain events or triggers. Name |
Enter a name for the webhook. |
|
Connection |
-
Open the Watch Events module, establish a connection, and copy the URL address to your clipboard.
-
Log in to your Kartra account. Click My Integrations> API > My API > Change. Select Yes Activate Outbound API and Click Save.
-
In the URL TO SEND THE API CALL TO field, enter the URL address copied in step 1, and select the actions for which you want to receive the alerts, and click Add.

The webhook has been added.
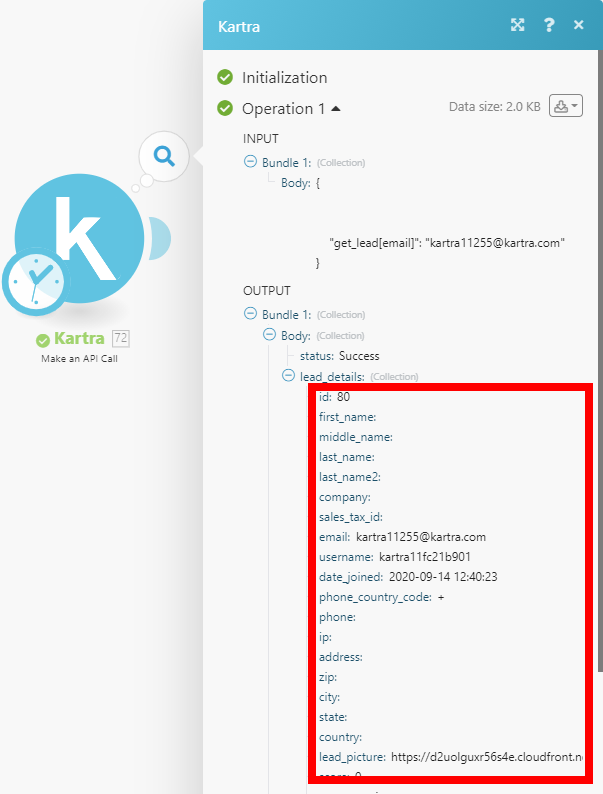
Performs an arbitrary authorized API call.
|
Connection |
|
|
Headers |
Enter the desired request headers. You don’t have to add authorization headers; we already did that for you. |
|
Query String |
Enter the request query string. |
|
Body |
Enter the body content for your API call. For example, the following body to retrieve all pages in your account: { "actions[][cmd]": "retrieve_account_pages" }
|
|
Note |
|---|---|
|
For the list of available API calls please refer to the Kartra API documentation. |
The following API call returns lead details from your Kartra account:
Body:
{
"get_lead[email]": "{lead_email}"
}

The result can be found in the module’s Output under BundleA bundle is a chunk of data and the basic unit for use with modules. A bundle consists of items, similar to how a bag may contain separate, individual items. > Body > lead_details.In our example, lead details were returned: