| Active with remarks |
|---|
| This application needs additional settings. Please follow the documentation below to create your own connectionUnique, active service acces point to a network. There are different types of connections (API key, Oauth…).. |
The Elastic Email modulesThe module is an application or tool within the Boost.space system. The entire system is built on this concept of modularity. (module - Contacts) allow you to create, update, retrieve, list, and delete the contacts, lists, campaigns, and emails in your Elastic Email account.
Prerequisites
-
An Elastic Email account
In order to use Elastic Email with Boost.spaceCentralization and synchronization platform, where you can organize and manage your data. IntegratorPart of the Boost.space system, where you can create your connections and automate your processes., it is necessary to have an Elastic Email account. If you do not have one, you can create an Elastic Email account at elasticemail.com/account#/create-account.
![[Note]](https://docs.boost.space/wp-content/themes/bsdocs/docs-parser/HTML/css/image/note.png) |
Note |
|---|---|
|
The moduleThe module is an application or tool within the Boost.space system. The entire system is built on this concept of modularity. (module - Contacts) dialog fields that are displayed in bold (in the Boost.space Integrator scenarioA specific connection between applications in which data can be transferred. Two types of scenarios: active/inactive., not in this documentation article) are mandatory! |
To connect your Elastic Email account to Boost.space Integrator you need to obtain the API Key from your Elastic Email account and insert it in the Create a connection dialog in the Boost.space Integrator module.
-
Log in to your Elastic Email account.
-
Click Your UserCan use the system on a limited basis based on the rights assigned by the admin. Name > Settings > API > Accept Consent > Create API Key. Enter a name for the key, select the permissions, and click Create. Copy the API key to your clipboard.
-
Go to Boost.space Integrator and open the Elastic Email module’s Create a connection dialog.
-
In the Connection name field, enter a name for the connection.
-
In the API Key field, enter the API key copied in step 2.
-
Select whether you want to establish the connection for private branding and enter the custom domain. For example,
<yourdomain.cz(uk, etc.)>. You can find at My Account > Settings > Domains. -
Click Continue.
The connection has been established.
TriggersEvery scenario has a trigger, an event that starts your scenario. A scenario must have a trigger. There can only be one trigger for each scenario. When you create a new scenario, the first module you choose is your trigger for that scenario. Create a trigger by clicking on the empty module of a newly created scenario or moving the... when a new contact is added to the list.
|
Connection |
|
|
List Name |
Select the contact list name whose contacts you want to watch. |
|
Limit |
Set the maximum number of contacts Boost.space Integrator should return during one scenario execution cycleA cycle is the operation and commit/rollback phases of scenario execution. A scenario may have one or more cycles (one is the default).. |
Adds a new contact and optionally to one of your lists.
|
Connection |
|
|
|
Enter the email address of the contact. |
|
Public Account ID |
Enter the Public Account ID for the contact. This is a public key that provides limited access to the contact. You can find the public key at My Account > Security. |
|
First Name |
Enter the first name of the contact. |
|
Last Name |
Enter the last name of the contact. |
|
List Name |
Add the contact list to which you want to add the contact. You can add multiple contacts. |
|
Consent Tracking |
Select whether you want to allow the consent tracking for the contact. |
|
Send Activation |
Select whether you want to send the activation email to the contact once you create the contact. |
|
Activation Template |
Select the activation template to send to the contact as an activation email. |
|
Notify Email |
Add the email address to which contact’s subscription notification emails will be sent. |
|
Activation Return URL |
Enter the URL address to which contact will be redirected after activation. |
|
Already Active URL |
Enter the URL address to which contact is redirected if already subscribed. |
|
Consent Date |
Enter the date on which the contact is provided consent. |
|
Consent IP |
Enter the IP address of consent to send this contact from your email. |
|
Return URL |
Enter the URL address to navigate to after account creation. |
|
Source |
Select the option in which the contact details are uploaded:
|
|
Source URL |
Enter the URL address from which the request for creating the contact was sent. |
Loads detailed contact information.
|
Connection |
|
|
Email Address |
Select the email address of the contact whose details you want to retrieve. |
Updates a selected contact.
|
Connection |
|
|
Email Address |
Select the email address of the contact whose details you want to update. |
|
First Name |
Enter the first name of the contact. |
|
Last Name |
Enter the last name of the contact. |
|
Clear the Rest of Fields |
When selected, resets the fields which are omitted in this request. |
|
Custom FieldsA feature in Boost.space that allows you to define and manage data within each module according to your specific needs. |
Add the custom fields for the contact: Field Name Enter the field name. For example, the company name. Field Type Select the field type:
Value Enter the field value. |
Permanently deletes the contacts provided. You can provide either a qualified rule or a list of emails.
|
Connection |
|
|
Delete Criterion |
Select the option through which you want to delete the contacts:
|
|
Email Address |
Add the email addresses of the contact whom you want to delete. |
|
Rule |
Select the option to filter the contacts whom you want to delete based on the specified query. |
Searches the contacts or lists them all.
|
Connection |
|
|
Sort |
Select the option to sort the contacts you want to list:
|
|
Rule |
Select the option to filter the contacts whom you want to list based on the specified query. |
|
Limit |
Set the maximum number of contacts Boost.space Integrator should return during one scenario execution cycle. |
Manually adds or updates a contact to unsubscribed statusCreate statuses for each module separately to create an ideal environment for efficient and consistent work..
|
Connection |
|
|
Email Address |
Select the email address of the contact whom you want to unsubscribe. |
Creates a new list based on the filtering rule or list of IDs.
|
Connection |
|
|
Create Empty List |
Select whether you want to create an empty list. |
|
List Name |
Enter a name for the list. |
|
Emails |
Add the email addresses of the contacts whom you want to add to the list. |
|
All Contacts |
Select to add all the contacts from your account to the list. |
|
Allow Unsubscribe |
Select to allow to unsubscribe the contacts from the list. |
|
Rule |
Select the option to filter the contacts whom you want to add to the list based on the specified query. |
Gets detailed information about a specific list.
|
Connection |
|
|
List Name |
Select the list whose details you want to retrieve. |
Updates an existing list.
|
Connection |
|
|
List Name |
Select the list whose details you want to update. |
|
New List Name |
Enter a new name for the list. |
|
Allow Unsubscribe |
Select whether you want to allow the contacts in the list to unsubscribe. |
|
Track History |
Select whether you want to track the history of the list. |
Deletes a list and removes all the contacts from it (does not delete contacts.
|
Connection |
|
|
List Name |
Select the list you want to delete. |
Searches the lists or lists them all.
|
Connection |
|
|
From |
Enter the date to list the lists that are created or updated on or after the specified date. |
|
To |
Enter the date to list the lists that are created or updated on or before the specified date. |
|
Limit |
Set the maximum number of lists Boost.space Integrator should return during one scenario execution cycle. |
Triggers when a new campaign is sent.
|
Connection |
|
|
Limit |
Set the maximum number of campaigns Boost.space Integrator should return during one scenario execution cycle. |
Submits the emails.
|
Connection |
|
|
To |
Add the recipient’s email addresses to whom you want to send the email. |
|
Lists |
Add the contact lists to which you want to send the email. |
|
Segments |
Add segments to which you want to send the email. Insert |
|
From |
Enter the email address from which you want to send the email. |
|
From Name |
Enter the name that appears in the email. |
|
Subject |
Enter the subject line of the email. |
|
Template ID |
Select the email Template ID. The templates must be created in your account. |
|
Attachments |
Add the attachments to the email. |
|
Sender |
Enter the sender’s email address to which you want to send the email. |
|
Sender Name |
Enter the sender’s name. |
|
Reply to |
Enter the email address to which the recipient can reply to your email. |
|
Reply to Name |
Enter the name to which the recipient can reply to the email. |
|
Track Clicks |
Select whether you want to track the clicks fro the email. |
|
Track Opens |
Select whether you want to track when the email is opened. |
|
Is Transactional |
Select whether this is a transactional email. |
|
Message to |
Add the email address that appears in the To field of the email. This field is ignored if the To parameter is also provided. Visible to all other recipients of the message as TO MIME header. |
|
Message from |
Enter the email address that appears in MIME header. |
|
Message From Name |
Enter name of the sender that appears in MIME header. |
|
Message BCC |
Add the recipient’s email address that you want to mention in the BCC field. |
|
Message CC |
Add the recipient’s email address that you want to mention in the CC field. |
|
Body AMP |
Enter the AMP email message text. |
|
Body HTML |
Enter the email message text in HTML format. |
|
Body Text |
Enter the email body text. |
|
Channel |
Enter the Channel ID that can be used for reporting. The ID can be of maximum 191 characters. |
|
Charset |
Enter the text value of charset encoding. For example, iso-8859-1, windows-1251, utf-8, us-ascii, windows-1250 |
|
Charset Body AMP |
Enter the charset for body AMP MIME part. |
|
Charset Body HTML |
Enter the charset for body HTML MIME part. |
|
Charset Body Text |
Enter the charset for body text MIME part. |
|
Data Source |
Enter the name or ID of the previously uploaded file. It must be a CSV list of recipients. |
|
Encoding Type |
Select the encoding type for the email. |
|
Merge Source Filename |
Enter the file name of the attachments which is a CSV list of recipients. |
|
Pool Name |
Enter the name of your custom IP Pool to be used in the email sending process. |
|
Post Back |
Enter an optional header returned in notifications. |
|
Time Off Set Minutes |
Enter the number of the minutes after which the email must be sent. You can send up to 1 year (524160 minutes). |
|
UTM Campaign |
Enter the utm campaign marketing parameter appended to each link in the campaign. |
|
UTM Content |
Enter the utm content marketing parameter appended to each link in the campaign. |
|
UTM Medium |
Enter the utm medium marketing parameter appended to each link in the campaign. |
|
UTM Source |
Enter the utm source marketing parameter appended to each link in the campaign. |
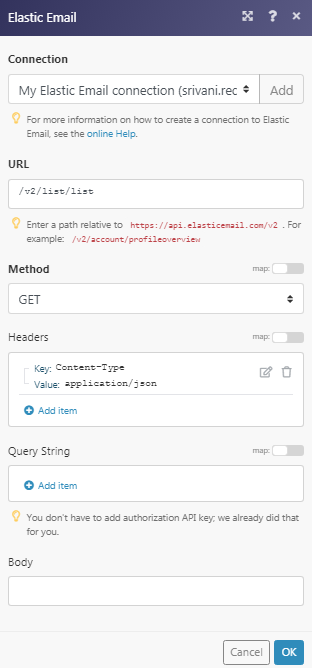
Performs an arbitrary authorized API call.
|
Connection |
||||
|
URL |
Enter a path relative to
|
|||
|
Method |
Select the HTTP method you want to use: GET to retrieve information for an entry. POST to create a new entry. PUT to update/replace an existing entry. PATCH to make a partial entry update. DELETE to delete an entry. |
|||
|
Headers |
Enter the desired request headers. You don’t have to add authorization headers; we already did that for you. |
|||
|
Query String |
Enter the request query string. |
|||
|
Body |
Enter the body content for your API call. |
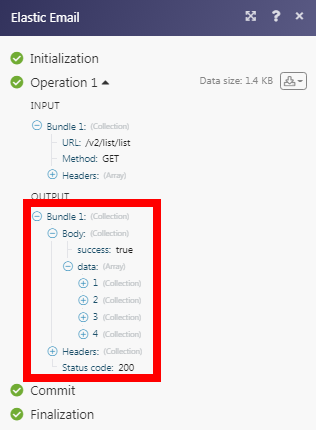
The following API call returns all lists from your Elastic Email account:
URL:
/v2/list/list
Method:
GET
Matches of the search can be found in the module’s Output under BundleA bundle is a chunk of data and the basic unit for use with modules. A bundle consists of items, similar to how a bag may contain separate, individual items. > Body > data.
In our example, 4 lists were returned: