| Active with remarks |
|---|
| This application needs additional settings. Please follow the documentation below to create your own connectionUnique, active service acces point to a network. There are different types of connections (API key, Oauth…).. |
With Auth0 modulesThe module is an application or tool within the Boost.space system. The entire system is built on this concept of modularity. (module - Contacts) in Boost.spaceCentralization and synchronization platform, where you can organize and manage your data. IntegratorPart of the Boost.space system, where you can create your connections and automate your processes., you can create, monitor, update and search for usersCan use the system on a limited basis based on the rights assigned by the admin. in your Auth0 account and make API calls.
To get started with Auth0, create an account at auth0.com.
![[Note]](https://docs.boost.space/wp-content/themes/bsdocs/docs-parser/HTML/css/image/note.png) |
Note |
|---|---|
|
The moduleThe module is an application or tool within the Boost.space system. The entire system is built on this concept of modularity. (module - Contacts) dialog fields that are displayed in bold (in the Boost.space Integrator scenarioA specific connection between applications in which data can be transferred. Two types of scenarios: active/inactive., not in this documentation article) are mandatory. |
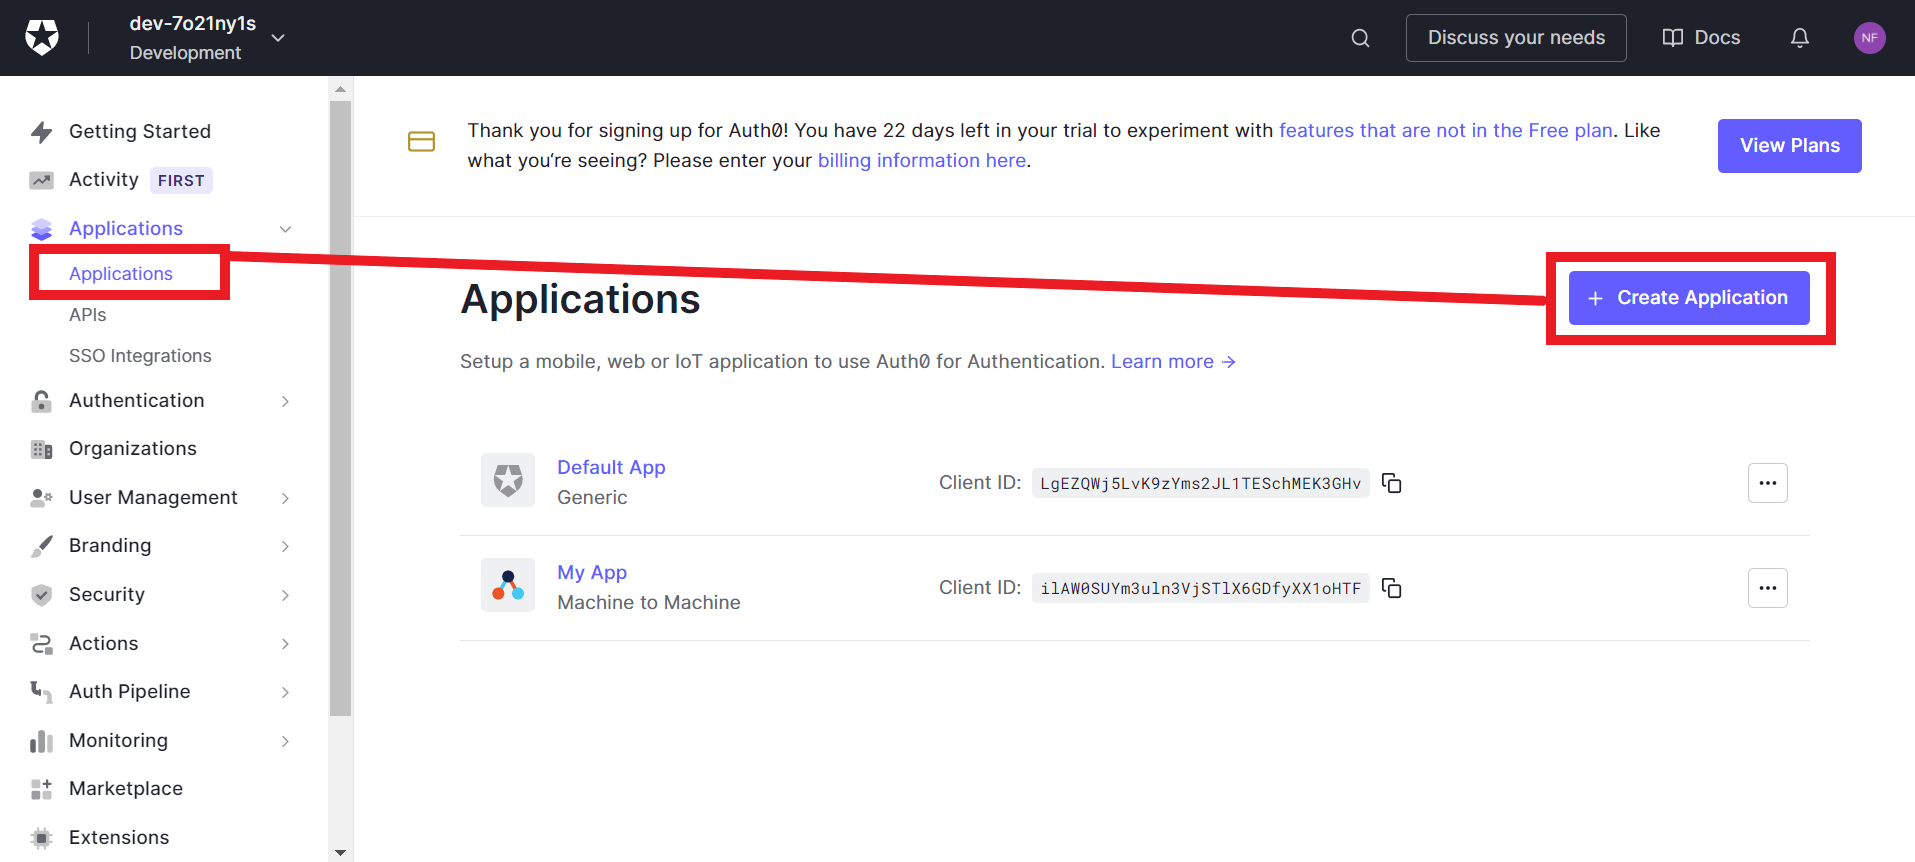
To make a connection you need to create an application in your Auth0 account and retrieve the credentials.
-
Log in to your Auth0 account.
-
Click Applications in the left-hand menu, then click Applications in the drop-down.
-
Click Create Application.
-
Choose a name for your new app.
-
Select the Machine to Machine app type, then click Create.
-
Select the API you want to authorize for invocation from your application. You can also create a new API.
-
Select any permissions you need, then click Authorize.
-
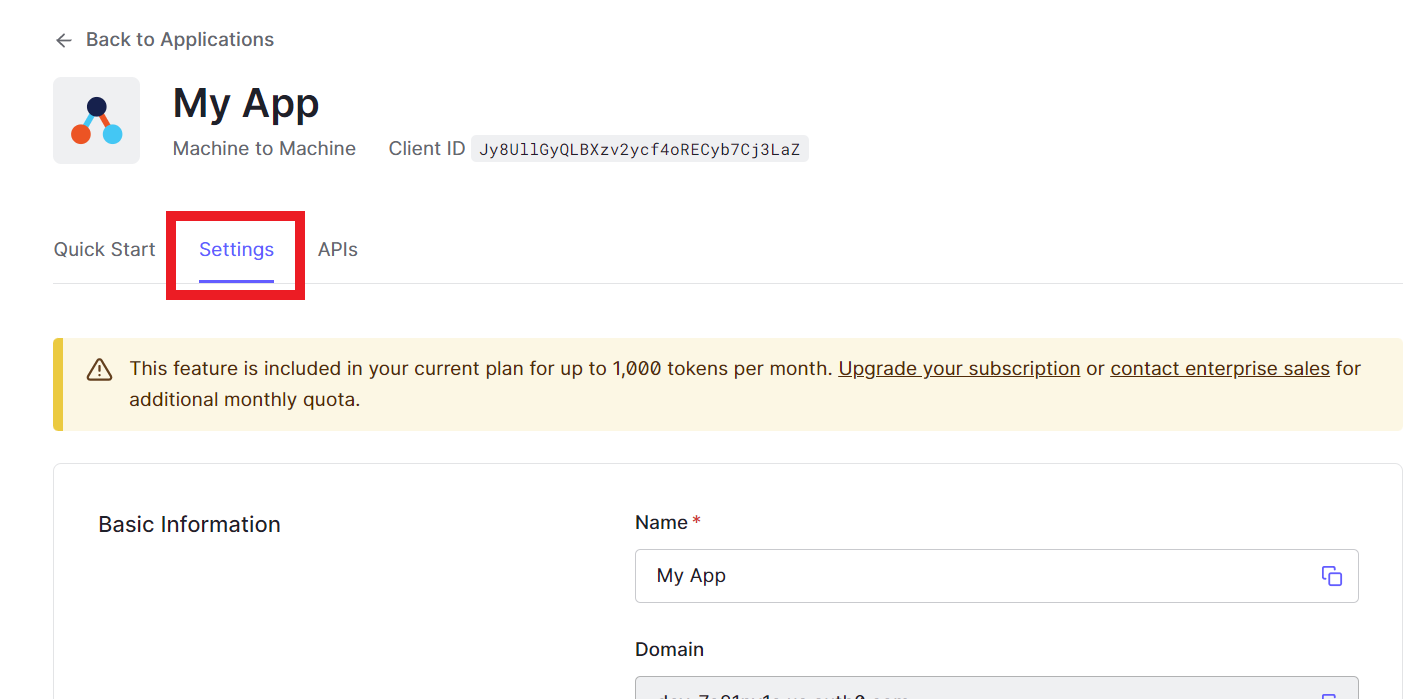
Once you have created your app, click Settings.
-
Under Basic Information, copy the Domain, Client ID, and Client Secret to your clipboard.
-
Go to your Boost.space Integrator scenario and choose the Auth0 module you want to use.
-
Next to Connection, click Add.
-
Give your connection a name.
-
Copy the Domain URL from step 9 into the corresponding field. For example, if your Auth0 domain is vasyapupkin.eu.auth0.com then use
https://vasyapupkin.eu.auth0.com. -
Copy the Client ID and Client Secret into their respective fields.
-
Click Save.
You have successfully established the connection.
TriggersEvery scenario has a trigger, an event that starts your scenario. A scenario must have a trigger. There can only be one trigger for each scenario. When you create a new scenario, the first module you choose is your trigger for that scenario. Create a trigger by clicking on the empty module of a newly created scenario or moving the... when a new userCan use the system on a limited basis based on the rights assigned by the admin. is created.
|
Connection |
|
|
Query |
Enter any search terms to filter the results. For more information see using query string syntax. |
|
Limit |
Enter the maximum number of users Boost.space Integrator returns during one scenario execution cycleA cycle is the operation and commit/rollback phases of scenario execution. A scenario may have one or more cycles (one is the default).. |
Creates a new user.
|
Connection |
||||
|
Connection |
Select the type of connection you want to use. |
|||
|
Email Address |
Enter the user’s email address. |
|||
|
Phone Number |
Enter the user’s phone number. Only valid for users from SMS connections. |
|||
|
User Metadata |
Add any additional data related to the user. |
|||
|
Blocked |
Select whether this user was blocked by an administrator or not. |
|||
|
Email Verified |
Select whether this email address is verified or unverified. User will receive a verification email after creation if Email Verified is |
|||
|
Phone Verified |
Select whether this phone number has been verified or not. |
|||
|
App Metadata |
Add any additional data related to the user. |
|||
|
Given Name |
Enter the user’s given name(s). |
|||
|
Family Name |
Enter the user’s family name(s). |
|||
|
Full Name |
Enter the user’s full name. |
|||
|
Nickname |
Enter the user’s nickname. |
|||
|
Picture |
Enter a URI pointing to the user’s picture. |
|||
|
User ID |
Enter the external user’s ID provided by the identity provider. |
|||
|
Password |
Enter the initial password for this user.
|
|||
|
Verify Email |
Select whether the user will receive a verification email after creation or no email.
|
|||
|
Username |
Enter the user’s username. Only valid if the connection requires a username. |
Searches for specific users or lists them all.
|
Connection |
|
|
Search |
Enter any search terms to filter the results. For more information see using query string syntax. |
|
Limit |
Enter the maximum number of users Boost.space Integrator returns during one scenario execution cycle. |
Updates a user by ID.
|
Connection |
||||
|
User ID |
Select the ID of the user you want to update. |
|||
|
Email Address |
Enter the user’s email address. |
|||
|
Phone Number |
Enter the user’s phone number. Only valid for users from SMS connections. |
|||
|
User Metadata |
Add any additional data related to the user. |
|||
|
Blocked |
Select whether this user was blocked by an administrator or not. |
|||
|
Email Verified |
Select whether this email address is verified or unverified. User will receive a verification email after creation if Email Verified is |
|||
|
Phone Verified |
Select whether this phone number has been verified or not. |
|||
|
App Metadata |
Add any additional data related to the user. |
|||
|
Given Name |
Enter the user’s given name(s). |
|||
|
Family Name |
Enter the user’s family name(s). |
|||
|
Full Name |
Enter the user’s full name. |
|||
|
Nickname |
Enter the user’s nickname. |
|||
|
Picture |
Enter a URI pointing to the user’s picture. |
|||
|
User ID |
Enter the external user’s ID provided by the identity provider. |
|||
|
Password |
Enter the initial password for this user.
|
|||
|
Verify Email |
Select whether the user will receive a verification email after creation or no email.
|
|||
|
Username |
Enter the user’s username. Only valid if the connection requires a username. |
Searches users by email.
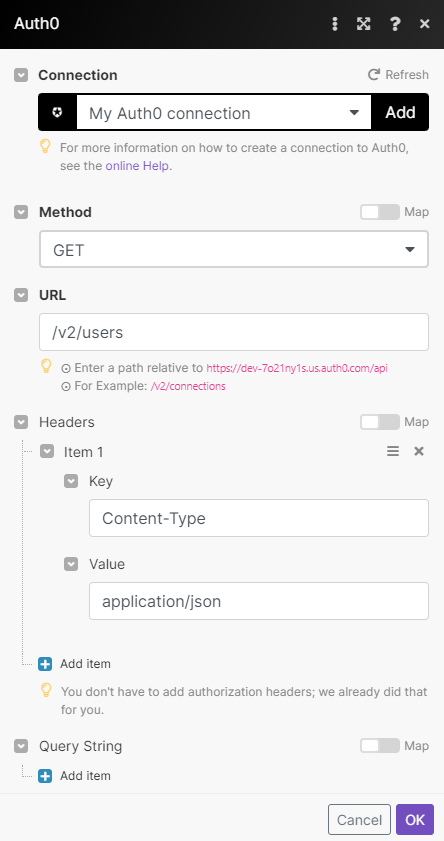
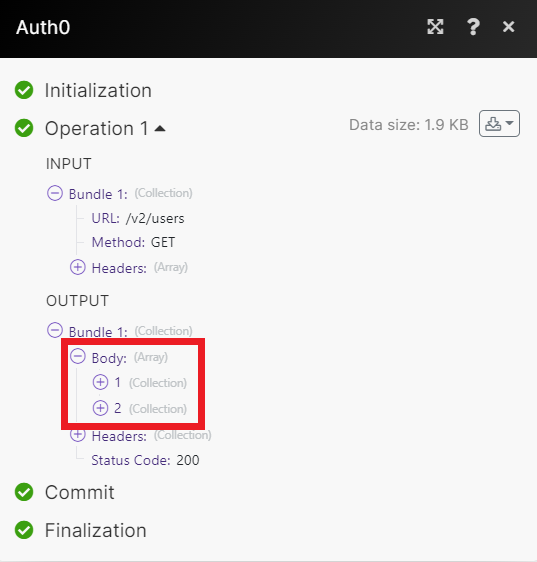
Performs an arbitrary authorized API call.
|
Connection |
|
|
URL |
Enter a path relative to For the list of available endpoints, refer to the Auth0 API documentation. |
|
Method |
Select the HTTP method you want to use: GET to retrieve information for an entry. POST to create a new entry. PUT to update/replace an existing entry. PATCH to make a partial entry update. DELETE to delete an entry. |
|
Headers |
Enter the desired request headers. You don’t have to add authorization headers; we already did that for you. |
|
Query String |
Enter the request query string. |
|
Body |
Enter the body content for your API call. |