- Zoho CRM
- Connect Zoho CRM to Boost.space Integrator
- Build Zoho CRM Scenarios
- Modules
- List Modules
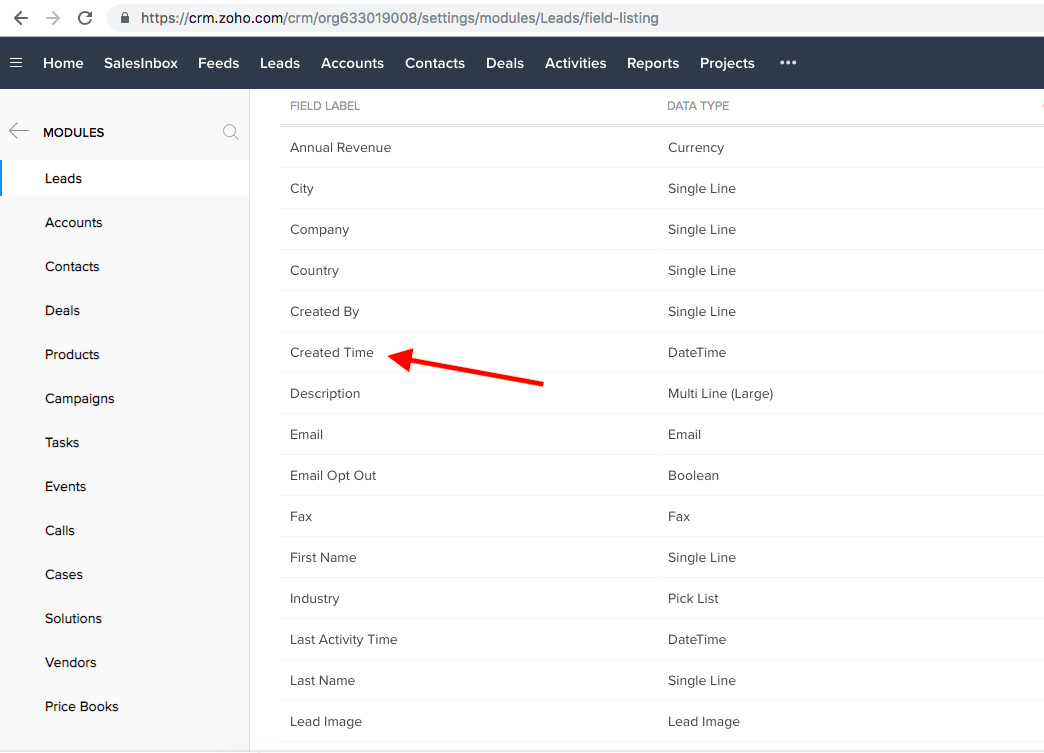
- Fields
- List Fields
- Users
- Add Users
- Search Users
- Delete a User
- Objects
- Watch Objects
- Create an Object
- Delete an Object
- Get an Object
- Update an Object
- List Objects
- Search Objects
- Leads
- Upsert a Lead
- Related Records
- Update a Related Record
- List Related Record
- Delete a Related Record
- Tags
- Add a Tag to a Record
- Remove a Tag from a Record
- Create a Tag
- Update a Tag
- Search Tags
- Delete a Tag
- Attachments
- Upload an Attachment
- Download an Attachment
- Photos
- Upload a Photo
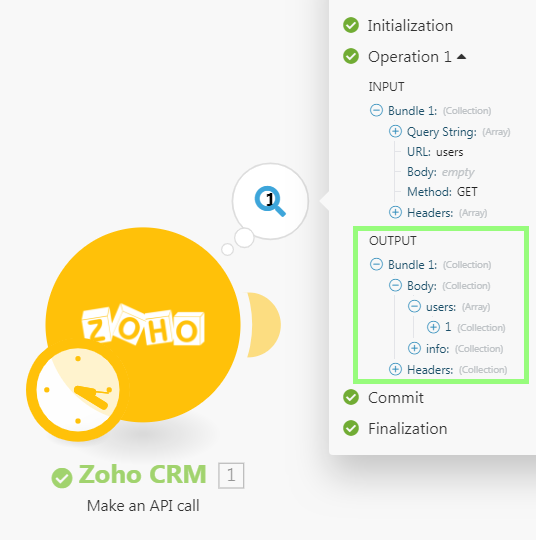
- Make an API Call
- Step by step guide to call APIs
- Troubleshooting
| Active with remarks |
|---|
| This application needs additional settings. Please follow the documentation below to create your own connectionUnique, active service acces point to a network. There are different types of connections (API key, Oauth…).. |
With Zoho CRM modulesThe module is an application or tool within the Boost.space system. The entire system is built on this concept of modularity. (module - Contacts) in Boost.spaceCentralization and synchronization platform, where you can organize and manage your data. IntegratorPart of the Boost.space system, where you can create your connections and automate your processes., you can list modules and fields, manage usersCan use the system on a limited basis based on the rights assigned by the admin., objects, related recordsOne row in the Boost.space database. These are individual rows under spaces in each module. For example single products, but not their variants., tags, and attachments, upsert leads, and upload photos in your Zoho CRM account.
To use the Zoho CRM modules, you must have a Zoho CRM account. You can create an account at zoho.com.
Refer to the Zoho CRM API documentation for a list of available endpoints.
![[Warning]](https://docs.boost.space/wp-content/themes/bsdocs/docs-parser/HTML/css/image/warning.png) |
Warning |
|---|---|
|
If you have more then one connection created to your Zoho CRM account, the Zoho CRM modules will not work. |
To establish the connection:
-
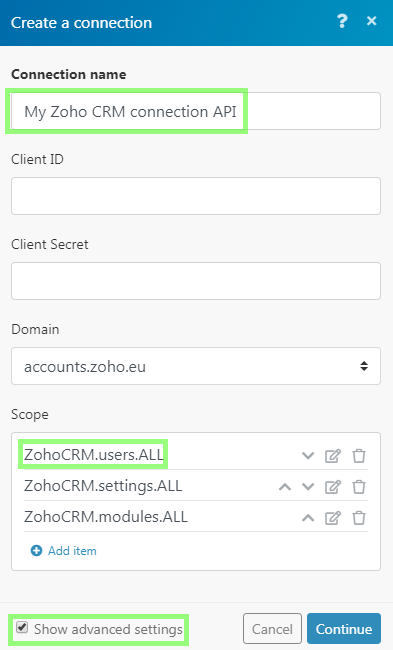
Log in to your Boost.space Integrator account, add a Zoho CRM moduleThe module is an application or tool within the Boost.space system. The entire system is built on this concept of modularity. (module - Contacts) to your scenarioA specific connection between applications in which data can be transferred. Two types of scenarios: active/inactive., and click Create a connection.
-
Optional: In the Connection name field, enter a name for the connection.
-
In the Domain field, select the applicable domain for your account.
-
Optional: Click Show Advanced Settings and enter your custom appCreate your own custom apps to be used in the integrator engine and share them with users in your organization. client credentials or manually add scopes. You must have a Zoho developer account to create custom appsCreate your own custom apps to be used in the integrator engine and share them with users in your organization.. For more information, refer to the Zoho CRM Register your Application guide.
If requested, use the following Redirect URI when creating your custom app:
https://integrator.boost.space/oauth/cb/zohocrm2. -
Click Save.
-
If prompted, authenticate your account and confirm access.
You have successfully established the connection. You can now edit your scenario and add more Zoho CRM modules. If your connection requires reauthorization at any point, follow the connection renewal steps here.
Build Zoho CRM ScenariosA specific connection between applications in which data can be transferred. Two types of scenarios: active/inactive.
Adds a new userCan use the system on a limited basis based on the rights assigned by the admin..
For field descriptions, see the Zoho CRM User API reference.
Searches for users or lists them all.
For field descriptions, see the Zoho CRM User API reference
Retrieves information about a newly created or updated object.
![[Note]](https://docs.boost.space/wp-content/themes/bsdocs/docs-parser/HTML/css/image/note.png) |
Note |
|---|---|
|
If the errorService is unavailable due to a failure, a service responds with unexpected data or the validation of input data fails. |
|
Connection |
||||
|
Module |
Zoho CRM has standard modules such as Leads, Accounts, Contacts, Deals, Forecasts, Activities, etc. Select the type of module you want to watch for changes and the fields.
|
|||
|
Sort by |
Select whether you want to sort retrieved objects by the created or modified time. |
|||
|
Limit |
Set the maximum number of objects Boost.space Integrator will return during one execution cycleA cycle is the operation and commit/rollback phases of scenario execution. A scenario may have one or more cycles (one is the default).. |
Creates a new object.
For Modules Fields reference, see help.zoho.com/portal/kb/articles/standard-modules-fields.
Updates an existing object.
Please find the fields’ descriptions in the Create Object section above.
Updates a related recordOne row in the Boost.space database. These are individual rows under spaces in each module. For example single products, but not their variants..
For the field descriptions, see the Zoho CRM API reference.
Lists related records data.
For the field descriptions, see the Zoho CRM API reference.
Deletes a related record.
For the field descriptions, see the Zoho CRM API reference.
Adds an existing or a new tag to a record.
For the field descriptions, see Zoho CRM API Tag reference.
Removes a tag from an existing record.
For the field descriptions, see Zoho CRM API Tag reference.
Searches for tags or lists them all.
For the field descriptions, see Zoho CRM API Tag reference.
Downloads an attachment of an object.
For the field descriptions, see the Zoho CRM API reference.
-
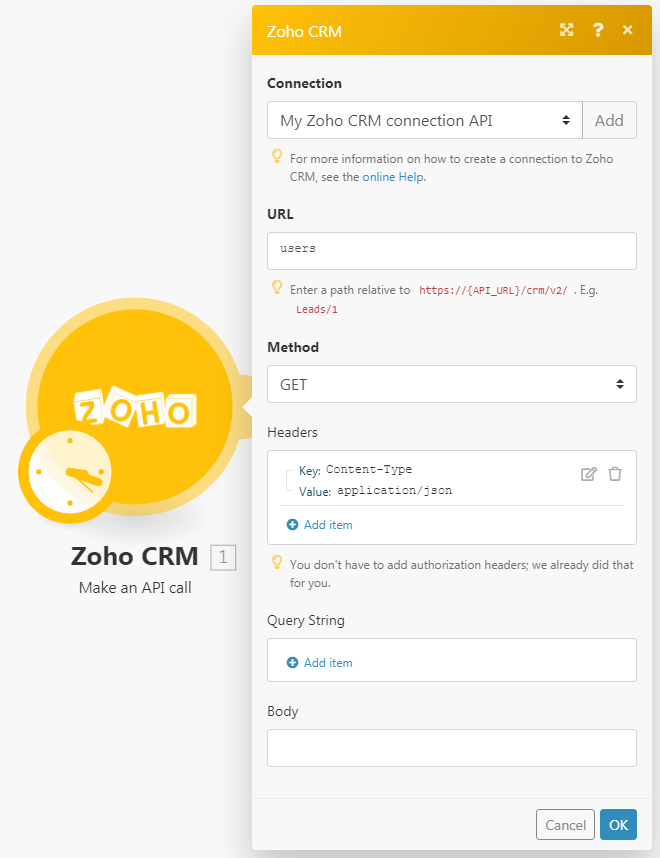
Insert the Zoho CRM > Make an API call module in your scenario.
-
Find the API endpoint you would like to call in the Zoho CRM API documentation, section “REST API” in the left side menu – e.g. Get users.
-
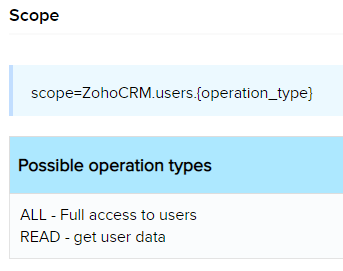
Check out the endpoint’s required scopes in the Scope section:
If the endpoint requires different scope(s) from these two:
ZohoCRM.settings.ALLZohoCRM.modules.ALLthen create a new connection and add all the required scope(s) in the Scope field:
-
Configure the module’s configuration to call the Get Users endpoint:
-
Execute the scenario.
-
Click the bubble above the module to verify the module’s output:
-
Log into your Zoho Accounts dashboard.
-
In the left sidebar, click on Sessions > Connected Apps.
-
Hover over the app you would like to disconnect and click on Revoke Access > Yes, Proceed.
You have successfully removed the Boost.space Integrator app.
Zoho CRM does not allow for creating additional accounts in the “offline” mode. If you receive the AUTHENTICATION_FAILURE error when creating accounts, you must delete old accounts and create a new custom app client in a Zoho CRM developer account.
-
Remove the Boost.space Integrator app following the instructions listed in the section above.
-
Log in to or create a developer account in the Zoho Developer Console.
-
Create a new custom app client as detailed in the Zoho CRM Register your Application guide.
Use the following Redirect URI:
https://integrator.boost.space/oauth/cb/zohocrm2. -
Establish a connection in Boost.space Integrator using your Client ID and Client Secret from the custom app client created in Step 3.