| Active with remarks |
|---|
| This application needs additional settings. Please follow the documentation below to create your own connection. |
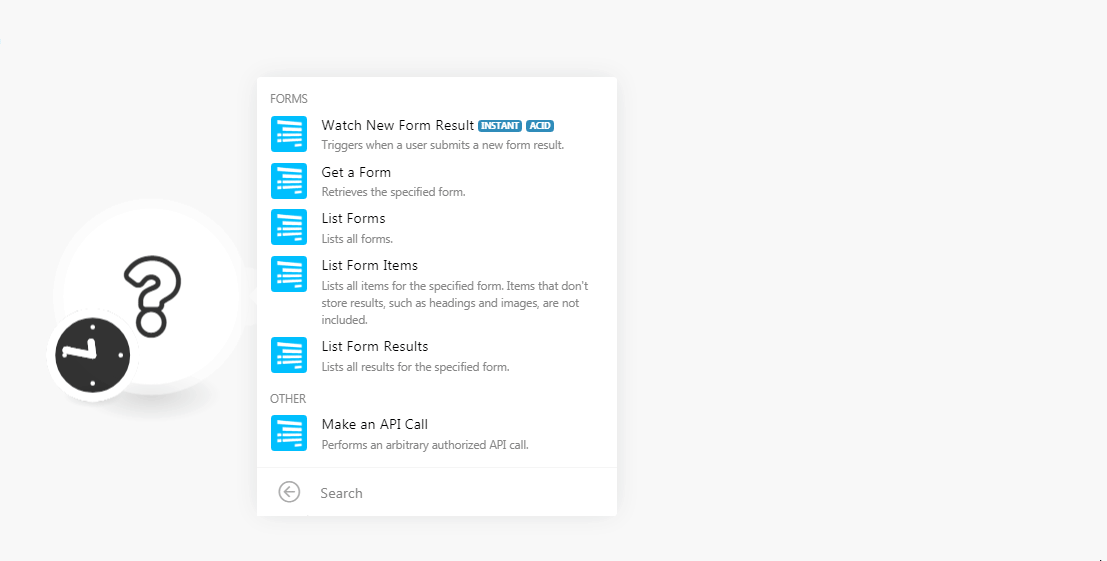
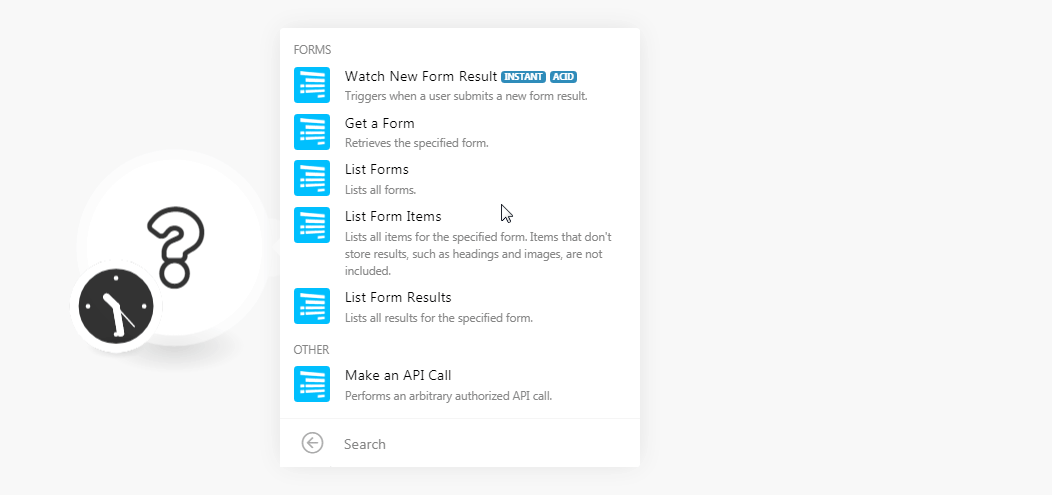
The Formsite modules allow you to watch, retrieve, list forms, form items, and form results in your Formsite account.
Prerequisites
-
A Formsite account
In order to use Formsite with Boost.space Integrator, it is necessary to have a Formsite account. If you do not have one, you can create a Formsite account at formsite.com
![[Note]](https://docs.boost.space/wp-content/themes/bsdocs/docs-parser/HTML/css/image/note.png) |
Note |
|---|---|
|
The module dialog fields that are displayed in bold (in the Boost.space Integrator scenario, not in this documentation article) are mandatory! |
To connect your Formsite account to Boost.space Integrator you need to obtain the API Key from your Formsite account and insert it in the Create a connection dialog in the Boost.space Integrator module.
1. Login to your Formsite account.
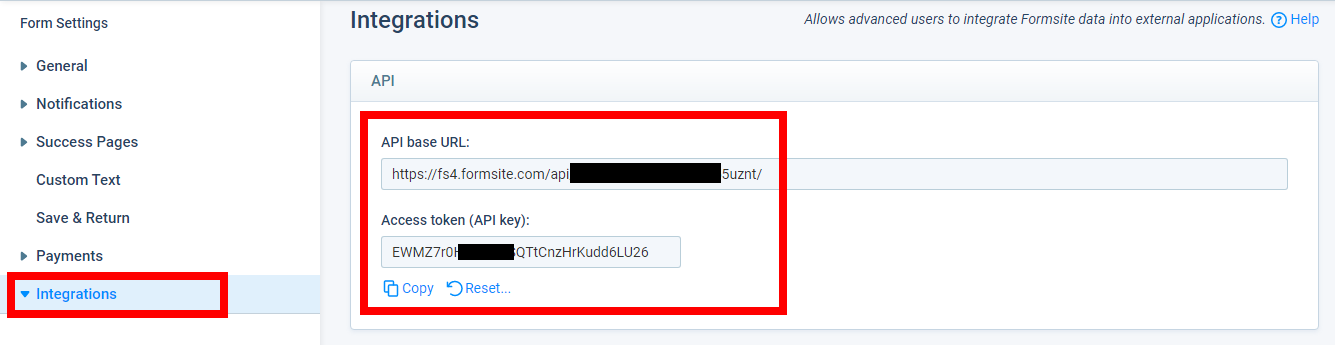
2. Create a form if you have not created one already. Click Form Settings > Integrations > Formsite API.
3. Copy the API Secret and API Base URL values to a safe place.
4. Go to Boost.space Integrator and open the Formsite module’s Create a connection dialog.
5. In the Connection name field, enter a name for the connection.
6. In the Server field, enter your account server name. For example, if your Formsite account’s URL address is www.xyz.formsite.com then, the server is xyz.
7. In the User Directory field, enter the directory details. For example, if your base https://fs4.formsite.com/api/v2/vSkOfz/forms/xhqi55uznt/, then your user directory is vSkOfz.
8. In the Access Token field, enter the API Key copied in step 3, and click Continue.
The connection has been established.
Triggers when a user submits a new form result.
|
Webhook Name |
Enter a name for the webhook. |
1. Open the Watch New Form Result module, establish a connection, click Save, and copy the URL address to your clipboard.
2. Login to your Formsite account. Open the form for which you want to add the webhook. Click Settings > Integrations > Server Post.
Enable the webhook, in the Server URL field, enter the URL address copied in step 1, select the options as required, and click Save.
The webhook is successfully added.
Retrieves the specified form.
|
Connection |
|
|
Form Directory |
Select the form whose details you want to retrieve. |
Lists all forms.
|
Connection |
|
|
Limit |
Set the maximum number of forms Boost.space Integrator should return during one scenario execution cycle. |
Lists all items for the specified form. Items that don’t store results, such as headings and images are not included.
|
Connection |
|
|
Form Directory |
Select the form whose items details you want to list. |
|
Limit |
Set the maximum number of items Boost.space Integrator should return during one scenario execution cycle. |
Lists all results for the specified form.
|
Connection |
|
|
Form Directory |
Select the form whose results you want to list. |
|
Limit |
Set the maximum number of results Boost.space Integrator should return during one scenario execution cycle. |
|
After Date |
Enter the date to list the results on or after the specified date. |
|
Before Date |
Enter the date to list the results on or before the specified date. |
|
After ID |
Enter the result ID of the form to list the results after the specified ID. |
|
Before ID |
Enter the result ID of the form to list the results before the specified ID. |
|
Sort ID |
Enter the ID to sort the items with the specified ID. |
|
Sort Direction |
Select the direction in which you want to sort the results:
|
|
Results View ID |
Enter the option to view the results. |
|
Search Equals |
Enter the ID to list the results that match the specified ID. For multiple-choice item types, use the choice’s position number. |
|
Search Begins |
Enter the ID to start the search with the specified ID. Only works with text item types. |
|
Search Ends |
Enter the ID to end the results search with the specified ID contains this value. Only works with text item types. |
|
Search Method |
Select the option to combine the results:
|
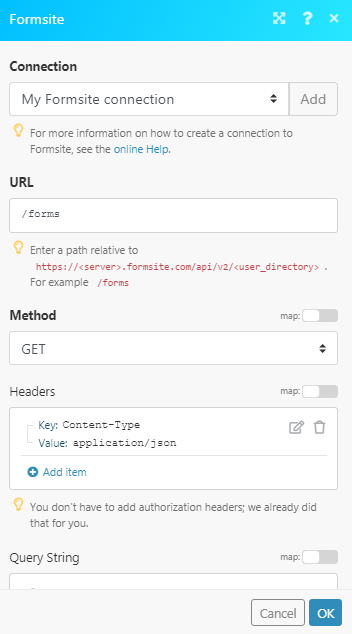
Performs an arbitrary authorized API call.
|
Connection |
||||
|
URL |
Enter a path relative to
|
|||
|
Method |
Select the HTTP method you want to use: GET to retrieve information for an entry. POST to create a new entry. PUT to update/replace an existing entry. PATCH to make a partial entry update. DELETE to delete an entry. |
|||
|
Headers |
Enter the desired request headers. You don’t have to add authorization headers; we already did that for you. |
|||
|
Query String |
Enter the request query string. |
|||
|
Body |
Enter the body content for your API call. |