| Active |
|---|
| This application does not need additional settings. So you can make connectionUnique, active service acces point to a network. There are different types of connections (API key, Oauth…). only by using your login credentials or by following the instructions below . |
![[Note]](https://docs.boost.space/wp-content/themes/bsdocs/docs-parser/HTML/css/image/note.png) |
Note |
|---|---|
|
UiPath is part of a limited availability release for the time being. If you find that the UiPath app is not active in your environment, please open a Support ticket. |
UiPath is a Robotic Process Automation (RPA) system. UsersCan use the system on a limited basis based on the rights assigned by the admin. create software robots (bots) that interact with systems and applications to automate users’ day-to-day tasks on the desktop, such as copying and pasting data, making calculations, and moving files.
By combining RPA with Action Flows, you can:
-
leverage your existing bots and take targeted action by intelligently triggering them based on insights from EMS.
-
automate your entire landscape by combining API-led automation and UI-led automation in one Action Flow.
Take a look at our video on RPAs and Action Flows.
To use UiPath with , you need to:
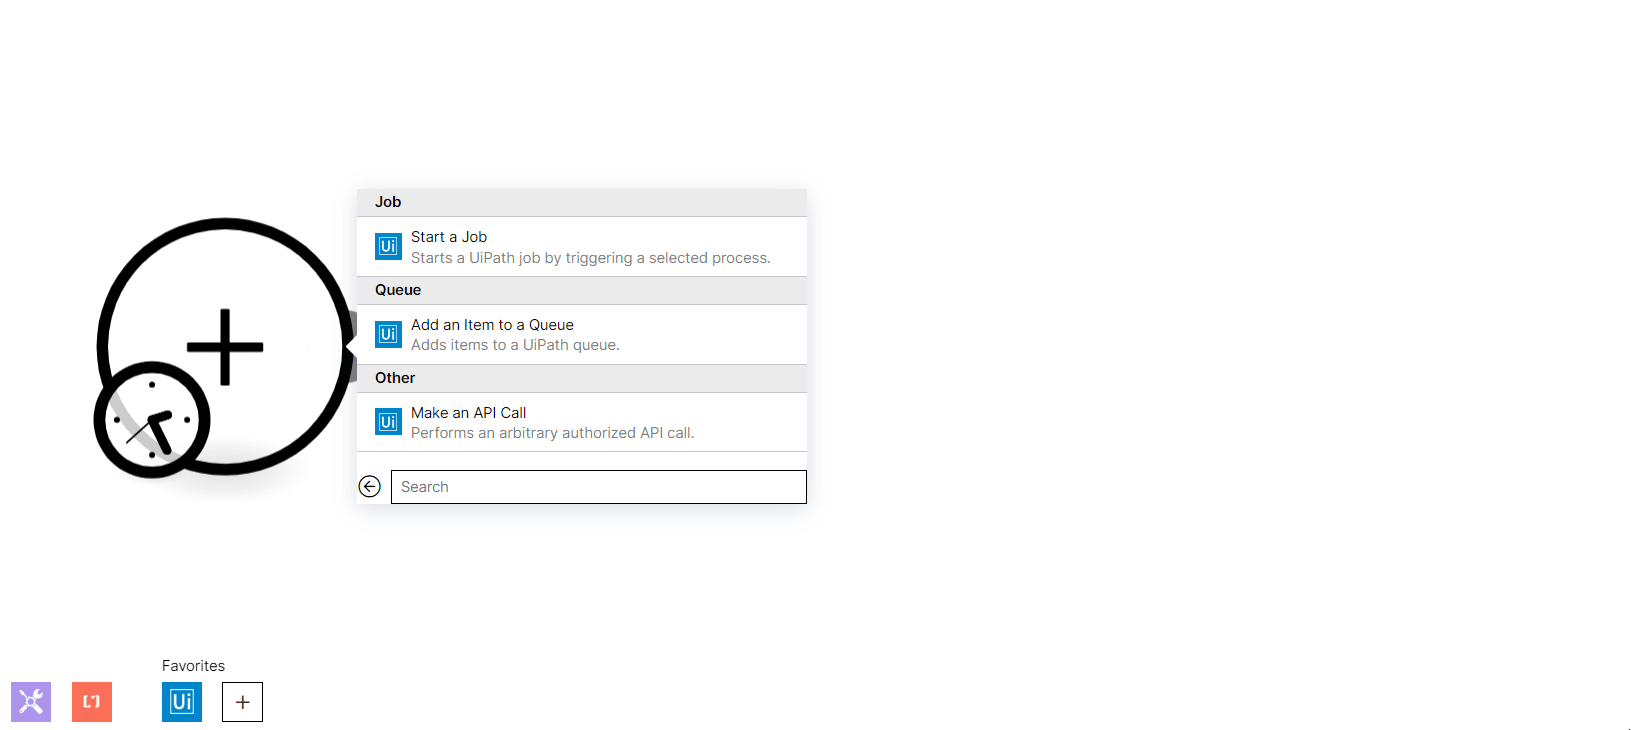
By using the UiPath app in Action Flows, users can:
-
start a UiPath job for a selected process.
-
add EMS data to UiPath by passing itemsItems are rows in records (order/request/invoice/purchase...) to a UiPath queue.
In UiPath, items are key-value pairs of specific content.
This page explains how to:
-
set up a connection to UiPath (cloud).
-
configure and start a UiPath job.
-
add items to a UiPath queue.
Connect UiPath to Boost.spaceCentralization and synchronization platform, where you can organize and manage your data. IntegratorPart of the Boost.space system, where you can create your connections and automate your processes.
Depending on the type of UiPath installation, you can connect UiPath to action flows using the following connection types:
-
UiPath On-premise (beta)
-
Uipath Cloud
|
Note |
|---|---|
|
Integration with an on-premise installation of UiPath is in the Beta version and is out of the scope of this documentation. The connection to an on-premise version is only possible when white-listing the Celonis IP address. |
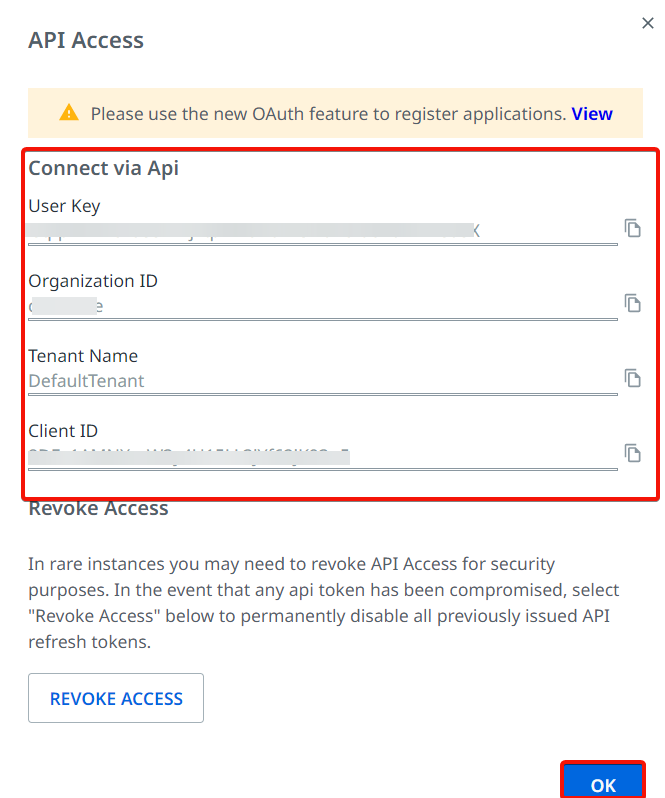
To connect to the UiPath Cloud version, you need to obtain the Client ID, UserCan use the system on a limited basis based on the rights assigned by the admin. Key, Tenant Name, and Organization ID from your UiPath account and insert it in the Create a connection dialog in the Boost.space Integrator moduleThe module is an application or tool within the Boost.space system. The entire system is built on this concept of modularity. (module - Contacts).
To connect to a UiPath Cloud version:
-
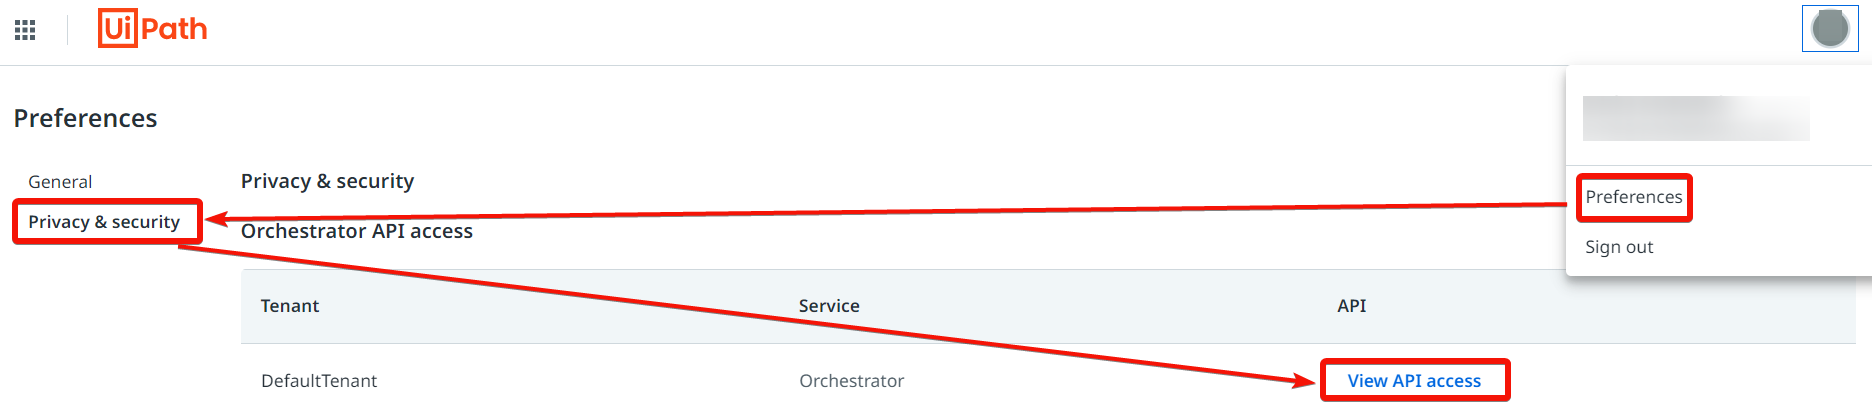
Log in to your UiPath Orchestrator account.
-
Click Account Preferences > Privacy and Security > View API Access.
-
Copy the details of User Key, Organization ID, Tenant Name, and Client ID to a safe place and click OK.
-
Go to Boost.space Integrator and open the UiPath module’s Create a connection dialog and select the Connection type to UiPath Cloud.
-
In the Connection name field, enter a name for the connection.
-
In the UiPath User Key, UiPath Organization ID, UiPath Tenant Name, and UiPath Client ID fields, enter the values copied in step 3 and click Create.
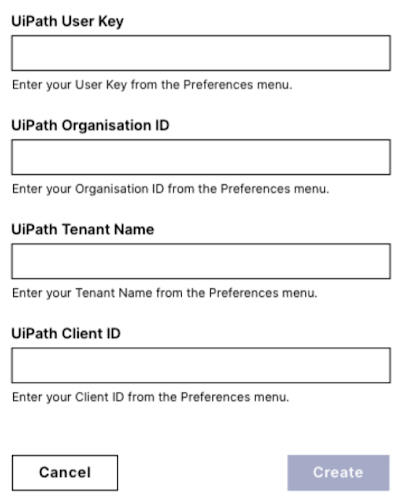
The connection is established and you can now create scenariosA specific connection between applications in which data can be transferred. Two types of scenarios: active/inactive. .
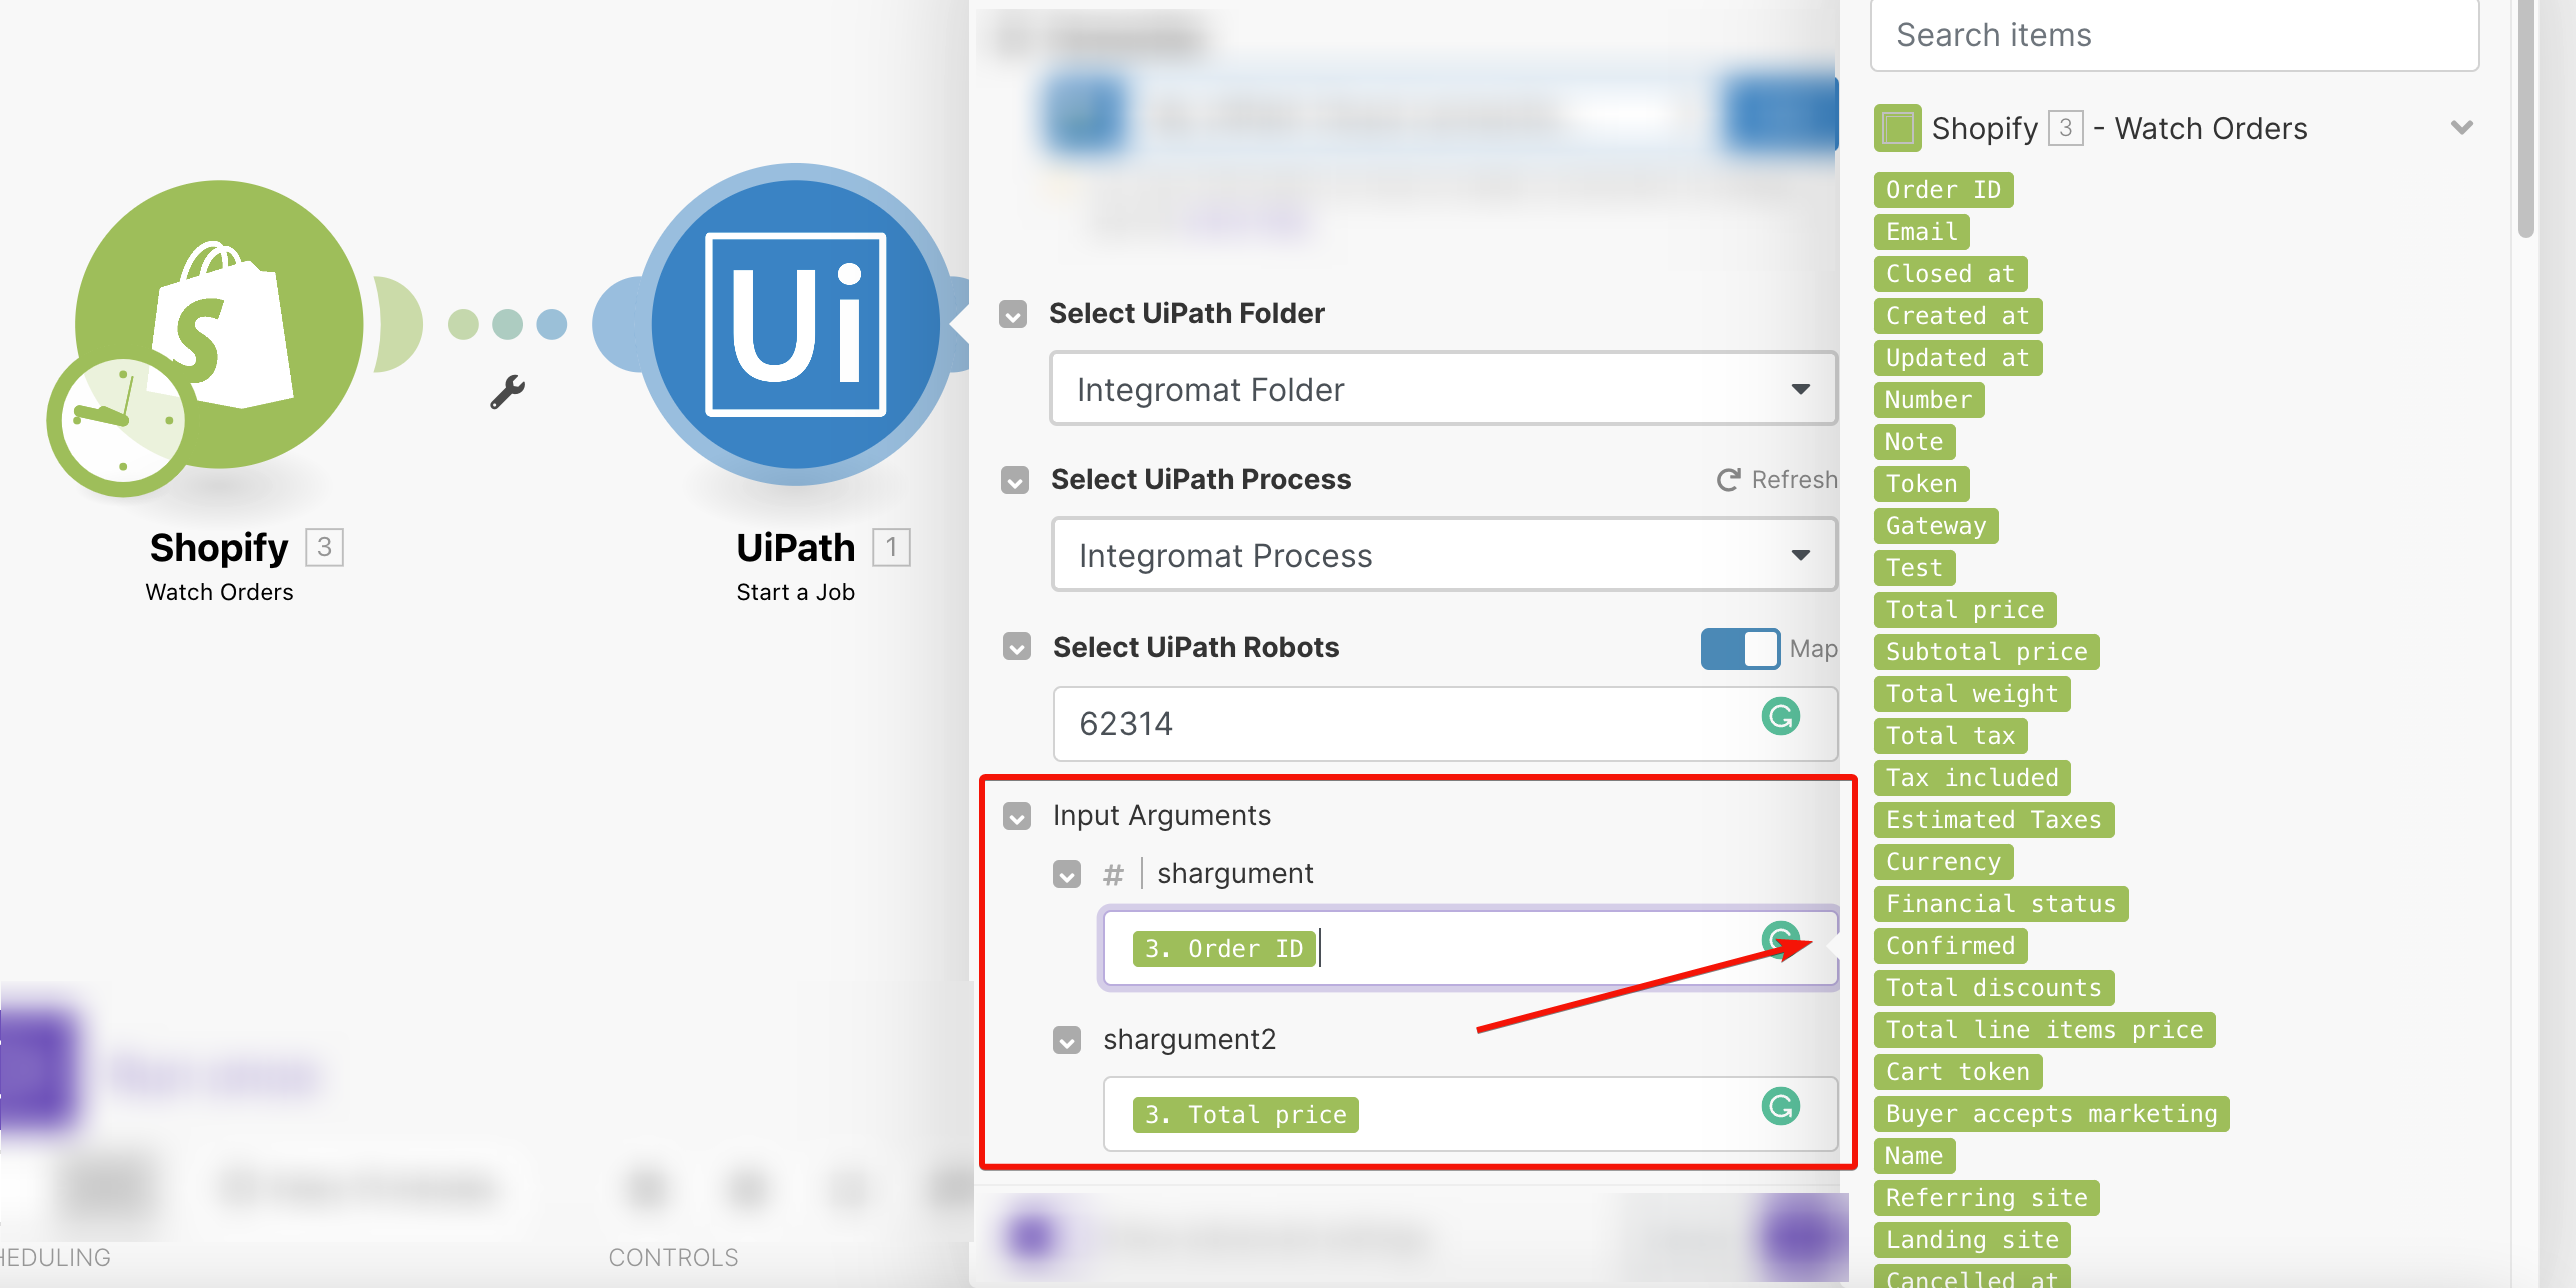
A Job is the triggerEvery scenario has a trigger, an event that starts your scenario. A scenario must have a trigger. There can only be one trigger for each scenario. When you create a new scenario, the first module you choose is your trigger for that scenario. Create a trigger by clicking on the empty module of a newly created scenario or moving the... event of a process. Each job is an instance of a robot running the process.
To start a UiPath job in action flows, you need to select the process, and a robot to execute the selected process.
Starts a UiPath job by triggering a selected process.
|
Connection |
Establish a connection to your UiPath account. |
|
Select UiPath Folder |
Select or map the UiPath folder that contains the process you want to execute. |
|
Select UiPath Process |
Select the UiPath process to start the job. You must create a process in your UiPath account. |
|
Select UiPath Robots |
Select a robot to execute the process. You can select multiple robots. You must configure robots in your UiPath account. |
|
Add Input Arguments (Optional) |
If there are any input variables configured for the process in your UiPath account, they would be shown in the app when you select the process. You can either enter the data manually or use the output values from the previous apps. |
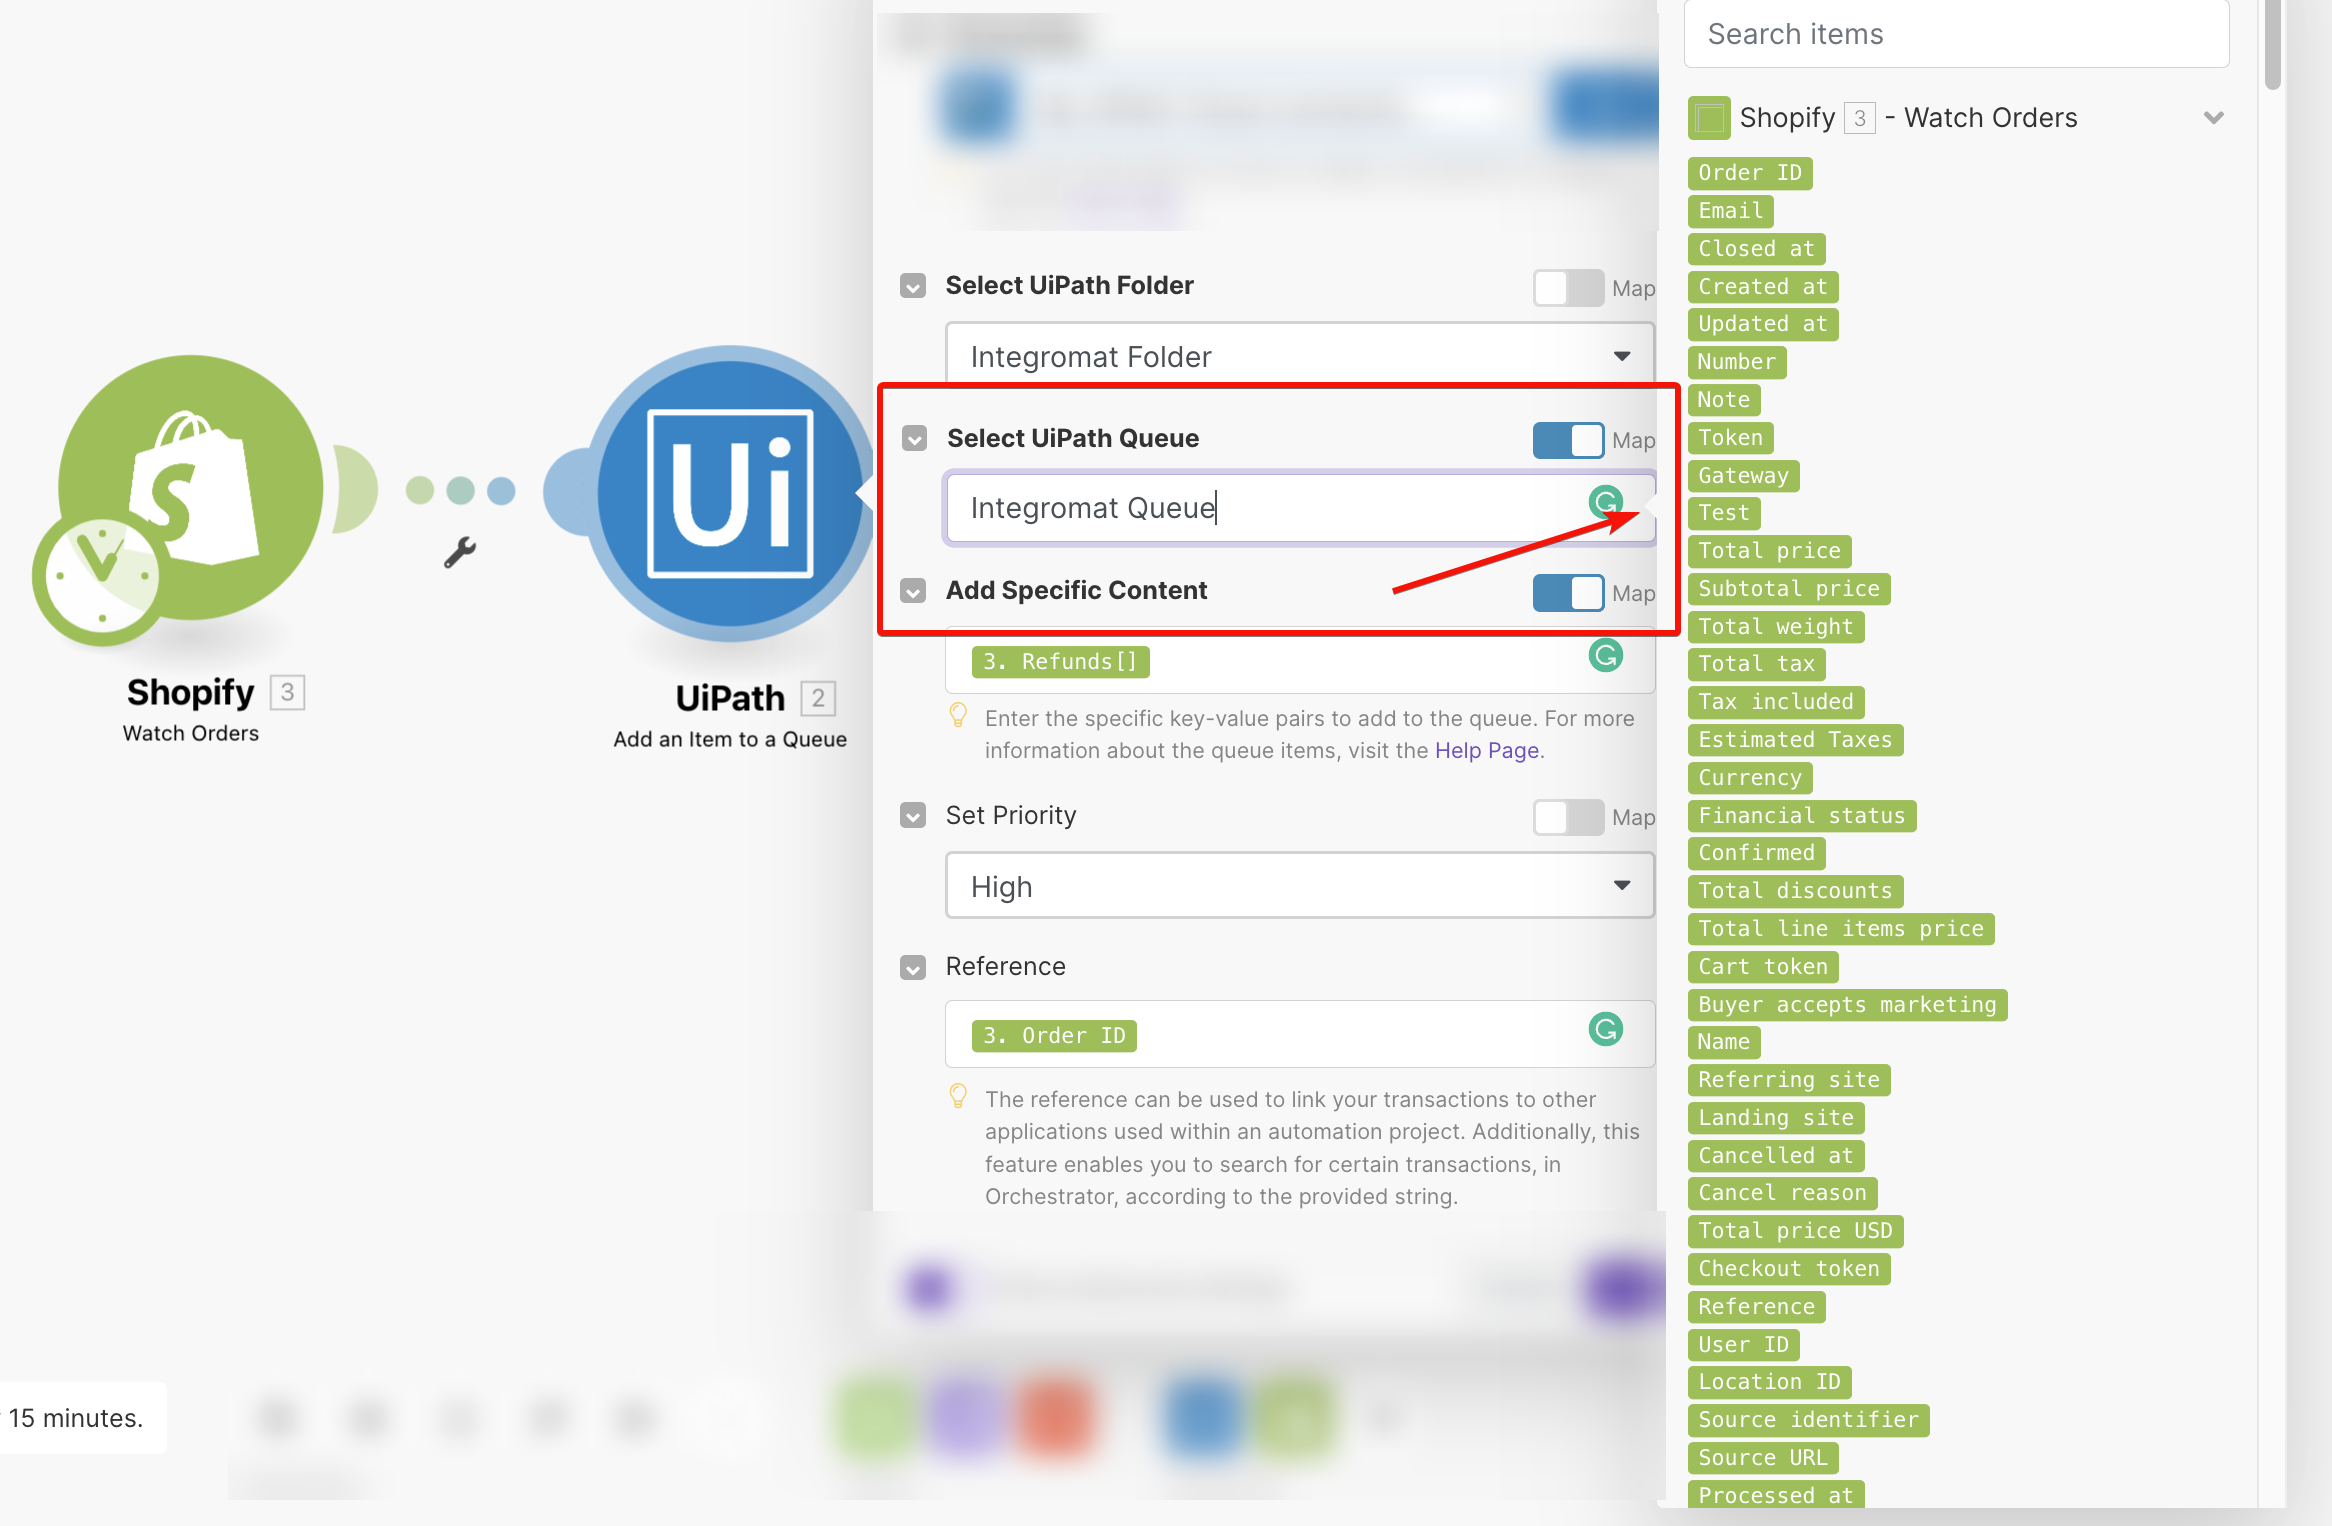
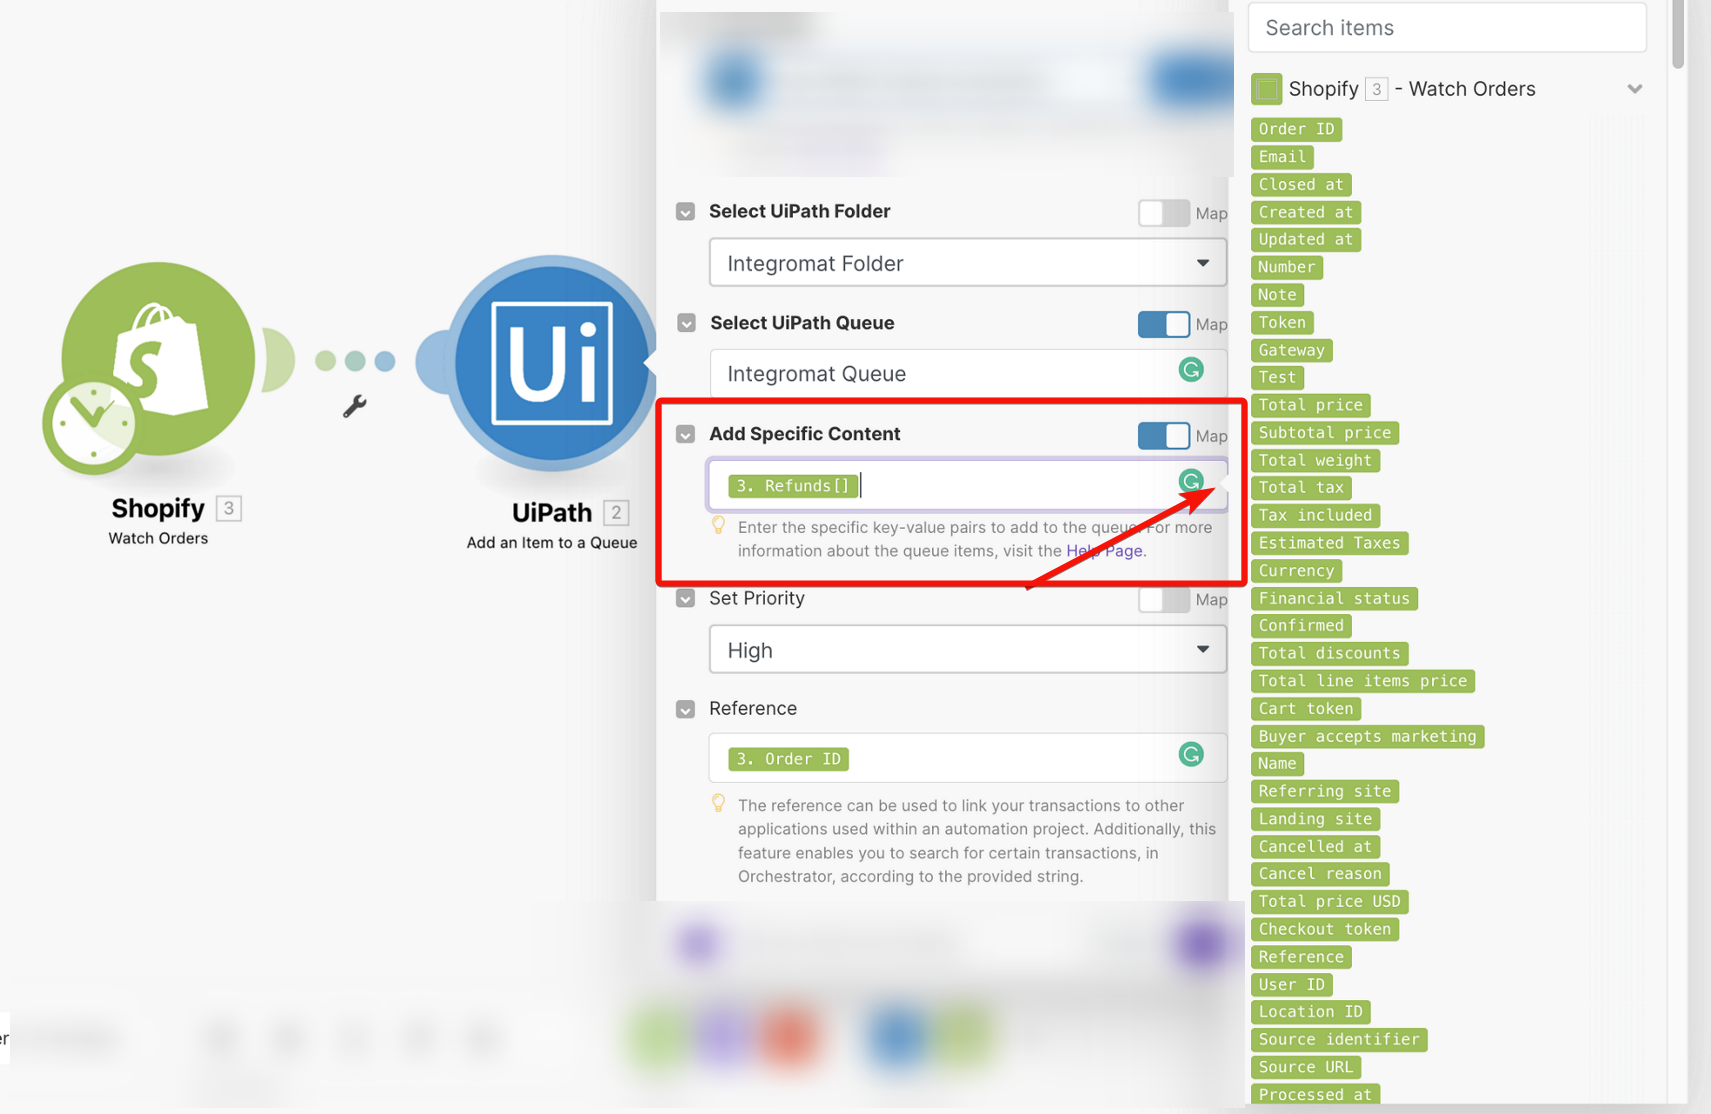
In UiPath, a queue is a container of data held so other bots or applications can use it. Users create queues in their UiPath account.
From the Action Flows, we allow the users to fill in these queues with the data (key/value pair) to be picked up by the jobs or other applications.
Adds an itemItems are rows in records (order/request/invoice/purchase...) to a queue.
|
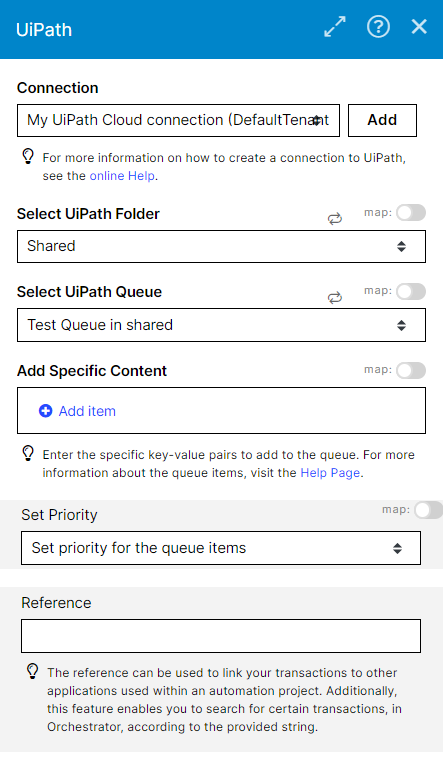
Connection |
Establish a connection to your UiPath account |
|
Select UiPath Folder |
Select or map the folder that contains the queue for which you want to add the items. |
|
Select UiPath Queue |
Select or map the queue to which you want to add the items. The Map functionFunctions you can use in Boost.space Integrator - create, update, delete, get, search. allows a user to map a value from one of the previous modulesThe module is an application or tool within the Boost.space system. The entire system is built on this concept of modularity. (module - Contacts) instead of selecting a queue from the dropdown list. |
|
Add Specific Content |
Enter or map the specific Key-Value pair to add the items to the queue. For more information about the queue items, see queue item requests. |
|
Set Priority (Advanced Settings) |
From the Priority list, select the item’s priority. The items are arranged in the queue for processing based on the priority set.
|
|
Reference (Advanced Settings) |
Enter or map the reference to link your transactions to other applications used within an automation project. Additionally, this reference enables you to search for certain transactions, in UiPath Orchestrator, according to the provided string. |
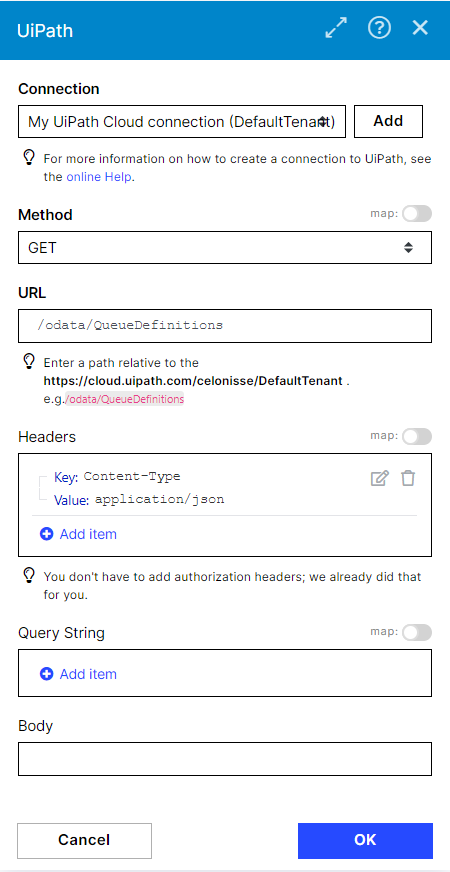
Performs an arbitrary authorized API call.
|
Connection |
Establish a connection to your UiPath account. |
|
URL |
Enter a path relative to |
|
Method |
Select the HTTP method you want to use: GET to retrieve information for an entry. POST to create a new entry. PUT to update/replace an existing entry. PATCH to make a partial entry update. DELETE to delete an entry. |
|
Headers |
Enter the desired request headers. You don’t have to add authorization headers; we already did that for you. |
|
Query String |
Enter the request query string. |
|
Body |
Enter the body content for your API call. |
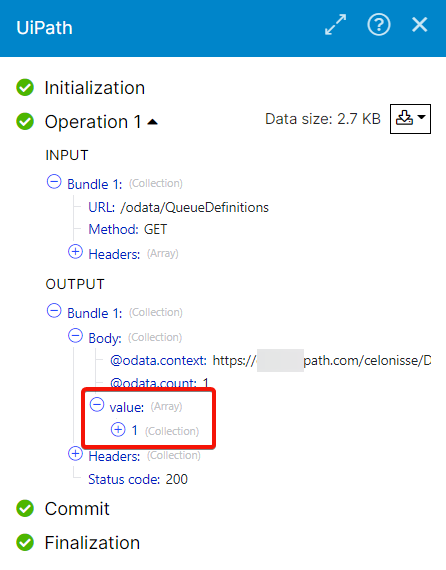
The following API call returns all the folders from your UiPath account:
URL
/odata/QueueDefinitions
Method
GET
Matches of the search can be found in the module’s Output under BundleA bundle is a chunk of data and the basic unit for use with modules. A bundle consists of items, similar to how a bag may contain separate, individual items. > Body > value.
In our example, 1 folder is returned: