| Active |
|---|
| This application does not need additional settings. So you can make connectionUnique, active service acces point to a network. There are different types of connections (API key, Oauth…). only by using your login credentials or by following the instructions below . |
With the Google Workspace AdminAdmins in Boost.space have exclusive access to system settings. They manage the overall system setup, including appearance, language, currency, user settings, and the availability of individual modules to users and teams. modulesThe module is an application or tool within the Boost.space system. The entire system is built on this concept of modularity. (module - Contacts) in Boost.spaceCentralization and synchronization platform, where you can organize and manage your data. IntegratorPart of the Boost.space system, where you can create your connections and automate your processes., you can watch, list, create, update, retrieve, and delete usersCan use the system on a limited basis based on the rights assigned by the admin., roles, role assignments, and organizational units.
To get started with Google Workspace Admin, create an account at https://workspace.google.com.
![[Note]](https://docs.boost.space/wp-content/themes/bsdocs/docs-parser/HTML/css/image/note.png) |
Note |
|---|---|
|
Boost.space Integrator‘s use and transfer of information received from Google APIs to any other app will adhere to Google API Services User Data Policy. |
-
Log in to your Boost.space Integrator account, add a Google Workspace Admin moduleThe module is an application or tool within the Boost.space system. The entire system is built on this concept of modularity. (module - Contacts) to your scenarioA specific connection between applications in which data can be transferred. Two types of scenarios: active/inactive., and click Create a connection.
-
Optional: In the Connection name field, enter a name for the connection.
-
Optional: Click Show Advanced Settings field, and enter the client credentials from your custom application. See Connecting to Google services using Oauth2.
-
Click the Sign in with Google button and select your Google account.
-
Review the access information and click Allow.
You have successfully established the connection. You can now begin editing scenarios and adding more Google Workspace Admin modules. If your connection needs reauthorization at any point, follow the connection renewal steps here.
Boost.space Integrator‘s modules’ advanced settings let you enter your own OAuth2 client credentials. OAuth is a security authorization protocol to interact with your protected data that does not require sending your login information.
In order to use OAuth2 with your Google apps, you need to create your own project and a custom OAuth client in Google Cloud Console. This is useful for connecting restricted Google services, like Google Drive or Gmail, to Boost.space Integrator.
The following procedure is intended for:
-
Personal use (@gmail.com and @googlemail.com users)
-
Organizational use (Internal use within a business or other organizationGoogle Workspace (formerly GSuite) users that prefer to use a custom OAuth client)
To create a custom OAuth client for Google service you must do the following:
-
Create a project on the Google Cloud Platform.
-
Enable APIs on the Google Cloud Platform.
-
Configure your OAuth Consent Form on the Google Cloud Platform.
-
Create credentials on the Google Cloud Platform.
-
Enter your credentials on Boost.space Integrator.
-
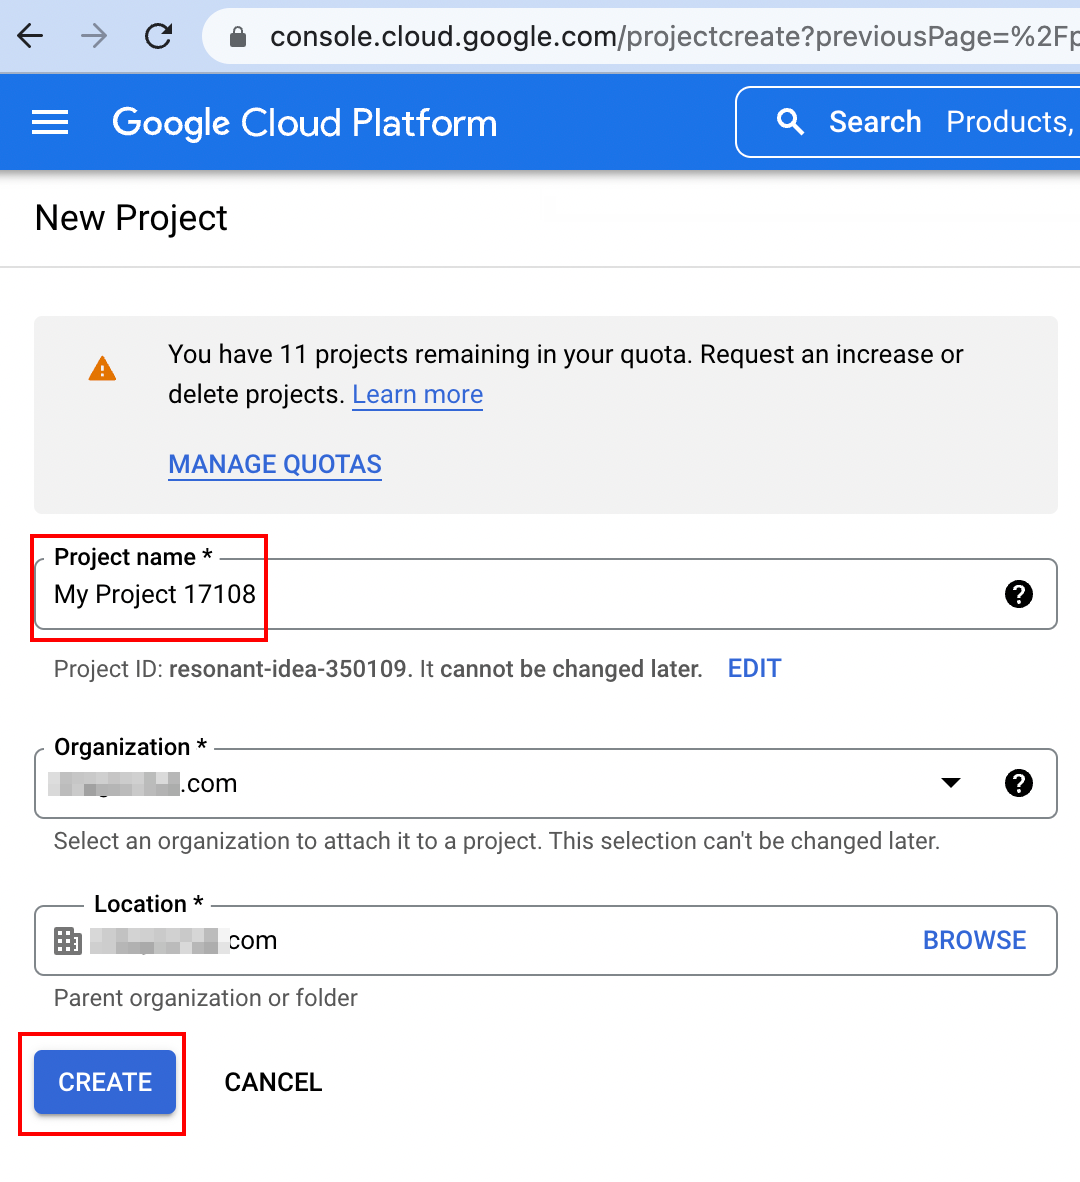
Sign in to Google Cloud Platform using your Google credentials.
-
Open the Dashboard, and click the CREATE PROJECT button.
-
Choose a name for your project, then click Create.

-
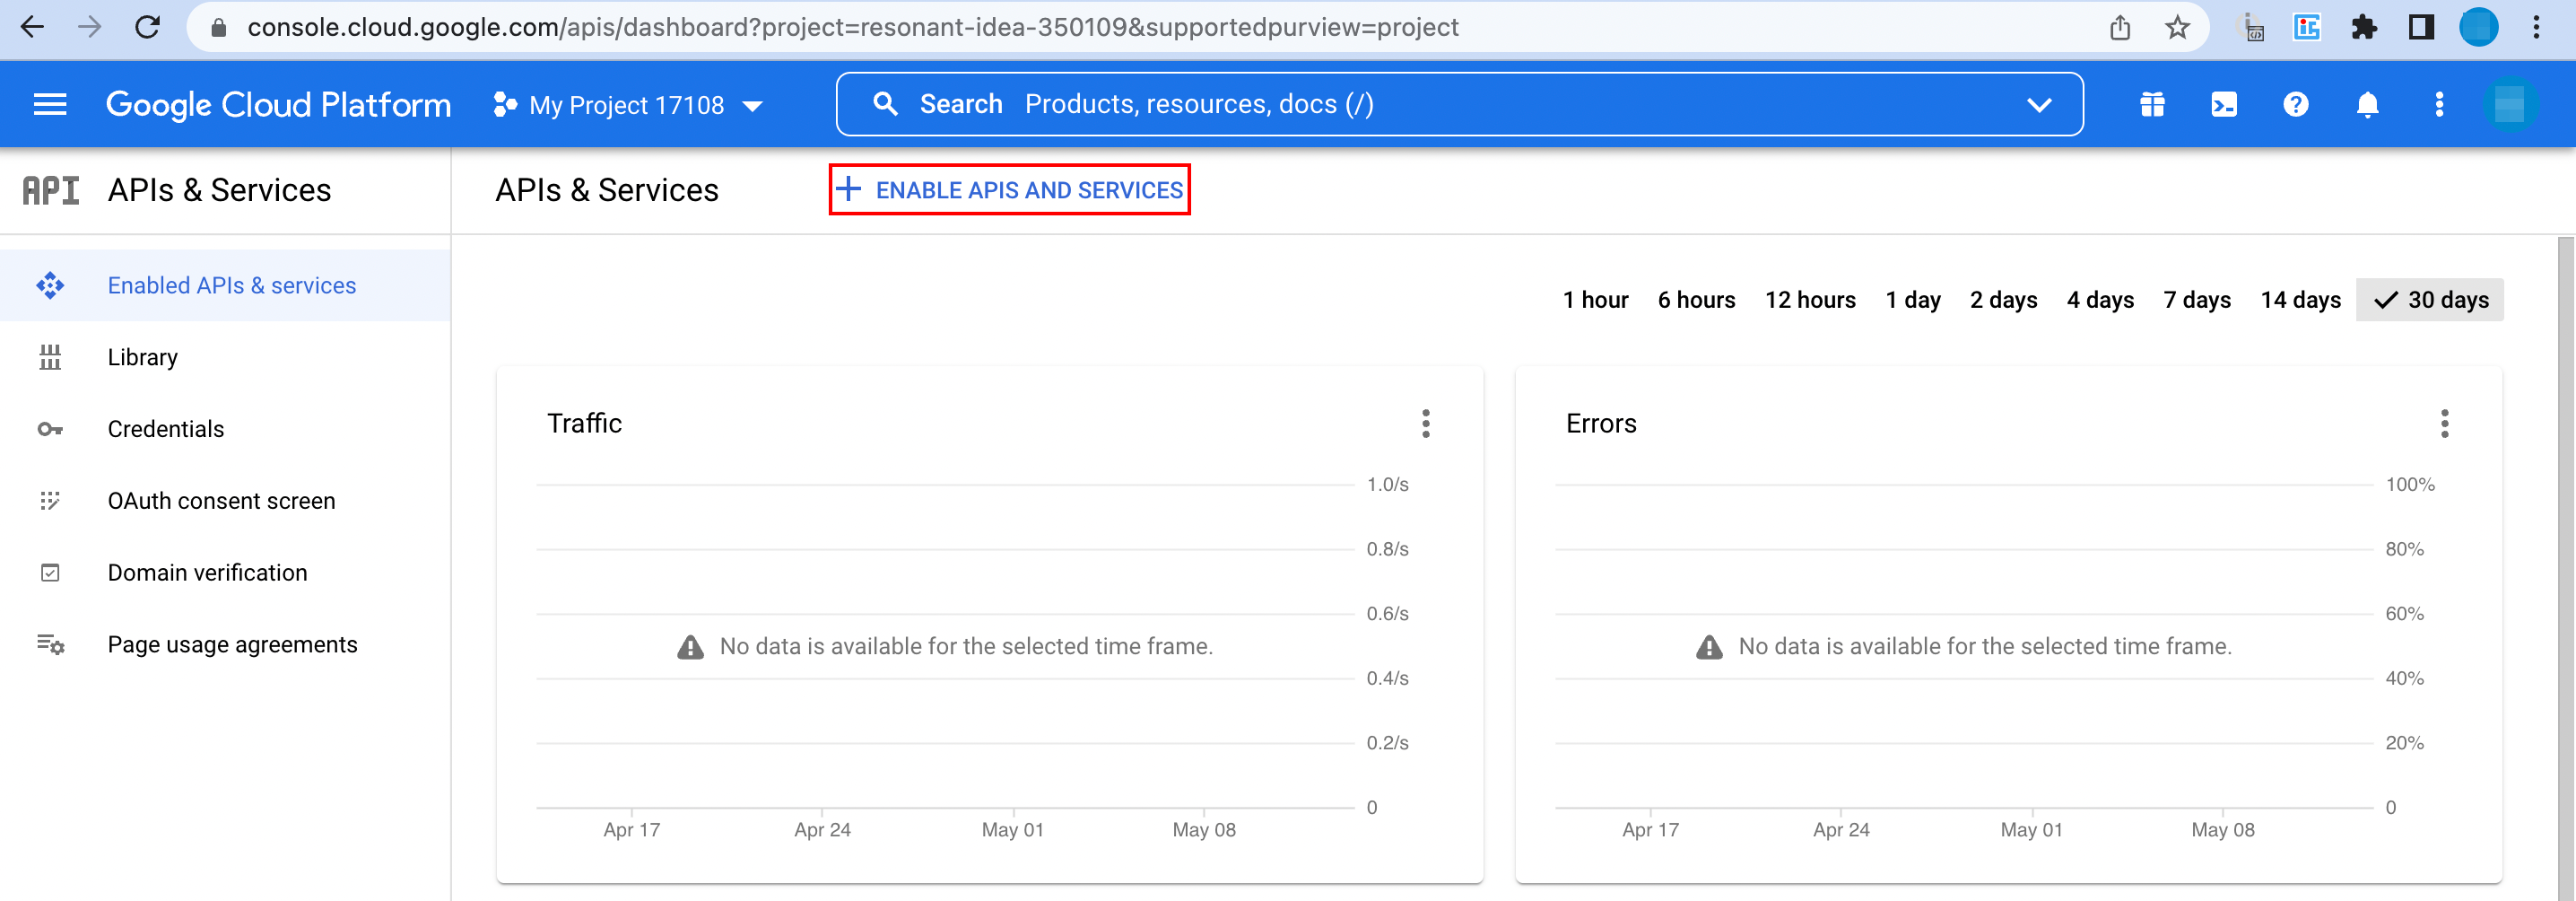
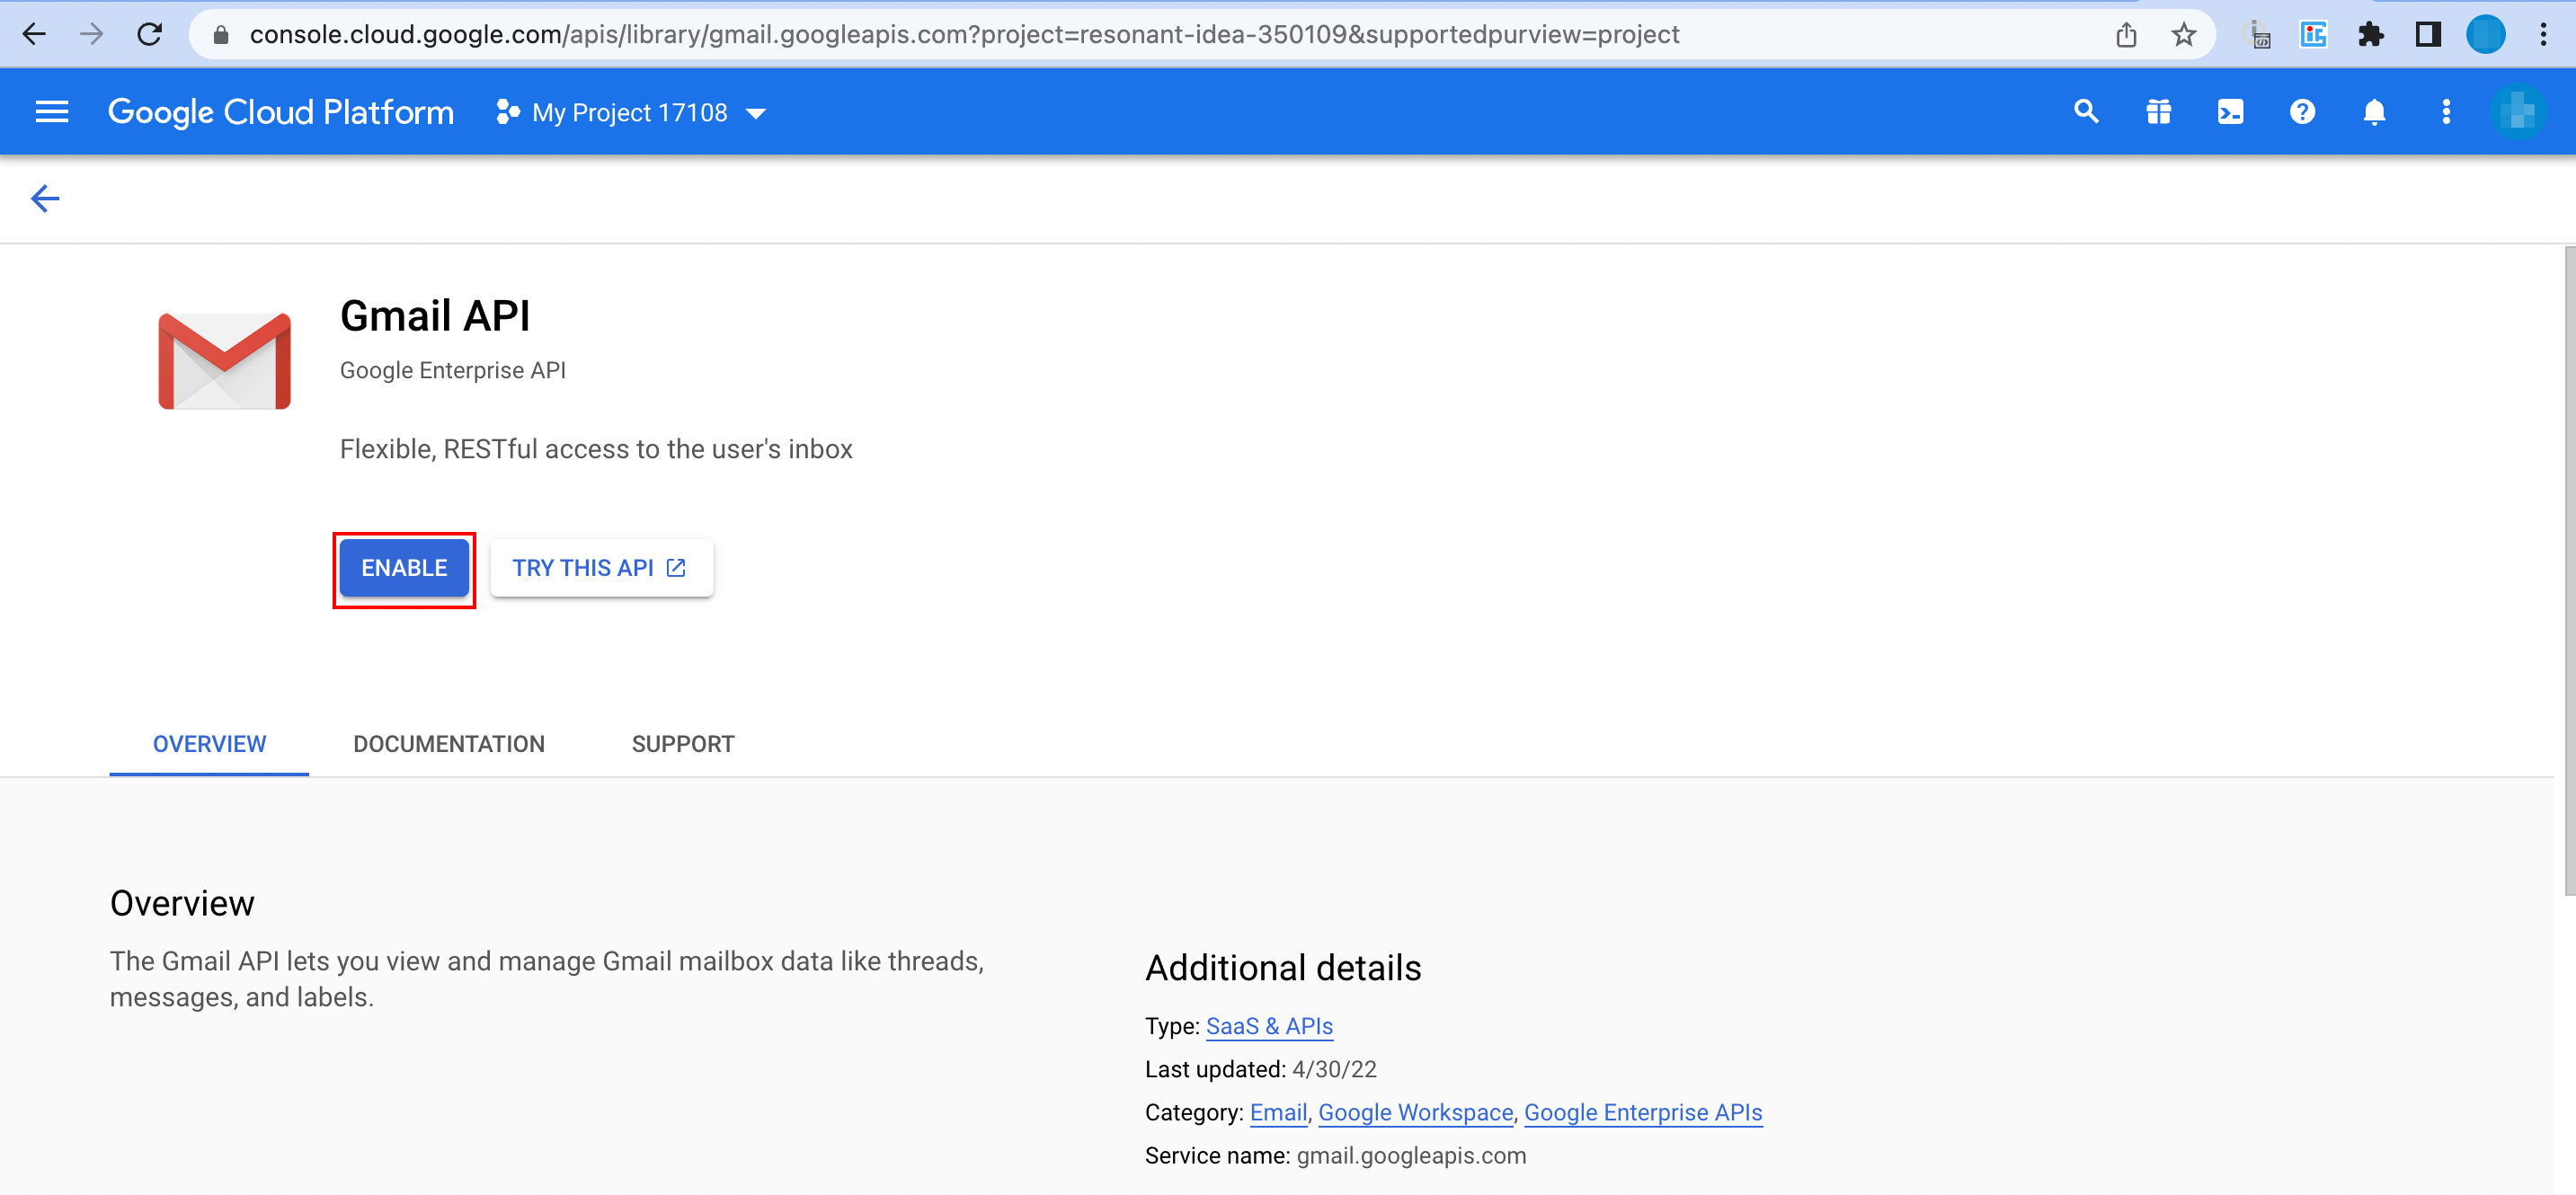
Click Enable APIs and services.
-
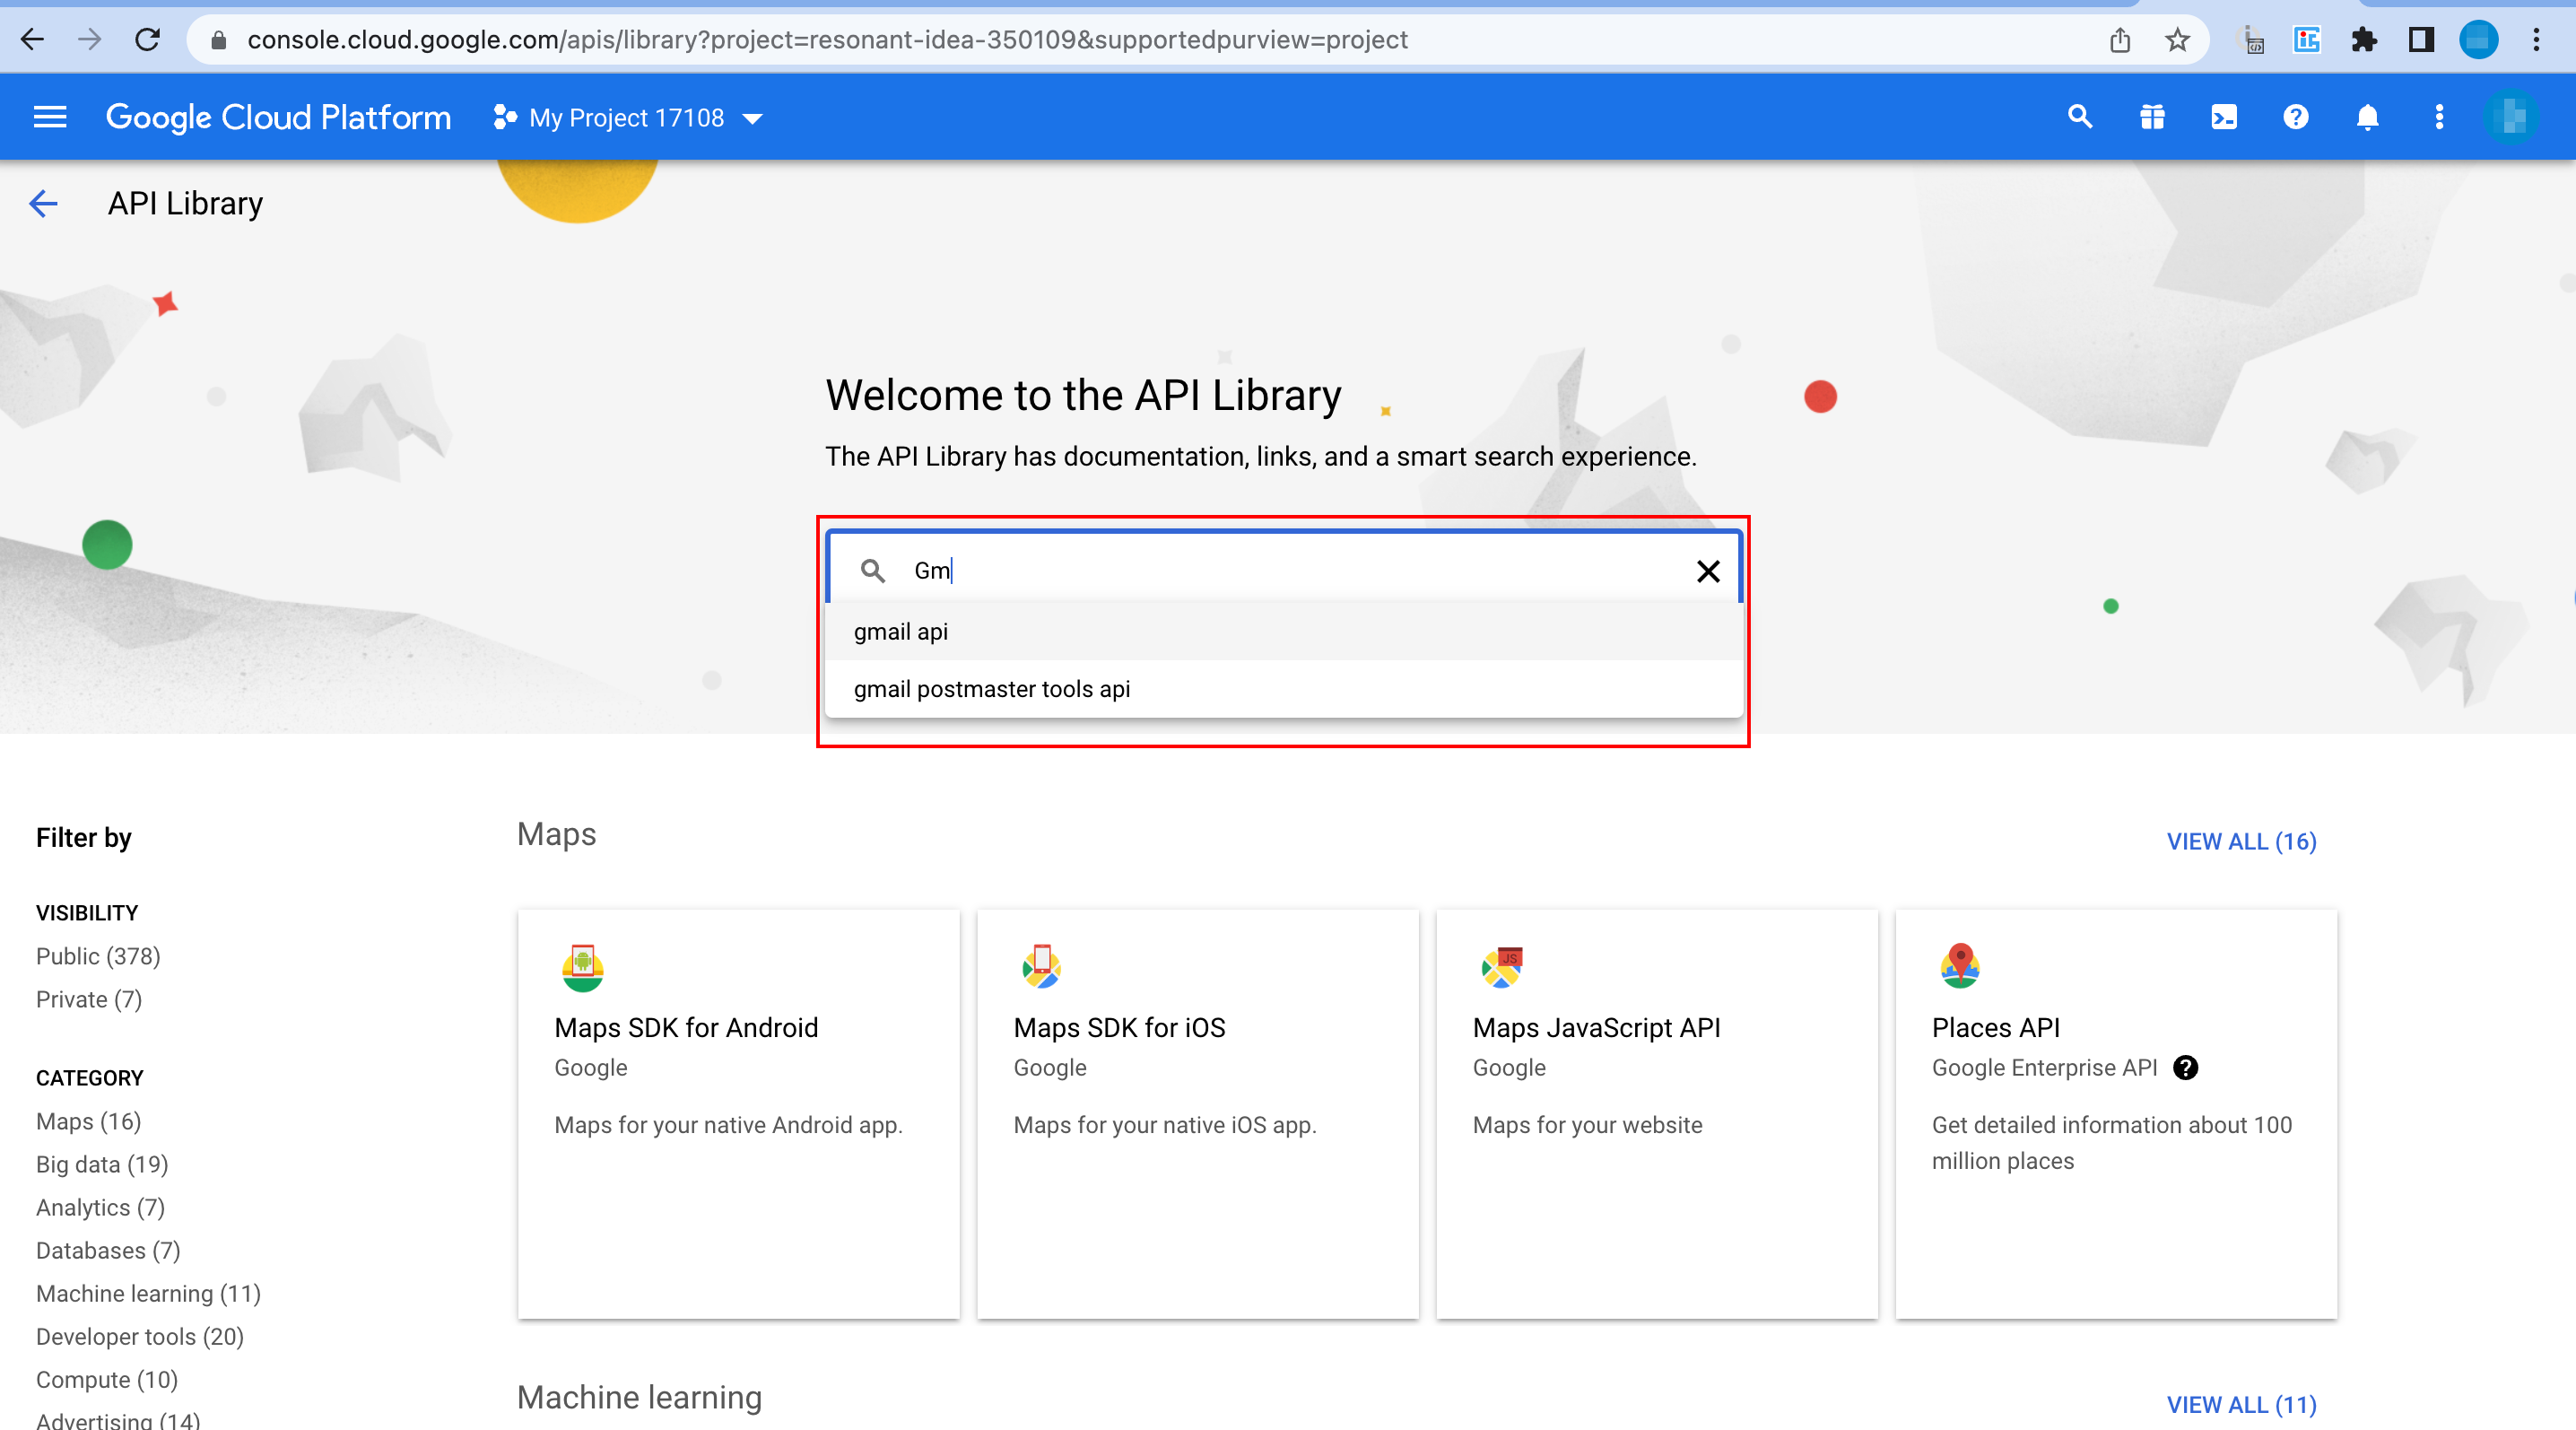
Enter the name of the service you want to use (for example, Gmail API or Google Drive API) in the Enable APIs and services field.
-
The desired service option should display as you type. Click on the API/service you want to connect to Boost.space Integrator.
-
Click Enable.
-
Go to APIs & Services > OAuth consent screen settings, choose the External option, then click Create.

Note You will not be charged when selecting this option. For more details, please refer to Google’s Exceptions to verification requirements.
-
Fill in the required fields as follows:
Application name
Enter the name of the app asking for consent.
For example:
Boost.space Integrator.UserCan use the system on a limited basis based on the rights assigned by the admin. Support Email
Select your email.
Authorized domains
integromat.commake.comDeveloper contact information
Enter your email.
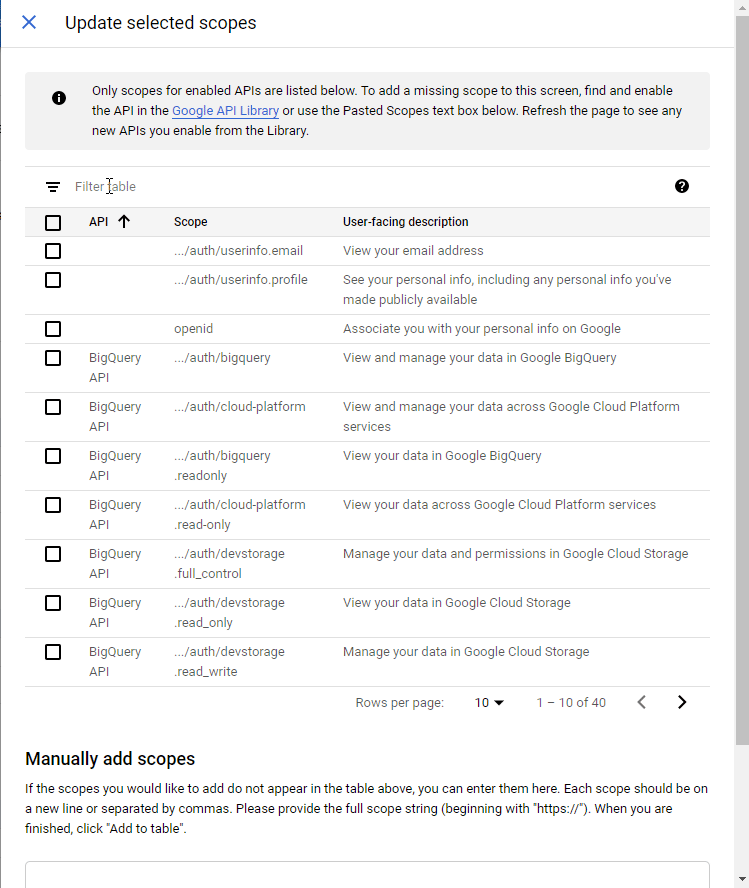
-
For the Scopes section:
-
On the Test Users section, click Add users to add the email address associated with the Google account you want to connect to Boost.space Integrator.
![[Warning]](https://docs.boost.space/wp-content/themes/bsdocs/docs-parser/HTML/css/image/warning.png)
Warning This step is required, otherwise, you won’t be able to establish a connection with Boost.space Integrator.
Note The Optional Info section is displayed only for non-Google Workspace users and does not contain any required fields.
-
Open the Credentials settings page.
Note If this is not the first API/SERVICE (Gmail or Google Drive) you have enabled, you don’t have to create credentials, as you have already created the credentials previously.
-
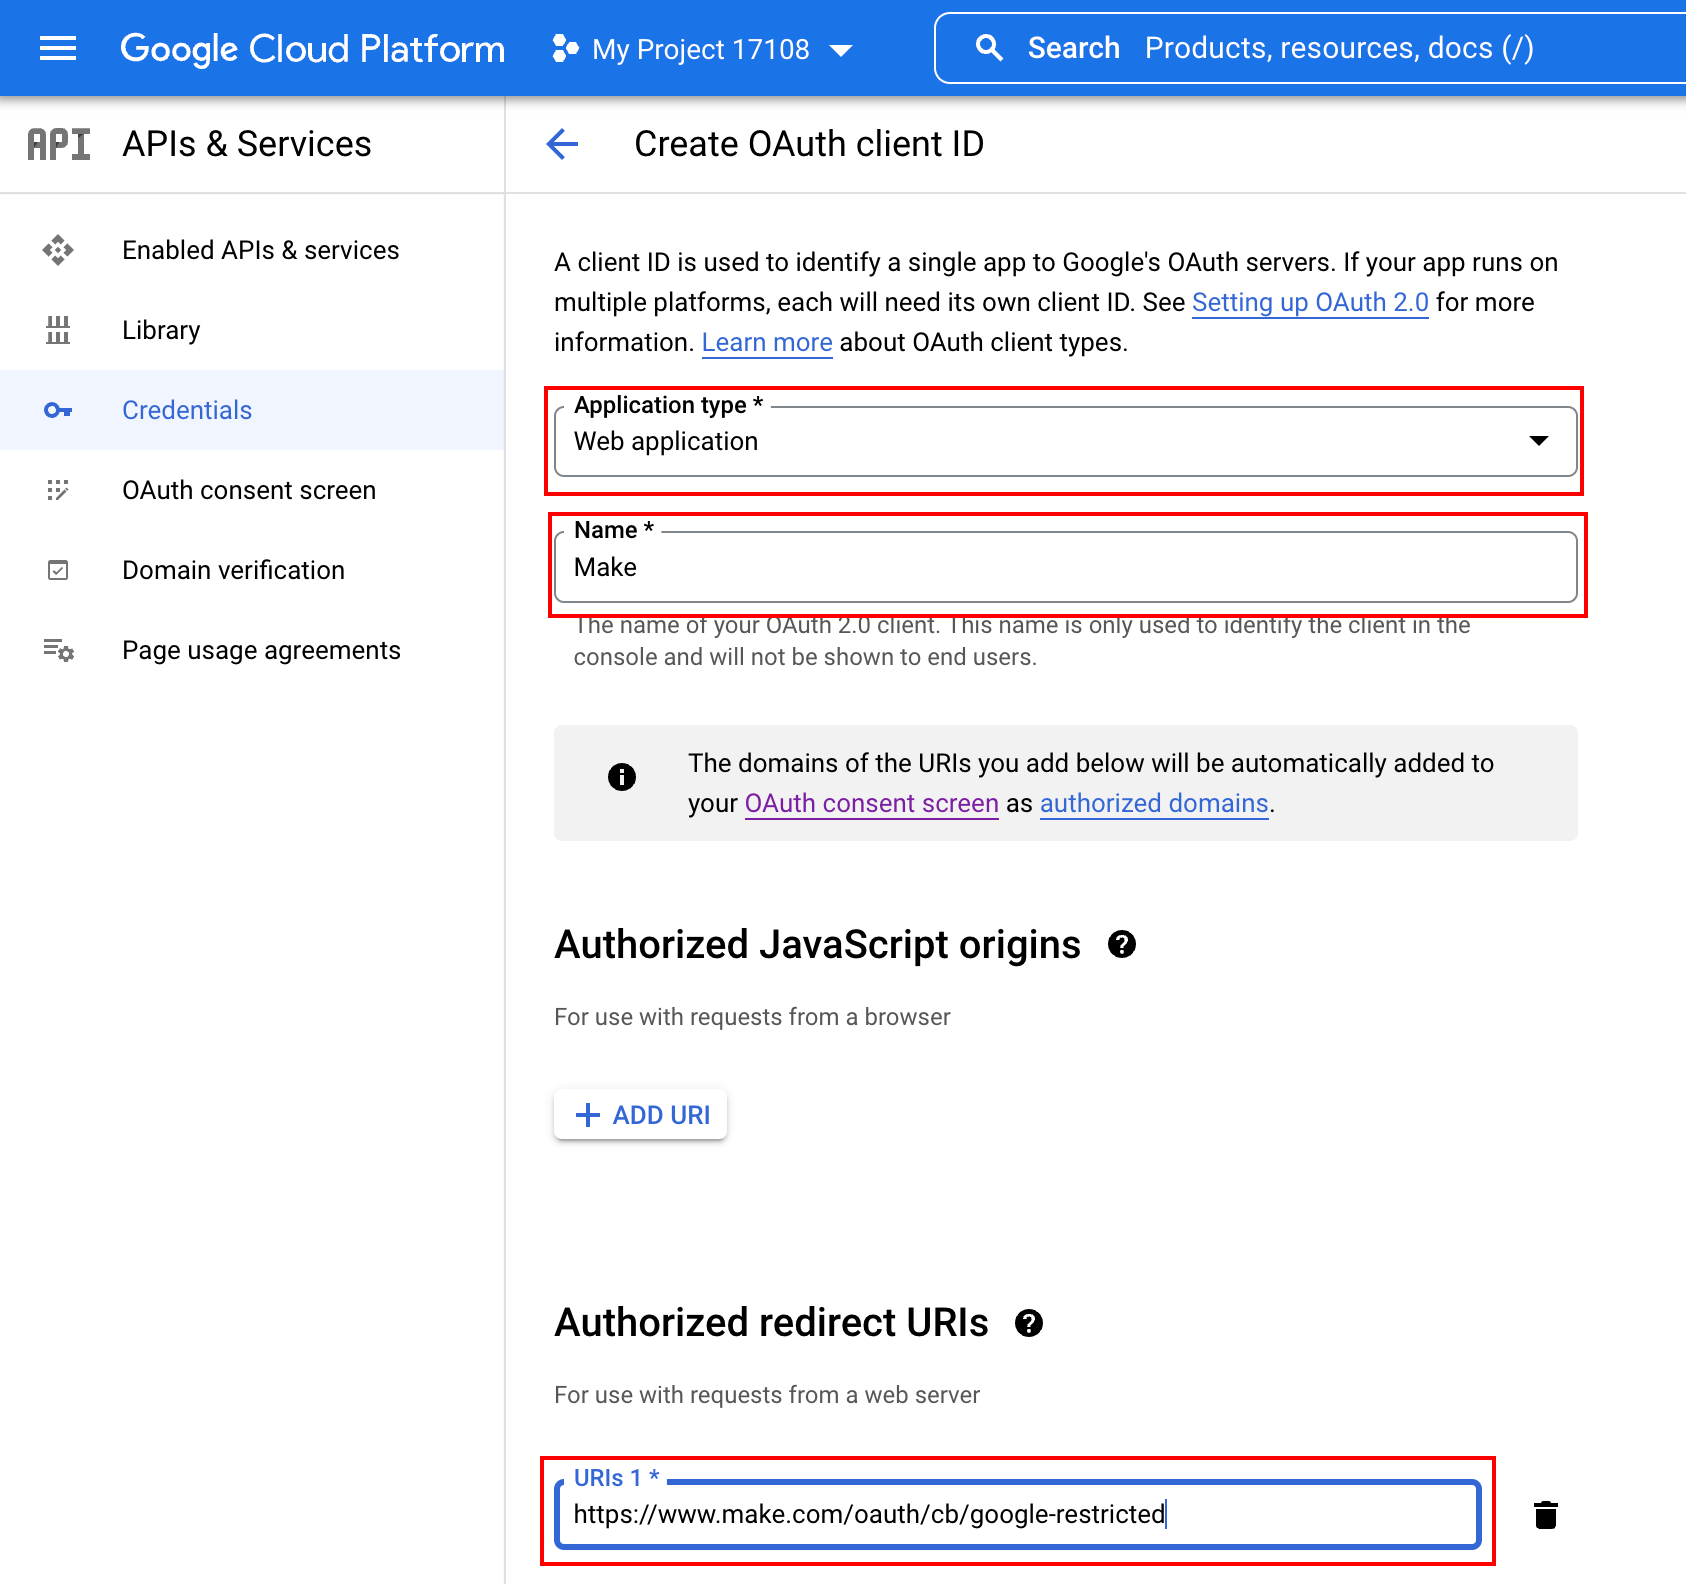
Click + Create credentials, and select the OAuth client ID option.

-
Fill in the required fields as follows, then click Create.
Application type
Web applicationName
e.g.
Boost.space IntegratorAuthorized redirect URIs
Add one of the following URIs:
-
https://integrator.boost.space/oauth/cb/google-restricted for Gmail or Google Drive
-
https://integrator.boost.space/oauth/cb/google/ for other Google apps
-
https://integrator.boost.space/oauth/cb/google-custom for Google Text-to-Speech and Google Natural Language
-
https://integrator.boost.space/oauth/cb/app for any app created via the Boost.space Integrator Developer Platform
OAuth redirect URI domain Notice that the redirect URI starts with
https://www.integromat.cominstead ofhttps://boost.space. This is currently a known issue in Make.Make was formerly called Integromat, which means you can trust this URL as much as any Make URL.
-
-
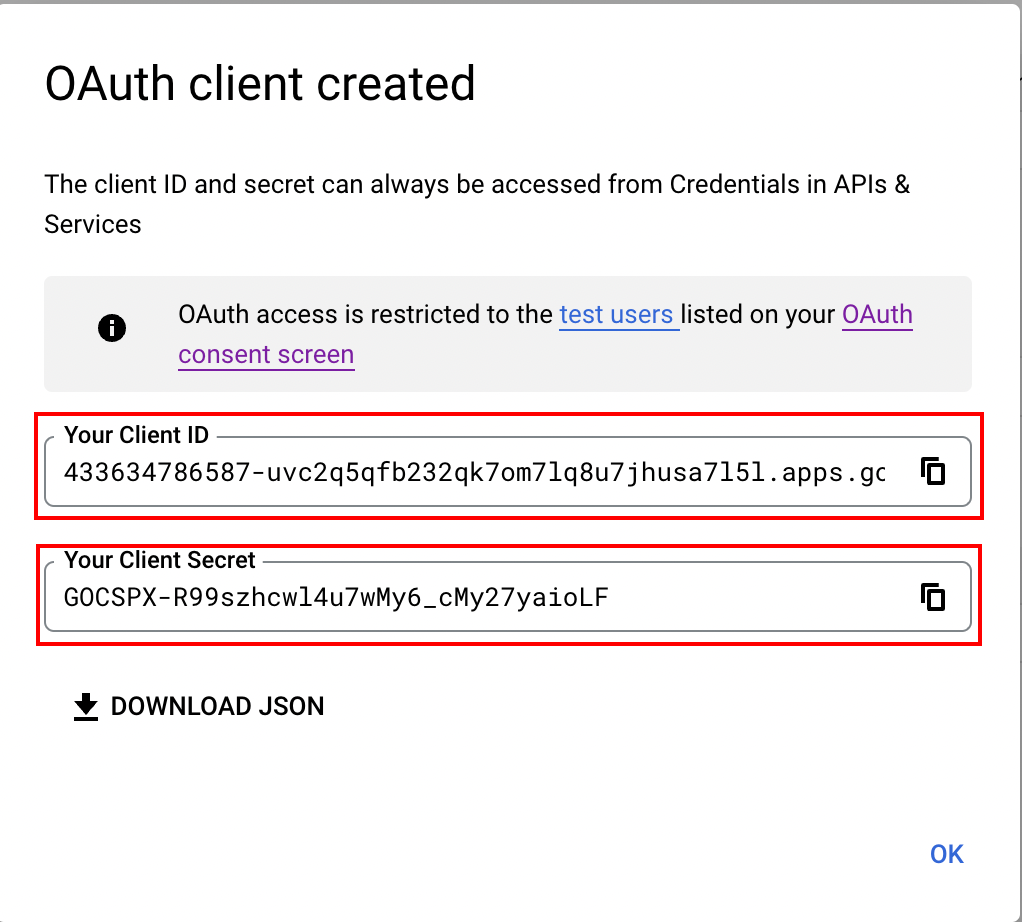
A dialog containing the app’s Client ID and Client Secret is displayed.
-
Go to your Boost.space Integrator scenario and choose the Google module you want to use.
-
Next to Connection, click Add.
-
Click Show advanced settings.
-
Enter the Client ID and Client Secret you retrieved in step 4 of the preceding procedure into the respective fields, then click Continue.
-
Sign in with your Google account.
-
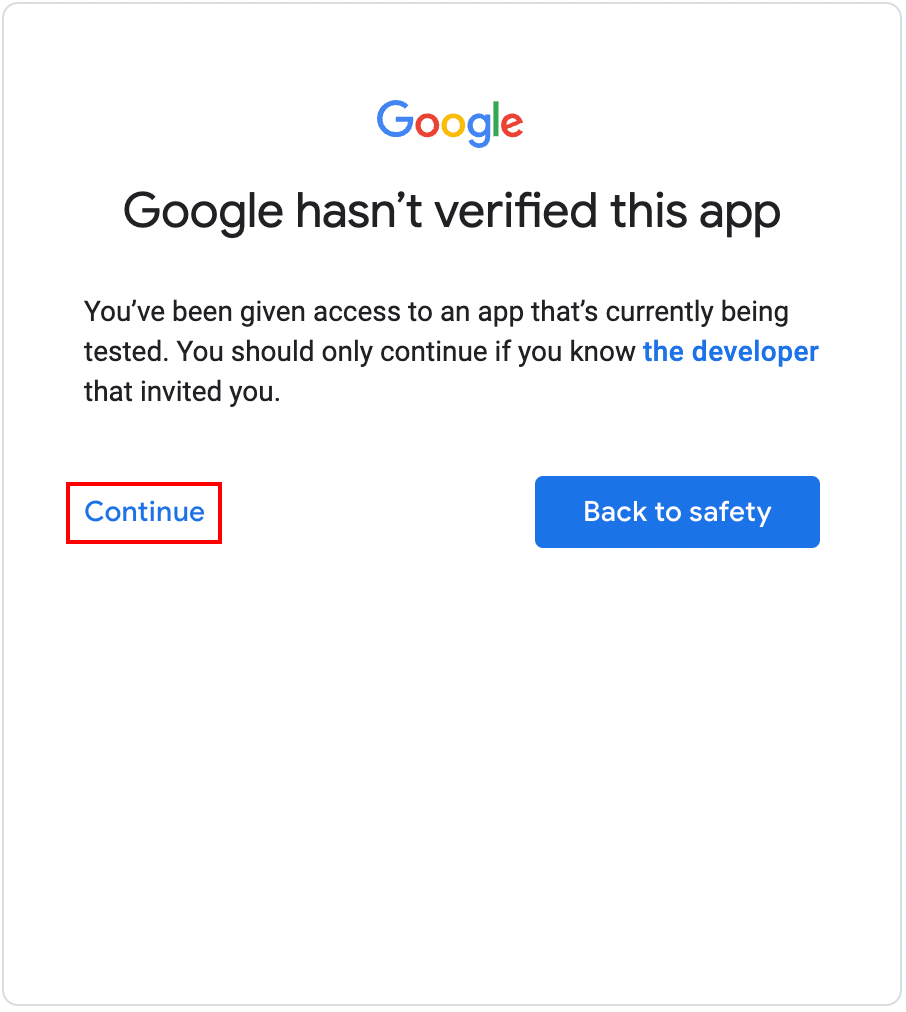
The This app isn’t verified window appears.
Note The app referred to in this window is your OAuth client.
-
Click on Continue.
-
Click the check box next to Google Product and click Allow to confirm your choices.
You have now established the connection to your chosen Google service using a custom OAuth client.
Using the following modules, you can watch, create, update, list, retrieve, and delete users and make users super admin.
TriggersEvery scenario has a trigger, an event that starts your scenario. A scenario must have a trigger. There can only be one trigger for each scenario. When you create a new scenario, the first module you choose is your trigger for that scenario. Create a trigger by clicking on the empty module of a newly created scenario or moving the... when a new user is created.
|
Connection |
|
|
Your Domain |
Select the domain whose users you want to watch. |
|
Query Search |
Enter the search query. You can search the users with the following three attributes:
For more details, refer to the Search Query Documentation. |
|
Projection |
Select the subset to fetch the user details:
|
|
Custom FieldA feature in Boost.space that allows you to define and manage data within each module according to your specific needs. Mask |
Enter a comma-separated list of schema names. |
|
Limit |
The maximum number of users Boost.space Integrator should return during one scenario execution cycleA cycle is the operation and commit/rollback phases of scenario execution. A scenario may have one or more cycles (one is the default).. |
Retrieves a list of users in a domain.
|
Connection |
|
|
Your Domain |
Select the domain whose users you want to list. |
|
Query Search |
Enter the search query. You can search the users with the following three attributes:
For more details, refer to the Search Query Documentation. |
|
Order By |
Select the order in which you want to list the users:
|
|
Projection |
Select the subset to fetch the user details:
|
|
Custom Field Mask |
Enter a comma-separated list of schema names. |
|
Show Deleted |
When selected, lists the users who are deleted. |
|
Sort Oder |
Select the order in which you list the users:
|
|
View Type |
Select the option to view the users:
|
|
Limit |
The maximum number of users Boost.space Integrator should return during one scenario execution cycle. |
Gets the details of a user.
|
Connection |
|
|
User ID |
Select the User ID whose details you want to retrieve. |
|
Projection |
Select the subset to fetch the user details:
|
|
Custom Field Mask |
Enter a comma-separated list of schema names. |
|
View Type |
Select the view:
|
Creates a new user.
|
Connection |
|
|
First Name |
Enter the first name of the user. |
|
Last Name |
Enter the last name of the user. |
|
Password |
Enter the password of the user. |
|
Your Domain |
Select the domain for the user. |
|
Phones |
Add the phone numbers of the user: Phone Number Enter the phone number. Type Select the phone number type. Primary Select whether this is the primary phone number of the user:
|
|
Secondary Email |
Add the secondary email address: Email Address Enter the email address. Type Select the email address type:
|
|
Change Password at Next Login |
When selected, it prompts the user to change the password when tried to login next time. |
Updates an existing user.
|
Connection |
|
|
User ID |
Select the User ID you want to update. |
|
First Name |
Enter the first name of the user. |
|
Last Name |
Enter the last name of the user. |
|
Password |
Enter the password of the user. |
|
Your Domain |
Select the domain for the user. |
|
Phones |
Add the phone numbers of the user: Phone Number Enter the phone number. Type Select the phone number type. Primary Select whether this is the primary phone number of the user:
|
|
Secondary Email |
Add the secondary email address: Email Address Enter the email address. Type Select the email address type:
|
Deletes a user.
|
Connection |
|
|
User ID |
Select the User ID of the user you want to delete. |
Makes a user a super administrator.
|
Connection |
|
|
User ID |
Select the User ID of the user whom you make a super admin. |
Using the following modules, you can list, retrieve, create, update, and delete organizational units.
Retrieves a list of all organizational units for an account.
|
Connection |
Establish a connection to your Google Workspace Admin account. |
|
Path |
Select the path whose organizational units you want to list. |
|
Type |
Select the type of organizational units you want to list:
|
|
Limit |
The maximum number of organizational units Boost.space Integrator should return during one scenario execution cycle. |
Gets the details of an organizational unit.
|
Connection |
Establish a connection to your Google Workspace Admin account. |
|
Get Organizational Unit |
Select the method by which you want to retrieve the organizational units:
|
|
Organizational Unit Path |
Select the organizational path whose organizational unit details you want to retrieve. |
Creates a new organizational unit.
|
Connection |
Establish a connection to your Google Workspace Admin account. |
|
Name |
Enter the name of the organizational unit. |
|
Description |
Enter the details of the organizational unit. |
|
Parent Organizational Unit Path |
Enter the path to the parent organizational unit if this organization is a subsidiary of any other organization. |
Updates an existing organizational unit.
|
Connection |
Establish a connection to your Google Workspace Admin account. |
|
Get Organizational Path |
Select the method by which you want to retrieve the organizational units:
|
|
Organizational Unit Path |
Select the organizational path whose organizational unit details you want to update. |
|
Name |
Enter a new name for the organizational unit. |
|
Description |
Enter the details of the organizational unit. |
Deletes an organizational unit.
|
Connection |
Establish a connection to your Google Workspace Admin account. |
|
Get Organizational Path |
Select the method by which you want to retrieve the organizational units:
|
|
Organizational Unit Path |
Select the organizational path whose organizational unit details you want to delete. |
Using the following modules, you can create, update, list, retrieve, and delete roles.
Retrieves a list of all roles in a domain.
|
Connection |
|
|
Limit |
The maximum number of roles Boost.space Integrator should return during one scenario execution cycle. |
Gets the details of a role.
|
Connection |
|
|
Role ID |
Select the Role ID whose details you want to retrieve. |
Creates a new role.
|
Connection |
|
|
Role Name |
Enter a name for the role. |
|
Role Privileges |
Add the permissions for the role: Service ID Select the service. Privilege Name Select the permission. |
|
Role Description |
Enter the details of the role. |
Updates an existing role.
|
Connection |
|
|
Role ID |
Select the Role ID you want to update. |
|
Role Name |
Enter a name for the role. |
|
Role Privileges |
Add the permissions for the role: Service ID Select the service. Privilege Name Select the permission. |
|
Role Description |
Enter the details of the role. |
Deletes a role.
|
Connection |
|
|
Role ID |
Select the Role ID you want to delete. |
Using the following modules, you can list, retrieve, assign, and delete role assignments.
Retrieves a list of all role assignments.
|
Connection |
|
|
Search Role Assignments |
Select the option to search the role assignments you want to list:
|
|
Your Domain |
Select the domain whose role assignments you want to list. |
|
Limit |
The maximum number of role assignments Boost.space Integrator should return during one scenario execution cycle. |
Gets the details of a role assignment.
|
Connection |
|
|
Role Assignment ID |
Select the Role Assignment ID whose details you want to retrieve. |
Assigns a user to a specific role.
|
Connection |
|
|
Role ID |
Select the Role ID which you want to assign to the user. |
|
Assign To |
Select the user to whom you want to assign the role. |
Deletes a role assignment.
|
Connection |
|
|
Role Assignment ID |
Select the Role Assignment ID you want to delete. |
Retrieves a list of all privileges for a customer.
|
Connection |
|
|
Limit |
The maximum number of privileges Boost.space Integrator should return during one scenario execution cycle. |
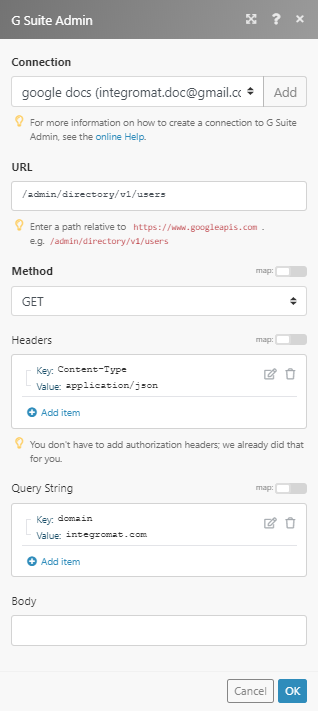
Performs an arbitrary authorized API call.
|
Connection |
||||
|
URL |
Enter a path relative to
|
|||
|
Method |
Select the HTTP method you want to use: GET to retrieve information for an entry. POST to create a new entry. PUT to update/replace an existing entry. PATCH to make a partial entry update. DELETE to delete an entry. |
|||
|
Headers |
Enter the desired request headers. You don’t have to add authorization headers; we already did that for you. |
|||
|
Query String |
Enter the request query string. |
|||
|
Body |
Enter the body content for your API call. |
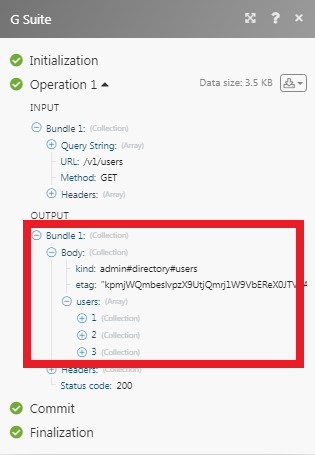
The following API call returns all the users in the same domain from your G Suite Admin account:
URL:
/admin/directory/v1/users
Method:
GET
Query String: Key: domain Value: {{domain you want to retrieve users from}}
Matches of the search can be found in the module’s Output under BundleA bundle is a chunk of data and the basic unit for use with modules. A bundle consists of items, similar to how a bag may contain separate, individual items. > Body > users. In our example, 3 users were returned: