| Active |
|---|
| This application does not need additional settings. So you can make connectionUnique, active service acces point to a network. There are different types of connections (API key, Oauth…). only by using your login credentials or by following the instructions below . |
The Deputy modulesThe module is an application or tool within the Boost.space system. The entire system is built on this concept of modularity. (module - Contacts) allow you to watch, create, list, retrieve, and delete the locations, employees, timesheets, news feed, information about the account, and schedules in your Deputy account.
Prerequisites
-
A Deputy account
In order to use Deputy with Boost.spaceCentralization and synchronization platform, where you can organize and manage your data. IntegratorPart of the Boost.space system, where you can create your connections and automate your processes., it is necessary to have a Deputy account. If you do not have one, you can create a Deputy account at deputy.com.
1. Go to Boost.space Integrator and open the Deputy module’s Create a connection dialog.
2. In the Connection name field, enter a name for the connection and click Continue.
3. Enter your login credentials, select the organization, and confirm the access by clicking Authorize.
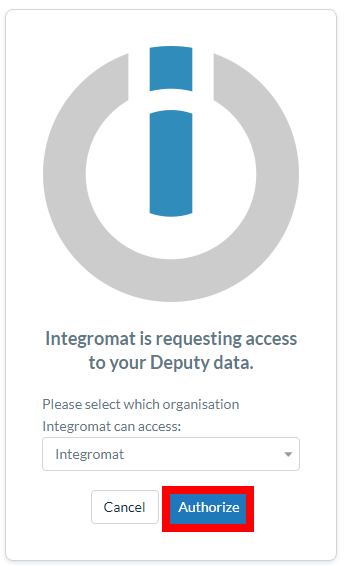
The connection has been established.
Provides details about the specified location.
|
Connection |
|
|
Location ID |
Select the Location ID whose details you want to retrieve. |
Provides settings of a specific location.
|
Connection |
|
|
Location ID |
Select the Location ID whose settings details you want to retrieve. |
Lists a user’s locations.
|
Connection |
|
|
Limit |
Set the maximum number of locations Boost.space Integrator should return during one scenarioA specific connection between applications in which data can be transferred. Two types of scenarios: active/inactive. execution cycleA cycle is the operation and commit/rollback phases of scenario execution. A scenario may have one or more cycles (one is the default).. |
Creates a new location (workplace/company).
|
Connection |
|
|
Location Name |
Enter a name for the location. |
|
Location Timezone |
Select the timezone of the location. |
|
Address |
Enter the street address of the location. The employees will be able to see this information. |
|
Address Note |
Enter any additional information which you want to mention for the address. |
|
Country |
Select the country where the location is located. |
|
Latitude of the location |
Enter the latitude details of the location. |
|
Longitude of the location |
Enter the longitude details of the location. |
|
Location Code |
Enter the three-character location code. |
|
Area Names |
Add the location area names. For example, |
Update location settings.
|
Connection |
|
|
Location ID |
Select the Location ID whose details you want to update. |
|
Week Start |
Enter the location business starting day of the week. For example, |
|
Location Open Time |
Enter the location’s opening time in 24-hour format. See the list of supported time formats. |
|
Location Close Time |
Enter the location’s opening time in 24-hour format. See the list of supported time formats. |
|
Default Shift Duration |
Enter the shift duration in hours. Default is 8. Enter a value between 0 and 24. |
|
Default Mealbreak Duration |
Enter the meal break duration in minutes. Default is 30. Enter a value between 0 and 240. |
|
Apply and Report On-Costs |
Enter a number to add an on-cost percentage to all wage and salary costs shown on the Schedule screen (including Daily, Weekly, and Monthly Stats) and on the Schedule vs Timesheets vs Sales report. For example, if you enter 10 here, an additional 10% will be added to wage and salary costs.Enter a value between 0 and 100. |
|
Prevent Modification |
Select the option to prevent the changes to the shift after the specified period:
|
|
Shift Notifications |
Select the option for sending shift notifications like late employee notifications and shift swap approvals.
|
|
Require Shift Confirmation |
Select the option to confirm the published rosters after which they will be automatically turned into open shifts:
|
|
Sort Scheduling Suggestions |
Select the option to sort the scheduling suggestions:
|
|
Allow Employees to View Each Other’s Schedule |
Select the option for employees to view each other’s shift schedule:
|
|
Allow Employees to Swap Shifts |
Select whether employees are allowed to swap their shifts. This is only allowed if employees can view other employee’s shift schedules. |
|
Shift Swapping Require ManagerCan manage members and space managers, view and manage items. Can modify space settings. Approval |
Select whether a manager’s approval is required if an employee accepts shift swapping with another employee. |
|
Allow Employees to Offer Shifts |
Select whether an employee can offer his shift to another employee if they cannot work on their shift. |
|
Schedule Allow SMS with Full Name |
Select whether publishing the schedule through SMS is allowed. Use the location’s full name and area when publishing schedules via SMS. |
|
Can Bump Shift via Desk |
Select whether employees are allowed to start, pause, and end their shifts in a web browser. |
|
Can Mobile Bump Shift |
Select whether employees are allowed to start, pause, and end their shifts with a mobile. |
|
Can SMS Bump Shift |
Select whether employees are allowed to clock in and clock out by sending SMS. |
|
Require Kiosk Photo Bump Shift |
Select whether employees are required a photo to be taken when starting and ending their shifts in Kiosk. |
|
Can Submit Shift via Desk |
If selected yes, allows employees to amend existing timesheets and create timesheets in the past in a web browser or using Mobile. |
|
Can Modify Timesheet on End |
Select whether employees are allowed to modify their timesheet before ending shift. |
|
Timesheet Maturity |
Enter the time in minutes before which an employee may submit their timesheet before the scheduled end time. The value must be higher than or equal to 1. |
|
Timesheet Closest Block |
Enter the time in minutes based on which the timesheets submitted through mobile and are shorter than the specified time to get automatically deleted. |
|
Mealbreak is Paid |
Select whether the employee’s meal break is paid. If yes, employees are paid for the duration of all meal breaks they take and these breaks will be recorded in timesheet reports. |
|
Timesheet Auto Round |
Select whether to enable the auto-rounding off timesheets for a location. Then the timesheets that are submitted to that location using mobile or Kiosk shall get their start time, end time, and break length rounded according to the corresponding settings. |
|
Timesheet Auto Time Approve |
Select an option for timesheets to be automatically time approved. For example, |
|
Can Clockin Shift Earlier |
Select whether employees are allowed to clock in early to their shift. |
|
Timesheet Match Schedule |
Select an option of how the unscheduled timesheets linked to a scheduled shift within the same day:
|
|
Can Clockin Shift Earlier Minutes |
Enter the time in minutes before which the shift is scheduled to start, that an employee is allowed to clock in. |
|
Can End Break Earlier |
Select whether the employees are allowed to end their break early. |
|
Auto Suggest Break |
Select whether to automatically suggest break duration for breaks not taken by an employee at the end of shift. |
|
Can Display Break Warning |
Select whether to display alerts for the missed breaks and if breaks are shorter in duration than scheduled. |
Deletes a location in Deputy after migrating associated employees to another location.
|
Connection |
|
|
Source Location ID |
Select the Location ID you want to delete. |
|
Target Location ID |
Select the Location ID to migrate the employees associated with the source location. |
|
Delete Associations |
Select whether to delete the associations with the location. |
![[Note]](https://docs.boost.space/wp-content/themes/bsdocs/docs-parser/HTML/css/image/note.png) |
Note |
|---|---|
|
You do not have to add the webhooksA webhook is a way for an app to send real-time information to a specific URL in response to certain events or triggers. in the Deputy as it is automatically done for you once you add and save an instant triggerEvery scenario has a trigger, an event that starts your scenario. A scenario must have a trigger. There can only be one trigger for each scenario. When you create a new scenario, the first module you choose is your trigger for that scenario. Create a trigger by clicking on the empty module of a newly created scenario or moving the... moduleThe module is an application or tool within the Boost.space system. The entire system is built on this concept of modularity. (module - Contacts) to your scenario. |
TriggersEvery scenario has a trigger, an event that starts your scenario. A scenario must have a trigger. There can only be one trigger for each scenario. When you create a new scenario, the first module you choose is your trigger for that scenario. Create a trigger by clicking on the empty module of a newly created scenario or moving the... when a new employee has been created.
|
WebhookA webhook is a way for an app to send real-time information to a specific URL in response to certain events or triggers. Name |
Enter a name for the webhook. |
|
Connection |
Triggers when an employee has been updated.
|
Webhook Name |
Enter a name for the webhook. |
|
Connection |
Triggers when an employee has been deleted.
|
Webhook Name |
Enter a name for the webhook. |
|
Connection |
Triggers when a new leave request has been submitted.
|
Webhook Name |
Enter a name for the webhook. |
|
Connection |
Provides details about the specified employee.
|
Connection |
|
|
Employee ID |
Select the Employee ID whose details you want to retrieve. |
Lists all employees.
|
Connection |
|
|
Limit |
Set the maximum number of employees Boost.space Integrator should return during one scenario execution cycle. |
Creates a new staff employee.
|
Connection |
|
|
First Name |
Enter the employee’s first name. |
|
Last Name |
Enter the employee’s last name. |
|
Location ID |
Select the Location ID for the employee. |
|
Role ID |
Enter the employee’s Role ID. |
|
Gender |
Select the employee’s gender. |
|
Stress Profile |
Select the shift for the employee. |
|
Date of Birth |
Enter the employee’s date of birth. |
|
Start Date |
Enter the employee’s start date with the location. |
|
Mobile Phone |
Enter the employee’s mobile phone. |
|
Annual Salary |
Enter the employee’s annual salary information. This field is applicable only to employees with annual pay and not for hourly-paid. |
|
Timesheet Export Code |
Enter the employee’s timesheet export code. |
|
Weekday Rate |
Enter the employee’s hourly rate on weekdays. |
|
Saturday Rate |
Enter the employee’s hourly rate on Saturday. |
|
Sunday Rate |
Enter the employee’s hourly rate on Sunday. |
|
Public Holiday Rate |
Enter the employee’s hourly rate during a public holiday. |
|
Country Code |
Select the employee’s country code. |
|
Street |
Enter the employee’s street name. |
|
State |
Enter the employee’s state name. |
|
City |
Enter the employee’s city name. |
|
Postal Code |
Enter the area postal code. |
|
Emergency Contact Name |
Enter the contact name to reach out during the emergency. |
|
Emergency Contact’s Phone Number |
Enter the emergency contact’s phone number. |
|
Employee’s Email |
Enter the employee’s email address. |
|
Send Invite to an Employee |
Select whether to send an email invite to the employee. |
Activates a terminated employee.
|
Connection |
|
|
Employee ID |
Select the Employee ID whom you want to activate. |
Invites an employee.
|
Connection |
|
|
Employee ID |
Select the Employee ID whom you want to invite. |
Updates employee details.
|
Connection |
|
|
Employee ID |
Select the Employee ID whose details you want to update. |
|
First Name |
Enter the employee’s first name. |
|
Last Name |
Enter the employee’s last name. |
|
Location ID |
Select the Location ID for the employee. |
|
Role ID |
Enter the employee’s Role ID. |
|
Gender |
Select the employee’s gender. |
|
Stress Profile |
Select the shift for the employee. |
|
Date of Birth |
Enter the employee’s date of birth. |
|
Start Date |
Enter the employee’s start date with the location. |
|
Mobile Phone |
Enter the employee’s mobile phone. |
|
Annual Salary |
Enter the employee’s annual salary information. This field is applicable only to employees with annual pay and not for hourly-paid. |
|
Timesheet Export Code |
Enter the employee’s timesheet export code. |
|
Weekday Rate |
Enter the employee’s hourly rate on weekdays. |
|
Saturday Rate |
Enter the employee’s hourly rate on Saturday. |
|
Sunday Rate |
Enter the employee’s hourly rate on Sunday. |
|
Public Holiday Rate |
Enter the employee’s hourly rate during a public holiday. |
|
Country Code |
Select the employee’s country code. |
|
Street |
Enter the employee’s street name. |
|
State |
Enter the employee’s state name. |
|
City |
Enter the employee’s city name. |
|
Postal Code |
Enter the area postal code. |
|
Emergency Contact Name |
Enter the contact name to reach out during the emergency. |
|
Emergency Contact’s Phone Number |
Enter the emergency contact’s phone number. |
|
Employee’s Email |
Enter the employee’s email address. |
|
Send Invite to an Employee |
Select whether to send an email invite to the employee. |
Terminates an active employee.
|
Connection |
|
|
Employee ID |
Select the Employee ID whom you want to terminate. |
Deletes a discarded/terminated employee’s account in Deputy.
|
Connection |
|
|
Employee ID |
Select the Employee ID whom you want to delete. |
Lists a user’s completed tasks.
|
Connection |
|
|
Limit |
Set the maximum number of locations Boost.space Integrator should return during one scenario execution cycle. |
Creates a new task.
|
Connection |
|
|
UserCan use the system on a limited basis based on the rights assigned by the admin. Responsible |
Select an assignee for the task. |
|
Question |
Enter the task name and details. |
|
Due Date |
Enter the date by which the task must be completed. |
|
Comment |
Enter any other information you would like to mention about the task. |
Creates or updates a journal.
|
Connection |
|
|
Comment |
Enter the comment text for the employee when approving the text. |
|
Employee ID |
Select the Employee ID for whom you are creating or updating a journal. |
|
Category ID |
Select the category ID of the comment:
|
|
Journal ID |
Select the Journal ID you want to update. If you are creating a new journal, leave it blank. |
Triggers when a new area or department has been created.
|
Note |
|---|---|
|
You do not have to add the webhooks in the Deputy as it is automatically done for you once you add and save an instant trigger module to your scenario. |
|
Webhook Name |
Enter a name for the webhook. |
|
Connection |
Creates an area/department.
|
Connection |
|
|
Company ID |
Select the Company ID for which you want to create an area or a department. |
|
Area/Department Name |
Enter a name for the area or department. |
|
Show on Schedule |
Select the checkbox to display the area or the department in the employee schedule. |
|
Active |
Select whether the area or the department is active. |
|
Address |
Select the address of the area. |
|
Parental Operational Unit |
Select the parental operational unit of the area or the department. |
|
Color |
Select the color for the area or the department to display in the schedule in HEX format. For example, |
|
Note |
|---|---|
|
You do not have to add the webhooks in the Deputy as it is automatically done for you once you add and save an instant trigger module to your scenario. |
Triggers when a new timesheet has been saved.
|
Webhook Name |
Enter a name for the webhook. |
|
Connection |
Triggers when a timesheet has been updated.
|
Webhook Name |
Enter a name for the webhook. |
|
Connection |
Starts a shift for your staff.
|
Connection |
|
|
Employee ID |
Select the Employee ID whose timesheet you want to start. |
|
Area/Department ID |
Select the Area or Department ID of the employee. |
Ends a shift that is in progress.
|
Connection |
|
|
Timesheet ID |
Select the Timesheet ID you want to end. |
|
Meal Break Length |
Enter the meal break time in minutes. |
Approves a timesheet.
|
Connection |
|
|
Timesheet ID |
Select the Timesheet ID you want to approve. |
Updates a given timesheet or creates a new one.
|
Connection |
|
|
Type of Action |
Select the action you want to perform:
|
|
Timesheet ID |
Select the Timesheet ID you want to update. |
|
Employee ID |
Select the Employee ID whose timesheet you want to create. |
|
Area/Department ID |
Select the Area or Department ID to which the employee belongs to. |
|
Date |
Enter the date for which you want to create the timesheet or update. See the list of supported formats. |
|
Start Hour |
Enter the starting hour of the timesheet in 24-hour format. For example, |
|
Start Minute |
Enter the starting minute of the timesheet. If the employee start time is |
|
Enter the ending hour of the timesheet in 24-hour format. For example, |
|
|
End Minute |
Enter the ending minute of the timesheet. If the employee start time is |
|
Meal break Length |
Enter the meal break time in minutes. For example, |
|
Comment |
Enter the comment text about the timesheet. |
Pauses/unpauses a user’s timesheet.
|
Connection |
|
|
Timesheet ID |
Select the Timesheet ID you want to pause or unpause. |
Lists a user’s unavailability recordsOne row in the Boost.space database. These are individual rows under spaces in each module. For example single products, but not their variants..
|
Connection |
|
|
Limit |
Set the maximum number of unavailability records Boost.space Integrator should return during one scenario execution cycle. |
List a user’s leave request.
|
Connection |
|
|
Limit |
Set the maximum number of leave requests Boost.space Integrator should return during one scenario execution cycle. |
List a user’s colleagues.
|
Connection |
|
|
Limit |
Set the maximum number of colleagues Boost.space Integrator should return during one scenario execution cycle. |
List a user’s schedule shifts.
|
Connection |
|
|
Limit |
Set the maximum number of shifts Boost.space Integrator should return during one scenario execution cycle. |
List a user’s timesheets.
|
Connection |
|
|
Limit |
Set the maximum number of timesheets Boost.space Integrator should return during one scenario execution cycle. |
Provides a user’s contact and address.
|
Connection |
List a user’s notifications.
|
Connection |
|
|
Limit |
Set the maximum number of notifications Boost.space Integrator should return during one scenario execution cycle. |
Lists a user’s news feeds.
|
Connection |
|
|
Limit |
Set the maximum number of feeds Boost.space Integrator should return during one scenario execution cycle. |
|
Note |
|---|---|
|
You do not have to add the webhooks in the Deputy as it is automatically done for you once you add and save an instant trigger module to your scenario. |
Triggers when a comment has been added.
|
Webhook Name |
Enter a name for the webhook. |
|
Connection |
|
|
Filter |
Add filters for the webhook. For example, if you want to filter the comments for the timesheet if an employee starts a shift. |
Triggers when an announcement has been deleted.
|
Webhook Name |
Enter a name for the webhook. |
|
Connection |
|
|
Filter |
Add filters for the webhook. For example, if you want to filter the comments for the timesheet if an employee starts a shift. |
List news feeds for a specific location.
|
Connection |
|
|
Location ID |
Select the Location ID whose news feed details you want to retrieve. |
|
Limit |
Set the maximum number of locations Boost.space Integrator should return during one scenario execution cycle. |
Creates a news feed announcement.
|
Connection |
|
|
Announcement Content |
Enter the feed content. |
|
Assign To |
Select the option to feed the news to:
|
|
Assigned Location IDs |
Select the Location IDs to which you want to assign the feed. |
|
Assigned User IDs |
Select the User IDs to which you want to assign the feed. |
|
Require Confirmation |
Select whether a confirmation is required to add a news feed. |
|
File IDs |
Add the File IDs related to the feed. |
|
Note |
|---|---|
|
You do not have to add the webhooks in the Deputy as it is automatically done for you once you add and save an instant trigger module to your scenario. |
Triggers when a new schedule has been added.
|
Webhook Name |
Enter a name for the webhook. |
|
Connection |
|
|
Filter |
Add filters for the webhook. For example, if you want to filter the comments for the timesheet if an employee starts a shift. |
Triggers when a schedule has been updated.
|
Webhook Name |
Enter a name for the webhook. |
|
Connection |
|
|
Filter |
Add filters for the webhook. For example, if you want to filter the comments for the timesheet if an employee starts a shift. |
Triggers when a schedule has been deleted.
|
Webhook Name |
Enter a name for the webhook. |
|
Connection |
|
|
Filter |
Add filters for the webhook. For example, if you want to filter the comments for the timesheet if an employee starts a shift. |
Provides details of a schedule.
|
Connection |
|
|
Schedule ID |
Select the Schedule ID whose details you want to retrieve. |
Lists all schedules (-12 hours to 36 hours from the current date).
|
Connection |
|
|
Limit |
Set the maximum number of schedules Boost.space Integrator should return during one scenario execution cycle. |
Creates a new schedule/roster.
|
Connection |
|
|
Start Time |
Enter the date and time of the start of the schedule. |
|
End Time |
Enter the date and time of the end of the schedule. |
|
Schedule Area ID |
Select the Schedule Area ID. |
|
Schedule Employee |
Select the employee for whom you are creating the schedule. |
|
Publish |
Select whether you want to publish the schedule. |
|
Mealbreak Length |
Enter the meal break time in minutes. Must be less than the roster length. |
|
Force OVerride |
Select whether to override the present schedule. |
|
Open |
Select whether to keep the schedule statusCreate statuses for each module separately to create an ideal environment for efficient and consistent work. open. |
|
Comment |
Enter any note about the schedule you want to mention. |
|
Confirm Status |
Select the option with which you want to confirm the status of the schedule:
|
|
Connect Status |
Select the connect status of the schedule:
|
|
Shift Template |
Enter the template details you want to use for the schedule. |
Publishes a schedule.
|
Connection |
|
|
Schedule ID |
Select the Schedule ID you want to publish. |
|
Mode |
Enter the schedule is available in. |
|
All Locations Mode |
Select the checkbox if the schedule is available in all locations mode. |
Updates a schedule.
|
Connection |
|
|
Schedule ID |
Select the Schedule ID whose details you want to update. |
|
Start Time |
Enter the date and time of the start of the schedule. |
|
End Time |
Enter the date and time of the end of the schedule. |
|
Schedule Area ID |
Select the Schedule Area ID. |
|
Schedule Employee |
Select the employee for whom you are creating the schedule. |
|
Publish |
Select whether you want to publish the schedule. |
|
Mealbreak Length |
Enter the meal break time in minutes. Must be less than the roster length. |
|
Force OVerride |
Select whether to override the present schedule. |
|
Open |
Select whether to keep the schedule status open. |
|
Comment |
Enter any note about the schedule you want to mention. |
|
Confirm Status |
Select the option with which you want to confirm the status of the schedule:
|
|
Connect Status |
Select the connect status of the schedule:
|
|
Shift Template |
Enter the template details you want to use for the schedule. |
Discards a schedule.
|
Connection |
|
|
Schedule ID |
Select the Schedule ID you want to delete. |
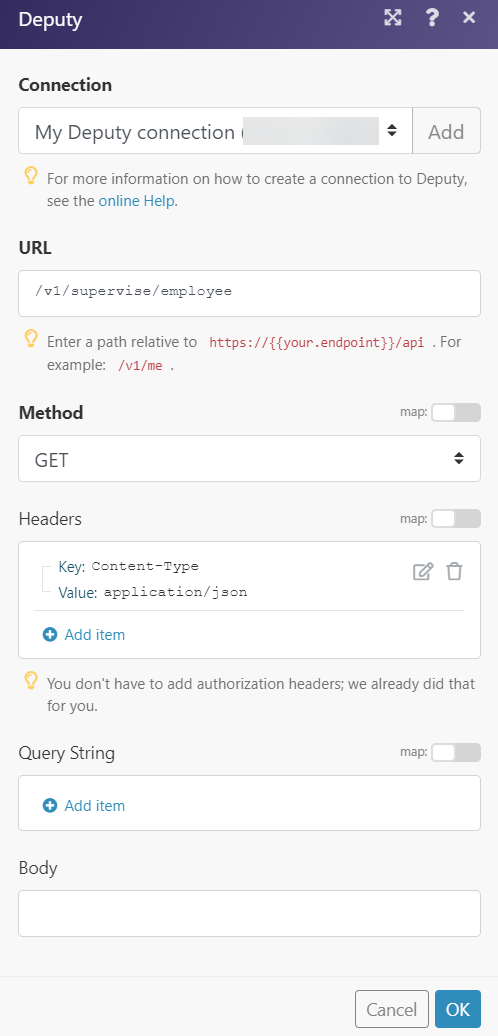
Performs an arbitrary authorized API call.
|
Connection |
|
|
URL |
Enter a path relative to For the list of available endpoints, refer to the Deputy API Documentation. |
|
Method |
Select the HTTP method you want to use: GET to retrieve information for an entry. POST to create a new entry. PUT to update/replace an existing entry. PATCH to make a partial entry update. DELETE to delete an entry. |
|
Headers |
Enter the desired request headers. You don’t have to add authorization headers; we already did that for you. |
|
Query String |
Enter the request query string. |
|
Body |
Enter the body content for your API call. |
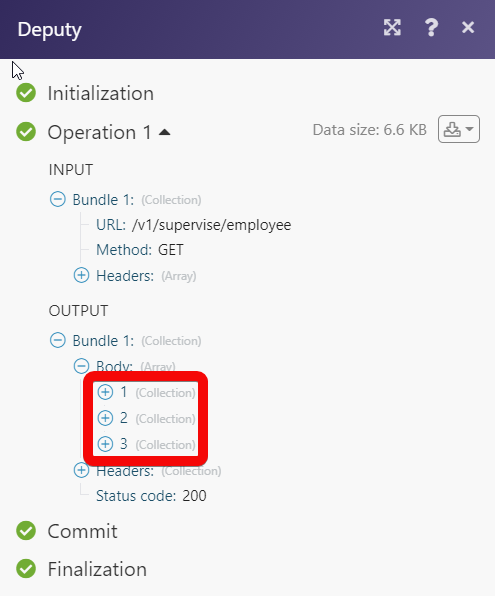
The following API call returns all the employees from your Deputy account:
URL:
/v1/supervise/employees
Method:
GET
Matches of the search can be found in the module’s Output under BundleA bundle is a chunk of data and the basic unit for use with modules. A bundle consists of items, similar to how a bag may contain separate, individual items. > Body.
In our example, 3 employees were returned: