| Active |
|---|
| This application does not need additional settings. So you can make connectionUnique, active service acces point to a network. There are different types of connections (API key, Oauth…). only by using your login credentials or by following the instructions below . |
The Printful modulesThe module is an application or tool within the Boost.space system. The entire system is built on this concept of modularity. (module - Contacts) allow you to watch, create, update, retrieve, and delete the orders in your Printful account.
![[Warning]](https://docs.boost.space/wp-content/themes/bsdocs/docs-parser/HTML/css/image/warning.png) |
Warning |
|---|---|
|
From September 30, 2022, Printful has disabled the creation of legacy API tokensThe API token is a multi-digit code that allows a user to authenticate with cloud applications.. Starting March 30, 2023, the Printful API will no longer be accessible using legacy API keys. To avoid losing access to the Printful API, customers will be required to migrate to the new API tokens. The new tokens are more secure and offer greater customization. For more information, see the Printful API key migration documentation. |
To get started with Printful, create an account at printful.com/auth/register.
To connect to the Printful app:
-
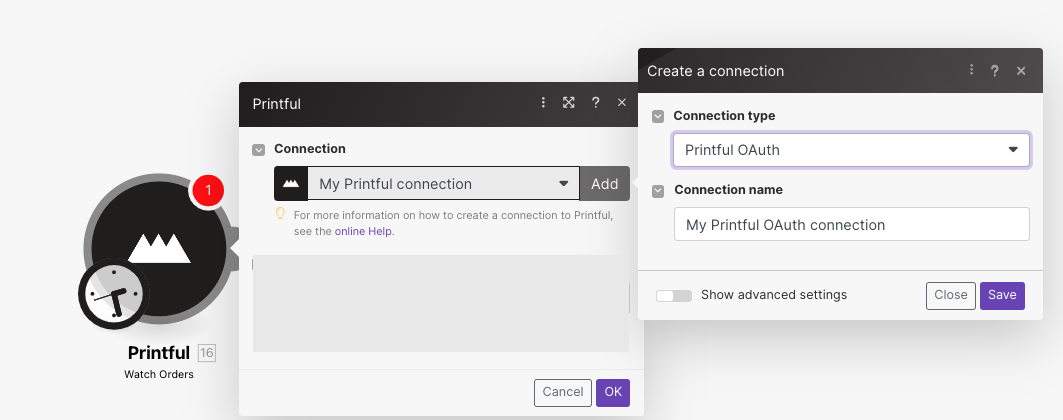
Log in to Boost.spaceCentralization and synchronization platform, where you can organize and manage your data. IntegratorPart of the Boost.space system, where you can create your connections and automate your processes., add any Printful moduleThe module is an application or tool within the Boost.space system. The entire system is built on this concept of modularity. (module - Contacts) to the scenarioA specific connection between applications in which data can be transferred. Two types of scenarios: active/inactive., click the Add button next to the Connection field, and select the connection type as Printful OAuth.
-
Optional: In the Connection name field, enter a name for the connection.
-
Optional: Click Show Advanced Settings, and enter the client credentials of your custom app.
-
Click Save.
You have successfully established the connection. You can now edit your scenario and add more Printful modules. If your connection needs reauthorization at any point, follow the connection renewal steps here.
You need to create a custom appCreate your own custom apps to be used in the integrator engine and share them with users in your organization. to generate client credentials.
-
Log into Printful Developer website.
-
Click Create App.
-
Enter the details as mentioned below:
App name
Name of the application.
Contact email
Email address to reach out for any queries.
Access Level
Select Store level access.
URLs
Enter all the URL addresses to install the application.
Redirection Domains
Add,
https://www.integromat.com/cb/oauth/printful.Scopes
Select all the scopes required for usersCan use the system on a limited basis based on the rights assigned by the admin. installing the application.
-
Click Create app.
-
Copy the Client ID and Secret Key to a safe place.
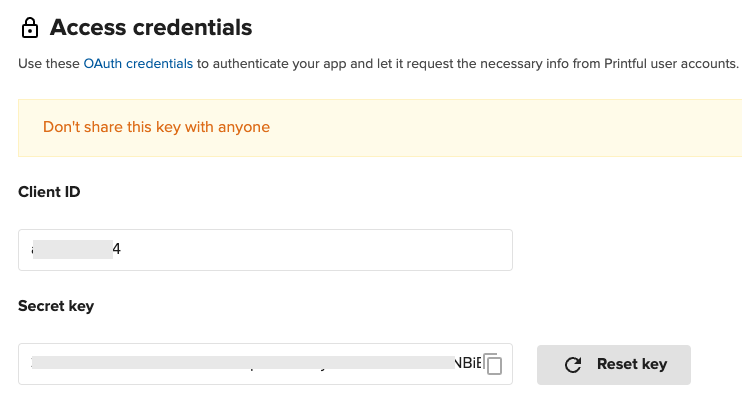
You have successfully retrieved the client credentials.
Watches for new orders.
|
Connection |
|
|
Limit |
Set the maximum number of new orders Boost.space Integrator should return during one scenario execution cycleA cycle is the operation and commit/rollback phases of scenario execution. A scenario may have one or more cycles (one is the default).. |
Watches for orders which have been fulfilled (all itemsItems are rows in records (order/request/invoice/purchase...) shipped successfully).
|
Connection |
|
|
Limit |
Set the maximum number of fulfilled orders Boost.space Integrator should return during one scenario execution cycle. |
Watches for new canceled orders.
|
Connection |
|
|
Limit |
Set the maximum number of canceled orders Boost.space Integrator should return during one scenario execution cycle. |
Returns information about an order.
|
Connection |
|
|
Order ID |
Select the Order ID whose details you want to retrieve. |
Creates an order.
|
Connection |
|
|
Product ID |
Select the Product ID for which you are creating the order. |
|
Quantity |
Enter the number of product items being ordered. |
|
URL |
Enter the URL address of the Printfile being ordered. |
|
Name |
Enter the recipient’s name. |
|
Address Line 1 |
Enter the recipient’s street address. |
|
City |
Enter the recipient’s city name. |
|
Country Code |
Enter the recipient’s two-letter country code. For example, the |
|
ZIP (Postal Code) |
Enter the recipient’s area postal code. |
|
State Code |
Enter the recipient’s two-digit state code. For example, AK for Alaska. |
|
Company Name |
Enter the recipient’s company name. |
|
Address Line 2 |
Enter the recipient company’s street address. |
|
State Name |
Enter the recipient company’s state name. |
|
Country Name |
Enter the recipient company’s country name. |
|
Phone |
Enter the recipient’s phone number. |
|
|
Enter the recipient’s email address. |
Updates an unsubmitted order and optionally submits it for fulfillment.
|
Connection |
|
|
Order ID |
Select the Order ID whose details you want to update. |
|
Product ID |
Select the Product ID for which you are creating the order. |
|
Quantity |
Enter the number of product items being ordered. |
|
URL |
Enter the URL address of the Printfile. |
|
Name |
Enter the recipient’s name. |
|
Address Line 1 |
Enter the recipient’s street address. |
|
City |
Enter the recipient’s city name. |
|
Country Code |
Enter the recipient’s two-letter country code. For example, the |
|
ZIP (Postal Code) |
Enter the recipient’s area postal code. |
|
State Code |
Enter the recipient’s two-digit state code. For example, |
|
Company Name |
Enter the recipient’s company name. |
|
Address Line 2 |
Enter the recipient company’s street address. |
|
State Name |
Enter the recipient company’s state name. |
|
Country Name |
Enter the recipient company’s country name. |
|
Phone |
Enter the recipient’s phone number. |
|
|
Enter the recipient’s email address. |
Cancels a pending or draft order.
|
Connection |
|
|
Order ID |
Select the Order ID you want to cancel. |
Performs an arbitrary authorized API call.
|
Connection |
||||
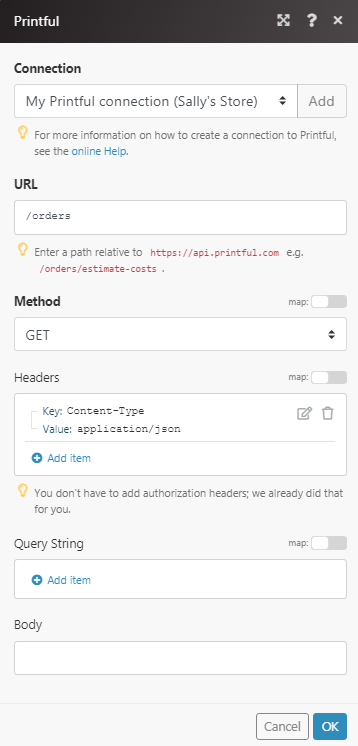
|
URL |
Enter a path relative to
|
|||
|
Method |
Select the HTTP method you want to use: GET to retrieve information for an entry. POST to create a new entry. PUT to update/replace an existing entry. PATCH to make a partial entry update. DELETE to delete an entry. |
|||
|
Headers |
Enter the desired request headers. You don’t have to add authorization headers; we already did that for you. |
|||
|
Query String |
Enter the request query string. |
|||
|
Body |
Enter the body content for your API call. |
![[Note]](https://docs.boost.space/wp-content/themes/bsdocs/docs-parser/HTML/css/image/note.png)
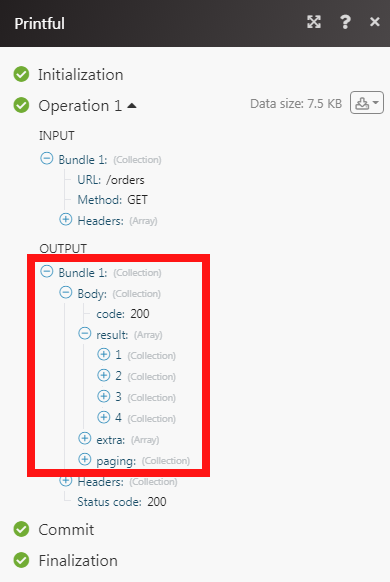
The following API call returns all the orders from your Printfile account:
URL:
/orders
Method:
GET
Matches of the search can be found in the module’s Output under BundleA bundle is a chunk of data and the basic unit for use with modules. A bundle consists of items, similar to how a bag may contain separate, individual items. > Body > result.
In our example, 4 orders were returned: