- HubSpot CRM
- Connect HubSpot CRM to Boost.space Integrator
- Connect HubSpot CRM to Boost.space Integrator with your user account credentials
- Connect HubSpot CRM to Boost.space Integrator with your developer account OAuth credentials
- Create a HubSpot CRM Custom Application
- Obtain your HubSpot CRM Developer API Key and User ID
- Establish an OAuth Connection between HubSpot CRM and Boost.space Integrator
- Set Up HubSpot CRM Webhooks
- HubSpot CRM Tutorial
- Build HubSpot CRM Scenarios
- Disconnect Boost.space Integrator from HubSpot CRM
- Connect HubSpot CRM to Boost.space Integrator
| Active |
|---|
| This application does not need additional settings. So you can make connectionUnique, active service acces point to a network. There are different types of connections (API key, Oauth…). only by using your login credentials or by following the instructions below . |
With HubSpot CRM modulesThe module is an application or tool within the Boost.space system. The entire system is built on this concept of modularity. (module - Contacts) in Boost.spaceCentralization and synchronization platform, where you can organize and manage your data. IntegratorPart of the Boost.space system, where you can create your connections and automate your processes., you can monitor events, recordsOne row in the Boost.space database. These are individual rows under spaces in each module. For example single products, but not their variants., contacts, engagements, files, and form submissions or create, retrieve, update, and delete records, contacts, engagements, events, or files in your HubSpot CRM account.
To use the HubSpot CRM modules, you must have a HubSpot CRM userCan use the system on a limited basis based on the rights assigned by the admin. account. You can create a user account here. To use HubSpot CRM webhooksA webhook is a way for an app to send real-time information to a specific URL in response to certain events or triggers., you must have a HubSpot CRM developer account. You can create a developer account here.
For a complete list of available endpoints, refer to the HubSpot API Documentation.
You can establish two types of connections between HubSpot CRM and Boost.space Integrator, using your user account credentials or developer account OAuth credentials.
To connect your HubSpot CRM account to Boost.space Integrator:
-
Log in to your Boost.space Integrator account, add a HubSpot CRM moduleThe module is an application or tool within the Boost.space system. The entire system is built on this concept of modularity. (module - Contacts) to your scenarioA specific connection between applications in which data can be transferred. Two types of scenarios: active/inactive., and click Create a connection.
-
Optional: In the Connection name field, enter a name for the connection.
-
Click Save.
-
If prompted, log in to your Hubspot CRM user account.
-
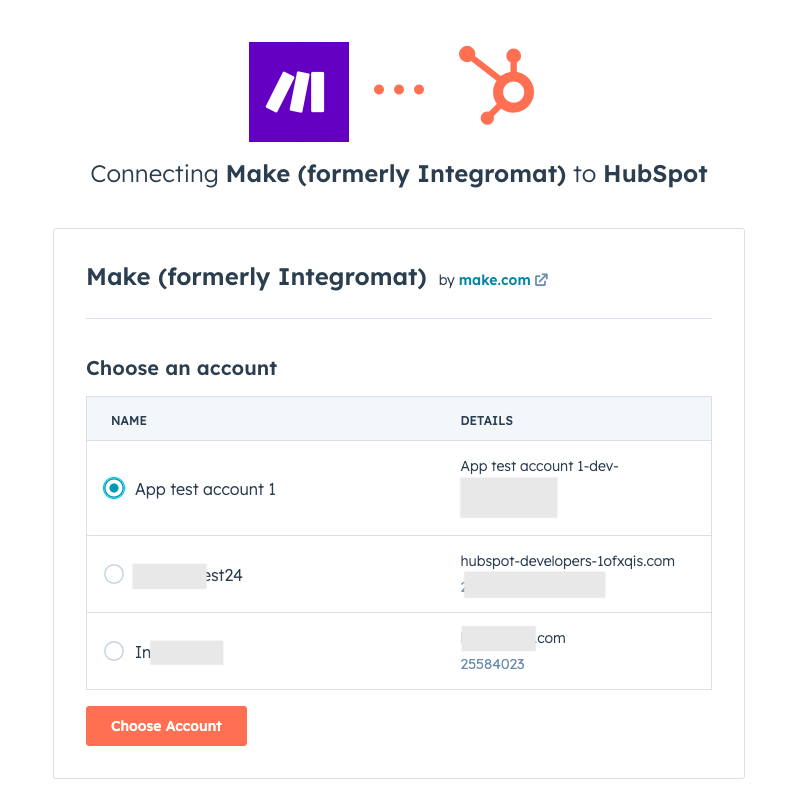
Select the user account you want to connect to.
-
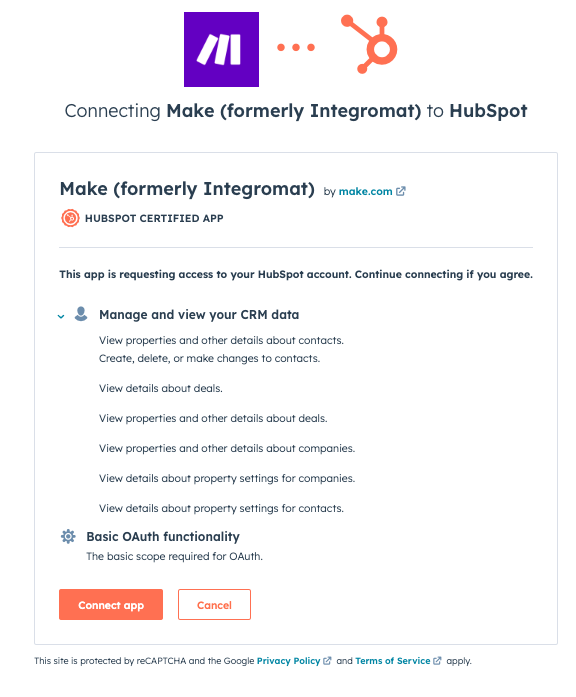
Confirm access by clicking Connect app.
You have successfully established the connection. You can now edit your scenario and add more HubSpot CRM modules. If your connection requires reauthorization at any point, follow the connection renewal steps here.
![[Note]](https://docs.boost.space/wp-content/themes/bsdocs/docs-parser/HTML/css/image/note.png) |
Note |
|---|---|
|
You must have a HubSpot CRM App developer account to establish this connection type. If you do not have a developer account, create one using the App Developer account option and your HubSpot CRM user credentials. Refer to your HubSpot CRM subscription for information regarding how many Custom Applications you can create. To create a connection for a webhookA webhook is a way for an app to send real-time information to a specific URL in response to certain events or triggers., see the Set Up HubSpot CRM Webhooks section. |
To establish the connection, you must:
To create a custom application:
-
Log in to your HubSpot developer account.
-
If you do not have any existing apps, click on Create an app . If you have existing apps, click on Manage apps > Create app.
-
In the App Info tab, enter the following details:
Public app name
Enter the app name.
App logo (Optional)
Click the Upload button to add an image.
Description (Optional)
Enter the app details.
-
In the Auth tab, enter the following details:
Install URL (OAuth)
Leave this field blank.
Redirect URLs
Enter
https://integrator.boost.space/oauth/cb/hubspotcrmScopes
You can leave this field blank.
-
Click Save changes.
-
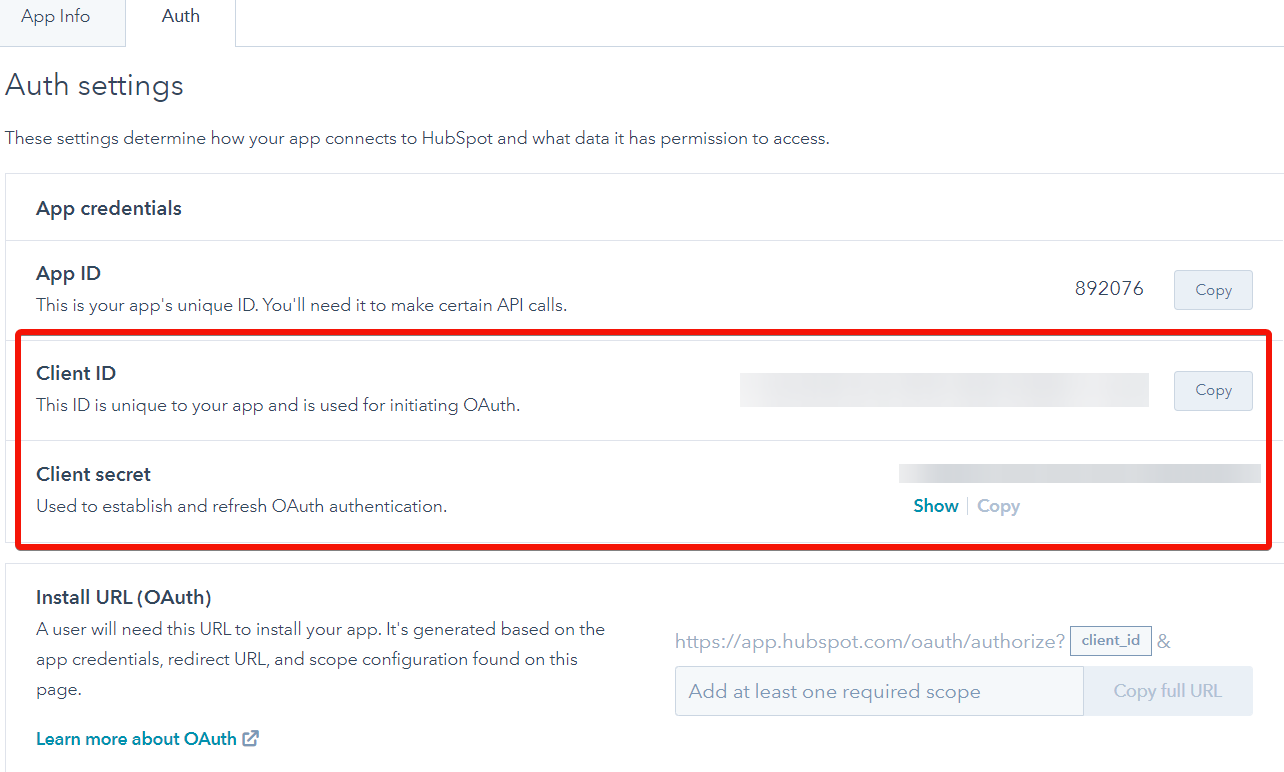
Scroll up to the App credentials section, copy the Client ID and Client Secret values, and store them in a safe place.
You now have the client credentials to use when creating your OAuth connection in Boost.space Integrator .
-
In your HubSpot developer account, click on the Apps tab in the top menu.
-
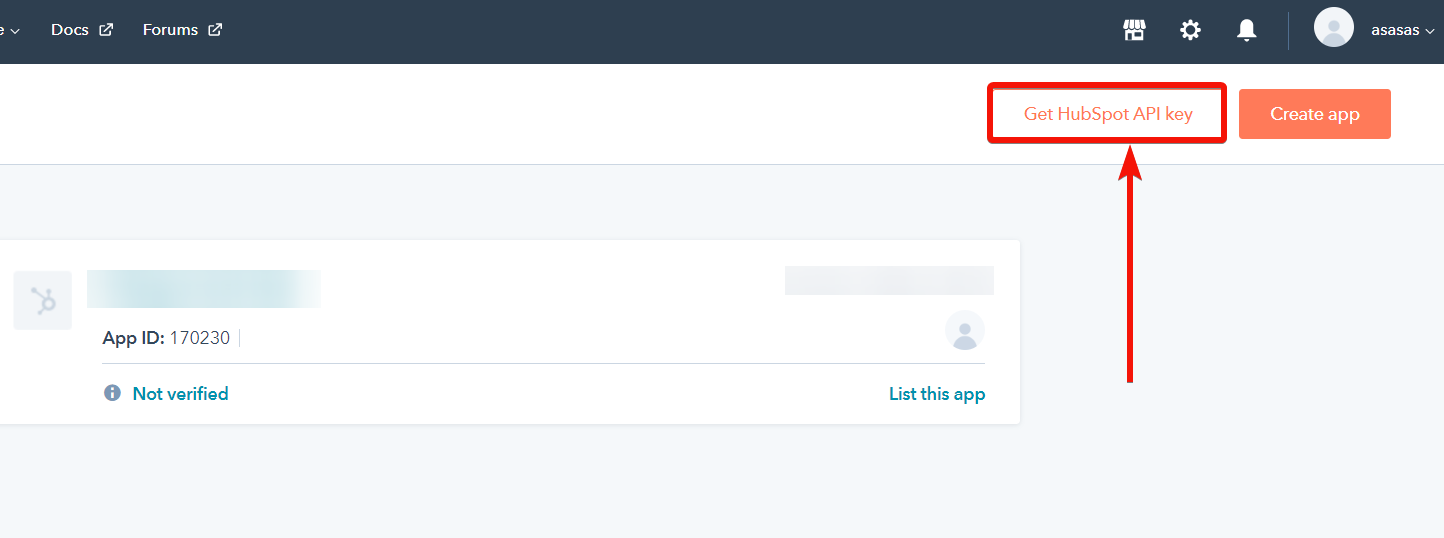
Click Get HubSpot API key.
-
If you have an existing API key, click Show key and copy the key value. If you do not have an existing key, click the Create key button and copy the key value. Store it in a safe place.
-
Copy your User ID and store it in a safe place.
You now have the API key and User ID values to use when creating your OAuth connection in Boost.space Integrator .
-
Log in to your Boost.space Integrator account, add a HubSpot CRM module to your scenario, and click Create a connection.
-
Optional: In the Connection name field, enter a name for the connection.
-
Click Show advanced settings.
-
In the HubSpot Developer API Key and User ID fields, enter the values from your HubSpot CRM developer account.
-
In the Client ID and Client Secret fields, enter the client credentials from your HubSpot CRM custom appCreate your own custom apps to be used in the integrator engine and share them with users in your organization..
-
Click Save.
-
If prompted, log in to your HubSpot CRM user account.
-
Select the associated user account to connect to and click Choose Account.
-
Confirm access by clicking Connect app.
You have successfully established the connection. You can now edit your scenario and add more HubSpot CRM modules. If your connection requires reauthorization at any point, follow the connection renewal steps here.
This app uses webhooks to triggerEvery scenario has a trigger, an event that starts your scenario. A scenario must have a trigger. There can only be one trigger for each scenario. When you create a new scenario, the first module you choose is your trigger for that scenario. Create a trigger by clicking on the empty module of a newly created scenario or moving the... a scenario when an event occurs instantly. All webhook modules have an instant tag next to their name.
You must have a HubSpot CRM App developer account to use HubSpot CRM webhooks. If you do not have a developer account, create one using the App Developer account option and your HubSpot CRM user credentials.
To use the HubSpot CRM Watch Notificationsinstant module, you must do the following:
|
Note |
|---|---|
|
Each HubSpot CRM Custom Application can only be associated with one webhook URL. To watch for multiple events (subscriptions), add all desired subscription when configuring the module in Boost.space Integrator. Refer to your HubSpot CRM subscription for information regarding how many Custom Applications you can create. |
To create a custom application for the webhook:
-
Log in to your HubSpot developer account.
-
If you do not have any existing apps, click on Create an app . If you have existing apps, click on Manage apps > Create app.
-
In the App Info tab, enter the following details:
Public app name
Enter the app name.
App logo (Optional)
Click the Upload button to add an image.
Description (Optional)
Enter the app details.
-
In the Auth tab, enter the following details:
Install URL (OAuth)
Leave this field blank.
Redirect URLs
Enter
https://integrator.boost.space/oauth/cb/hubspotcrmScopes
Add required scopes based on the subscriptions you will watch for. Refer to the Required Permissions for HubSpot CRM Webhooks section Custom App Scopes column for the required scopes to include.
-
Click Save changes.
-
Scroll up to the App credentials section, copy the Client ID and Client Secret values, and store them in a safe place.
You now have the client credentials to use when creating your OAuth connection in Boost.space Integrator .
-
In your HubSpot developer account, click on the Apps tab in the top menu.
-
Click Get HubSpot API key.
-
If you have an existing API key, click Show key and copy the key value. If you do not have an existing key, click the Create key button and copy the key value. Store it in a safe place.
-
Copy your User ID and store it in a safe place.
You now have the API key and User ID values to use when creating your webhook’s OAuth connection in Boost.space Integrator .
You must create a new OAuth connection, specifically to be used with your Custom Application for the webhook.
-
Go to your Boost.space Integrator account, add the HubSpot CRM Watch Notifications
instantmodule to your scenario and click Create a webhook. -
Enter a name for the webhook indicating what the webhook will watch for. For example,
Contact created or updated. -
Click Create a connection or Add in the Connection field.
-
Optional: In the Connection name field, enter a name for the connection.
-
Click Show advanced settings.
-
In the HubSpot Developer API Key and User ID fields, enter the values from your HubSpot CRM developer account.
-
In the Client ID and Client Secret fields, enter the client credentials from your HubSpot CRM custom app.
-
Add the necessary Custom Scopes based on the Subscriptions you will watch for. Refer to the Required Permissions for HubSpot CRM Webhooks section Connection Custom Scopes column for the required scopes to add.
-
Click Save.
-
If prompted, log in to your HubSpot CRM user account.
-
Select the associated user account to connect to and click Choose Account.
-
Confirm access by clicking Connect app.
-
In the Subscriptions field of the module, add or map the Subscription Type to watch for.
Note: Ensure to add all desired subscriptions (and their scopes) as this field cannot be updated at a later time.
-
Click Save.
HubSpot CRM will now send data to Boost.space Integrator through the webhook when the selected event occurs.
When using the Watch Notificationsinstant module, the following permissions must be added as HubSpot CRM custom app Scopes and OAuth connection Custom Scopes.
|
Subscription |
Custom App Scopes |
Connection Custom Scopes |
|
Company – created |
|
CRM Companies Read |
|
Company – deleted |
|
CRM Companies Read |
|
Company – specified property is changed |
|
CRM Companies Read |
|
Contact – created |
|
CRM Contacts Read |
|
Contact – deleted |
|
CRM Contacts Read |
|
Contact – deleted for privacy compliance reasons |
|
CRM Contacts Read |
|
Contact – specified property is changed |
|
CRM Contacts Read |
|
Deal – created |
|
CRM Deals Read |
|
Deal – deleted |
|
CRM Deals Read |
|
Deal – specified property is changed |
|
CRM Deals Read |
For permission information regarding additional subscriptions, refer to the HubSpot Developer Webhook subscriptions documentation.
|
Legacy API |
|---|---|
|
If you are using the legacy version of HubSpot, refer to the HubSpot Legacy Docs Webhooks documentation for permission information. |
This tutorial explains how to build a scenario that grabs new contacts from HubSpot CRM, inserts their information into a Google Docs Template, uploads the compiled document to Dropbox and sends it via Gmail.
Build HubSpot CRM ScenariosA specific connection between applications in which data can be transferred. Two types of scenarios: active/inactive.
After connecting the app, you can perform the following actions:
CRM Objects
-
Watch CRM Objects
-
Search for CRM Objects
Records (Deals, Contacts, Companies)
-
Get a RecordOne row in the Boost.space database. These are individual rows under spaces in each module. For example single products, but not their variants. Property
Custom Objects
-
Create a Custom Object Record
-
Get a Custom Object Record
-
Update a Custom Object Record
-
Delete a Custom Object Record
Contacts
-
Watch Contacts Added to a List
-
Watch Contacts
-
Add Contacts to a List
-
Remove a Contact from a List
-
New Events
-
Create a Contact
-
Update a Contact
-
Get a Contact
-
Search for Contacts
-
Merge Contacts
-
Delete a Contact
Deals
-
Watch Deals
-
Create a Deal
-
Update a Deal
-
Get a Deal
-
List Deal/Ticket Pipelines
-
Search for Deals
-
Delete a Deal
Companies
-
Watch Companies
-
Create a Company
-
Update a Company
-
Get a Company
-
Search for Companies
-
Delete a Company
Engagements
-
Watch Engagements
-
Create an Engagement
-
Delete an Engagement
Events and Notifications
-
Watch Notifications
Note: For details, see this section.
-
Create a Timeline Event
-
List Timeline Event Templates
Files
-
Watch Files
-
Create a Folder
-
List Files
-
Upload a File
-
Update File Properties
-
Delete a File
-
Delete a Folder
UsersCan use the system on a limited basis based on the rights assigned by the admin.
Tickets
-
Watch Tickets
-
Create a Ticket
-
Update a Ticket
-
Get a Ticket
-
Search for Tickets
-
Delete a Ticket
Forms
-
Watch Submissions for a Form
-
Get a File Uploaded via Form
-
List Forms
-
Submit Data to a Form
Workflows
-
Add a Contact to a Workflow
-
Remove a Contact from a Workflow
Subscriptions
Note: You cannot subscribe a contact to an email address that is already subscribed.
-
Watch Subscriptions Timeline for a Portal
-
Subscribe Contact
-
Unsubscribe a Contact
Associations
-
Create an Association
-
List Associations
-
Delete an Association
Other
-
Make an API Call
|
Numeric Value Character Limit |
|---|---|
|
HubSpot imposes a 18 digit character limit for numeric values and automatically truncates values that exceed the limit. For example, when you filter by a custom fieldA feature in Boost.space that allows you to define and manage data within each module according to your specific needs. with more than 18 digits, the API will automatically truncate the number to 18 digits. |
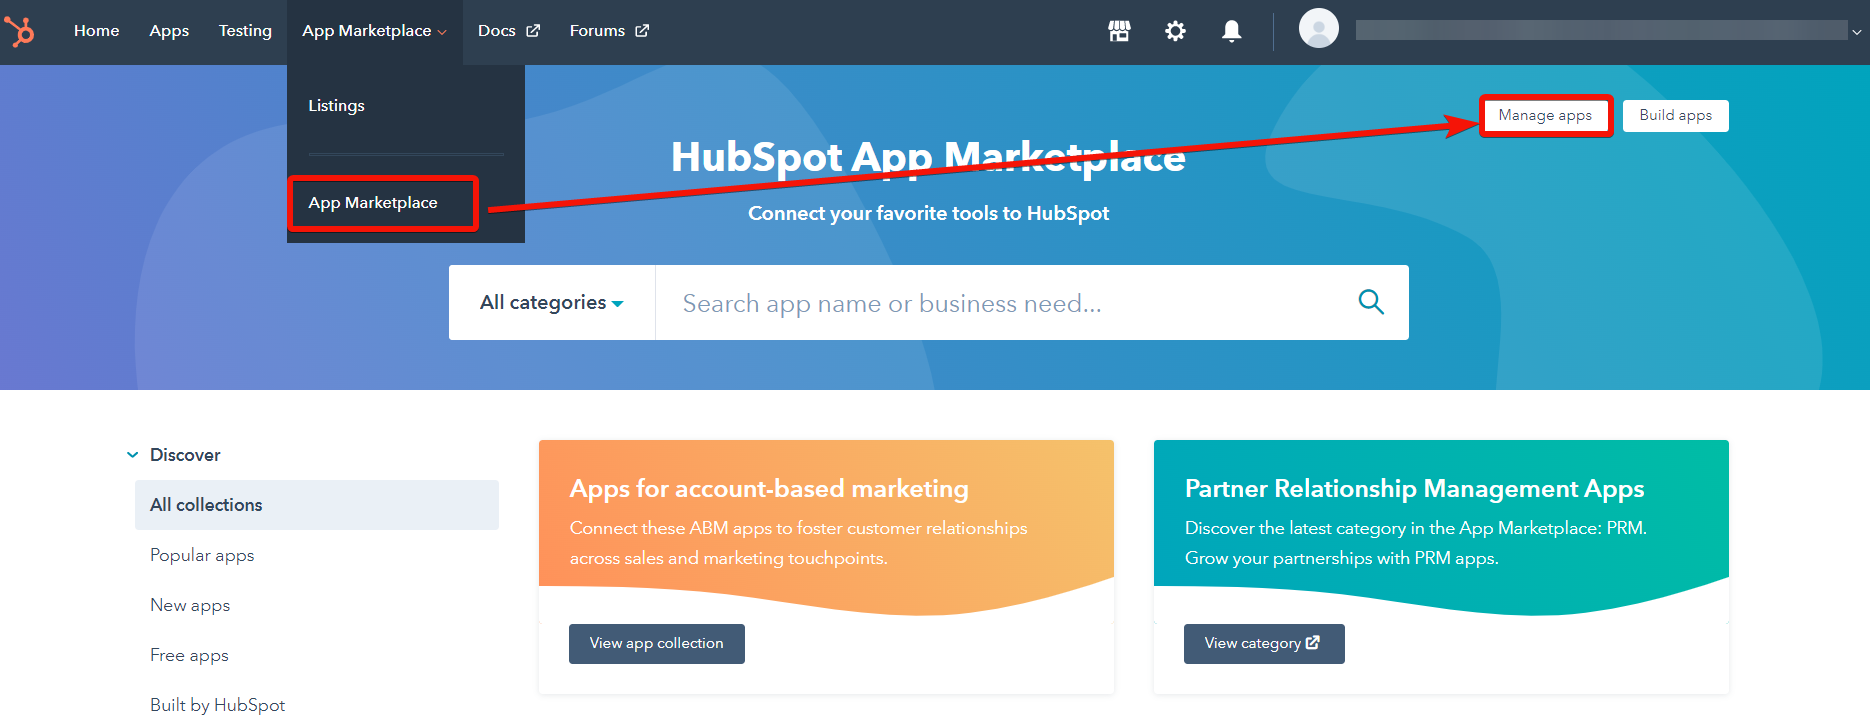
To disconnect the Boost.space Integrator app from your HubSpot CRM account:
-
Log in to your HubSpot Developer account.
-
Click App Marketplace > App Marketplace > Manage Apps.
-
Under the Connected apps section, in the app you want to disconnect, click Actions > Uninstall.
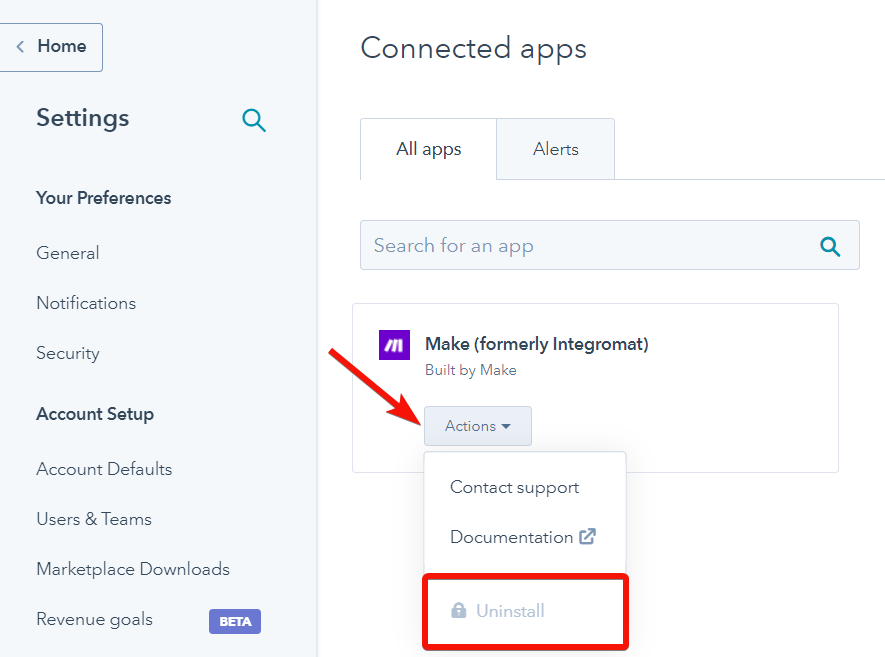
The app has been disconnected.