| Active |
|---|
| This application does not need additional settings. So you can make connectionUnique, active service acces point to a network. There are different types of connections (API key, Oauth…). only by using your login credentials or by following the instructions below . |
![[Important]](https://docs.boost.space/wp-content/themes/bsdocs/docs-parser/HTML/css/image/important.png)
With Microsoft 365 Email modulesThe module is an application or tool within the Boost.space system. The entire system is built on this concept of modularity. (module - Contacts) in Boost.spaceCentralization and synchronization platform, where you can organize and manage your data. IntegratorPart of the Boost.space system, where you can create your connections and automate your processes., you can watch for, search for, retrieve, create and send, update, forward, reply, move and delete messages, create and send draft messages, and retrieve, add, and download attachments.
To get started with Microsoft 365 Email, create an account at office.com.
Refer to the Microsoft 365 Email API documentation for a list of available endpoints.
See the changelog for the Microsoft 365 Email App
To establish the connection using your Microsoft account:
-
Log in to your Boost.space Integrator account, add a Microsoft 365 Email moduleThe module is an application or tool within the Boost.space system. The entire system is built on this concept of modularity. (module - Contacts) to your scenarioA specific connection between applications in which data can be transferred. Two types of scenarios: active/inactive., and click Create a connection.
-
Optional: In the Connection name field, enter a name for the connection.
-
Optional: Click Show advanced settings and enter your custom appCreate your own custom apps to be used in the integrator engine and share them with users in your organization. client credentials.
For more information, see the Connect Microsoft 365 Email With Custom App and Client Credentials section.
-
Click Save.
-
If prompted, authenticate your account and confirm access.
You have successfully established the connection. You can now edit your scenario and add more Microsoft 365 Email modules. If your connection requires reauthorization at any point, follow the connection renewal steps here.
Before you begin:
-
Make sure you have Client ID and Client Secret ready.
If you haven’t created your credentials yet, you need to create a custom app in your Azure account to generate the Client ID and Client Secret. See Generating credentials in Azure.
-
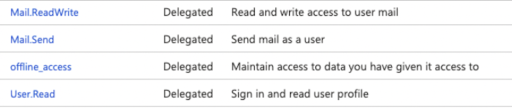
Make sure the Microsoft 365 Email application has the following permissions assigned in the Azure portal:
Build Microsoft 365 Email ScenariosA specific connection between applications in which data can be transferred. Two types of scenarios: active/inactive.
After connecting the app, you can perform the following actions:
Message
-
Watch Messages
Required Permissions: Mail.Read
-
Watch Messages in a Shared Folder
Required Permissions: Mail.Read.Shared
-
Search Messages
Required Permissions: Mail.Read
-
Get a Message
Required Permissions: Mail.Read
-
Create and Send a Message
Required Permissions: Mail.Send, Mail.ReadWrite
-
Forward a Message
Required Permissions: Mail.Send
-
Reply to a Message
Required Permissions: Mail.Send, Mail.ReadWrite
-
Move a Message
Required Permissions: Mail.ReadWrite
-
Delete a Message
Required Permissions: Mail.ReadWrite
Draft Message
-
Create a Draft Message
Required Permissions: Mail.ReadWrite
-
Send a Draft Message
Required Permissions: Mail.ReadWrite
-
Update a Message
Required Permissions: Mail.ReadWrite
Attachment
-
List Attachments
Required Permissions: Mail.Read
-
Add an Attachment
Required Permissions: Mail.ReadWrite
-
Download an Attachment
Required Permissions: Mail.Read
Other
-
Make an API Call
Required Permissions: Mail.ReadWrite