- WooCommerce
- Connect WooCommerce to Boost.space Integrator
- Triggers
- Action
- Create a Coupon
- Create a Customer
- Create an Order
- Create an Order Note
- Create a Product
- Create Products (batch)
- Create a Product Variation
- Delete a coupon
- Delete a Customer
- Delete an Order
- Delete an Order Note
- Delete a Product
- Delete Products (batch)
- Delete a Product Variation
- Get a Coupon
- Get a Customer
- Get an Order
- Get an Order Note
- Get a Product
- Get a Product Variation
- Update a Coupon
- Update a Customer
- Update an Order
- Update an Order Status
- Update a Product
- Update a Product Variation
- Searches
| Active with remarks |
|---|
| This application needs additional settings. Please follow the documentation below to create your own connectionUnique, active service acces point to a network. There are different types of connections (API key, Oauth…).. |
WooCommerce modulesThe module is an application or tool within the Boost.space system. The entire system is built on this concept of modularity. (module - Contacts) in Boost.spaceCentralization and synchronization platform, where you can organize and manage your data. IntegratorPart of the Boost.space system, where you can create your connections and automate your processes., you can monitor, create, retrieve, update, delete, and search coupons, customers, orders, order notes, products, and product attributes, terms, categories, and variations.
To get started with WooCommerce, you must have a WooCommerce account and a WooCommerce WordPress plugin installed.
Refer to the WooCommerce API documentation for a list of available endpoints.
To connect your WooCommerce account to Boost.space Integrator,you must generate the Consumer Key and Consumer Secret in your WooCommerce account.
-
Log in to your WordPress dashboard.
-
In the left sidebar, click WooCommerce > Settings.
-
Click on the Advanced tab.
-
Go to Legacy API, check the Enable the Legacy REST API checkbox, and click Save changes.
-
Continue to the REST API section and click the Add Key button.
-
Enter the description of your connection and select the Read/Write option from the permissions drop-down menu.
-
Click on the Generate API Key button.
-
When the page refreshes, copy the Consumer Key and Consumer Secret and store them in a safe place.
-
Log in to your Boost.space Integrator account, add a WooCommerce moduleThe module is an application or tool within the Boost.space system. The entire system is built on this concept of modularity. (module - Contacts) to your scenarioA specific connection between applications in which data can be transferred. Two types of scenarios: active/inactive., and click Create a connection.
Note: If you add a module with an
instanttag, click Create a webhookA webhook is a way for an app to send real-time information to a specific URL in response to certain events or triggers., then Create a connection. -
In the Consumer Key and Consumer Secret fields, enter the credentials you copied in Step 8.
-
In the Eshop URL field, enter the URL of your Eshop, including HTTPS. For example,
https://my-eshop.com. -
Click Save.
![[Note]](https://docs.boost.space/wp-content/themes/bsdocs/docs-parser/HTML/css/image/note.png)
Note SSL must be enabled on your WordPress site.
Note Use pretty permalinks. Change the permalinks settings under Settings > Permalinks.
You have successfully established the connection. You can now edit your scenario and add more WooCommerce modules. If your connection requires reauthorization at any point, follow the connection renewal steps here.
(Reference: https://woocommerce.github.io/woocommerce-rest-api-docs/)
TriggersEvery scenario has a trigger, an event that starts your scenario. A scenario must have a trigger. There can only be one trigger for each scenario. When you create a new scenario, the first module you choose is your trigger for that scenario. Create a trigger by clicking on the empty module of a newly created scenario or moving the... when a coupon, customer, order, or product is created, updated, or deleted.
|
Webhook name |
Enter a name for the webhook. E.g. Order Created Webhook. |
|
Connection |
|
|
Topic |
Select the action that triggers the module. |
Triggers when a new coupon is created.
|
Connection |
|
|
Limit |
Set the maximum number of coupons Boost.space Integrator will return during one cycleA cycle is the operation and commit/rollback phases of scenario execution. A scenario may have one or more cycles (one is the default).. |
Triggers when a new customer is created.
|
Connection |
|
|
Role |
Select the specific role of the userCan use the system on a limited basis based on the rights assigned by the admin. you want to retrieve. |
|
I want to watch |
Select whether to retrieve only new usersCan use the system on a limited basis based on the rights assigned by the admin. or new and updated users. |
|
Limit |
Set the maximum number of users Boost.space Integrator will return during one cycle. |
Triggers when a new order is created.
|
Connection |
|
|
Limit |
Set the maximum number of orders Boost.space Integrator will return during one cycle. |
Triggers when a new product is created.
|
Connection |
|
|
Limit |
Set the maximum number of products Boost.space Integrator will return during one cycle. |
Creates a new coupon.
|
Connection |
|
|
Code |
Enter a coupon code. |
|
Amount |
Enter the amount of discount. Should always be numeric, even if setting a percentage. |
|
Discount type |
Select a type of applied discount. |
|
Description |
Enter a description for the coupon. |
|
Date expires |
Enter the date when the coupon expires. List of supported date formats. |
|
Individual use |
If enabled, the coupon can only be used individually. Other applied coupons will be removed from the cart. |
|
Product IDs |
Enter product IDs the coupon can be used on. |
|
Excluded product IDs |
Enter product IDs the coupon cannot be used on. |
|
Usage limit |
Define how many times the coupon can be used (in total). |
|
Usage limit per user |
Define how many times the coupon can be used (per customer). |
|
Limit usage to X itemsItems are rows in records (order/request/invoice/purchase...) |
Set a maximum number of items in the cart the coupon can be applied to. |
|
Free shipping |
If this option is enabled and if the free shipping method requires a coupon, this coupon will enable free shipping. |
|
Product categories |
Select (or map) product categories (IDs) the coupon applies to. |
|
Excluded product categories |
Select (or map) product categories (IDs) the coupon doesnot apply to. |
|
Exclude sale items |
If this option is enabled the coupon will not be applied to items that have sale prices. |
|
Minimum amount |
Enter the minimum order amount that needs to be in the cart before the coupon applies. |
|
Maximum amount |
Enter the maximum order amount allowed when using the coupon. |
|
Email restrictions |
Enter email addresses that can use this coupon. |
|
Meta data |
Enter the key-value metadata for the coupon. |
Creates a new customer.
|
Connection |
|
|
Username |
Set the customer login name. |
|
Password |
Set the customer password |
|
First name |
Enter the customer’s first name. |
|
Last name |
Enter the customer’s last name. |
|
Billing address |
Enter the billing address properties. |
|
Shipping address |
Enter the shipping address properties. |
|
Meta data |
Enter the key-value metadata for the coupon. |
Creates a new order.
|
Connection |
|
|
Parent Order ID |
Enter the parent order ID. |
|
StatusCreate statuses for each module separately to create an ideal environment for efficient and consistent work. |
Set the order status. |
|
Currency |
Select the currency for the order. |
|
Customer ID |
Enter the ID of the customer who created the order. |
|
Customer Note |
The note that is left by a customer during checkout. |
|
Billing address |
Enter the billing address properties. For the Country field, please use ISO 3166-1 country code. |
|
Shipping address |
Enter the shipping address properties. For the Country field, please use ISO 3166-1 country code. |
|
Payment Method |
Select one of the payment methods. |
|
Transaction ID |
Enter the unique transaction ID. |
|
Line items |
Add desired line items. For more details refer to the WooCommerce API documentation. |
|
Shipping Lines |
Enter shipping line properties. For more details refer to the WooCommerce API documentation. |
|
Fee Lines |
Add fee lines if needed. For more details refer to the WooCommerce API documentation. |
|
Coupon Lines |
Enter coupon codes and discount totals. |
|
Set paid |
If the option Yes is selected, the order is set as paid. It will set the status to processing and reduce stock items. The default value is set to No. |
|
Meta data |
Enter the key-value metadata for the order. |
Adds a note to the order.
|
Connection |
|
|
Order ID |
Enter (map) the ID of the order you want to add a note to. |
|
Note |
Enter the content of the note. |
|
Note will be shown to customers |
If this option is enabled, the note will be for customers (with notification). If disabled, the note will be set as private – only for your reference. |
For more details about WooCommerce products refer to Adding and Managing Products on the WooCommerce documentation site.
Adds a new product.
|
Connection |
|
|
Name |
Enter a product name. |
|
Slug |
Set the product slug for the URL. |
|
Type |
Select a product type. Options: simple, grouped, external and variable. Default is simple. |
|
Status |
Set the product status by selecting from the drop-down menu. |
|
Featured |
Select the Yes option to set the product as featured. |
|
Catalog visibility |
Select where the created product will be visible. |
|
Description |
Enter the product description. |
|
Short description |
Enter the short description of the product. |
|
SKU |
Enter the stock-keeping unit. |
|
Regular price |
Enter the regular price of the product. |
|
Sale price |
Enter the sale price of the product. |
|
Date on sale from |
The start date of the sale price, in the site’s timezone. The list of supported date formats. |
|
Date on sale to |
The end date of the sale price, in the site’s timezone. The list of supported date formats. |
|
Virtual |
Select the Yes option if the product is virtual. |
|
Downloadable |
Select the Yes option if the product is downloadable. |
|
Downloads |
Add files to be downloaded. File name Name of the file that is shown to a customer. File URL Enter the URL or absolute path to the file which customers will get access to. URLs should be already encoded. |
|
Download limit |
Enter the number of times downloadable files can be downloaded after purchase. |
|
Download expiry |
Enter the number of days until access to downloadable files expires. |
|
External URL |
Product external URL. Only for external products. |
|
Button text |
Button text for the external product. Only for external products. |
|
Tax status |
Select whether the taxable status of the product is |
|
Tax class |
Select to tax class of the product. |
|
Stock management at product level |
Select whether you want to manage the stock or not. |
|
Stock quantity |
Enter the stock quantity (Stock management at product level option must be enabled). |
|
In stock |
Select Yes to list the product as |
|
Backorders |
If managing stock, this controls if backorders are allowed. |
|
Sold individually |
Select the Yes option to allow one itemItems are rows in records (order/request/invoice/purchase...) to be bought in a single order. |
|
Weight |
Enter the product weight. |
|
Dimensions |
Enter the product length, width, and height. |
|
Shipping class |
Select the shipping class of the product. |
|
Reviews allowed |
Select Yes to allow product reviews. |
|
Up-sell IDs |
Enter the IDs of the recommended (up-sells) products. |
|
Cross-sell IDs |
Enter the IDs of the products you want to promote in the cart. |
|
Product parent IDs |
Enter the product parent ID. |
|
Purchase note |
Optional note to send the customer after purchase. |
|
Categories |
Select product categories. |
|
Tags |
Add tag(s) to the product. |
|
Images |
Add images of the product. |
|
Menu order |
Enter the custom ordering position. |
|
Attributes |
Use this to add product attributes (e.g. color, size, etc.). |
|
Metadata |
Enter the key-value metadata for the product |
Allows you to create multiple products.
|
Products |
Add one or more products. Find fields description in the Create a product section above. |
Creates a variation of the specified product.
|
Connection |
|
|
Product ID |
Enter (map) the ID of the product that you want to create a variation for. |
Please find the field descriptions in the Create a product section above.
Deletes a specified coupon.
|
Connection |
|
|
Coupon ID |
Enter (map) the ID of the coupon you want to delete. |
Deletes a specified customer.
|
Connection |
|
|
Customer ID |
Enter (map) the ID of the customer you want to delete. |
Deletes a specified order.
|
Connection |
|
|
Order ID |
Enter (map) the ID of the order you want to delete. |
Deletes a specified order.
|
Connection |
|
|
Order ID |
Enter (map) the ID of the order that contains a note you want to delete. |
|
Note ID |
Enter (map) the ID of the note you want to delete. |
Deletes a specified product.
|
Connection |
|
|
Product ID |
Enter (map) the ID of the product you want to delete. |
Deletes multiple products.
|
Connection |
|
|
Product IDs |
Add (map) IDs of the products you want to delete. |
Deletes a variation of a specified product.
|
Connection |
|
|
Product ID |
Enter (map) the ID of the product that contains a variation you want to delete. |
|
Variation ID |
Enter (map) the ID of the variation you want to delete. |
Retrieves coupon details.
|
Connection |
|
|
Coupon ID |
Enter (map) the ID of the coupon you want to retrieve information about. |
Retrieves customer details.
|
Connection |
|
|
Customer ID |
Enter (map) the ID of the customer you want to retrieve information about. |
Retrieves specified order details.
|
Connection |
|
|
Customer ID |
Enter (map) the ID of the order you want to retrieve information about. |
Retrieves specified order note details.
|
Connection |
|
|
Order ID |
Enter (map) the ID of the order that contains a note you want to retrieve information about. |
|
Note ID |
Enter (map) the ID of the note you want to retrieve information about. |
Retrieves specified product details.
|
Connection |
|
|
Product ID |
Enter (map) the ID of the product you want to retrieve information about. |
Retrieves details of a specified product variation.
|
Connection |
|
|
Product ID |
Enter (map) or search for the ID of the product that contains a variation you want to retrieve information about. |
|
Variation ID |
Enter (map) the ID of the variation you want to retrieve information about. |
Updates an existing coupon.
|
Coupon ID |
Enter (map) the ID of the coupon you want to modify. |
Please find the description of the module fields in the Create a Coupon section.
Updates customer details.
|
Customer ID |
Enter (map) the ID of the customer whose details you want to modify. |
Please find the description of the module fields in the Create a Customer section.
Changes the order details.
|
Order ID |
Enter (map) the ID of the order which details you want to modify. |
Please find the description of the module fields in the Create an Order section.
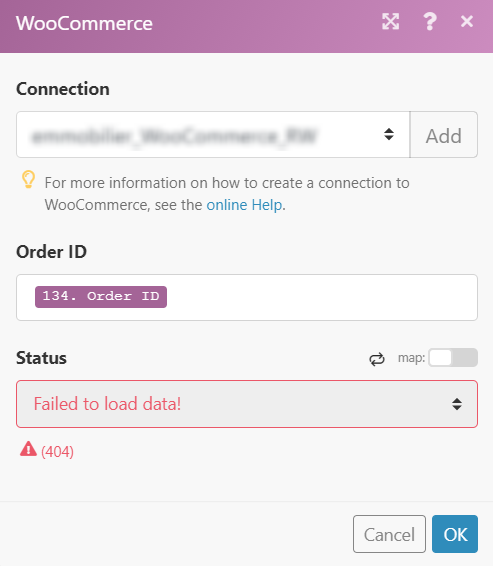
Allows you to change the status of a specified order.
|
Order ID |
Enter (map) the ID of the order which status you want to change. |
|
|
Status |
Select a new status of the order. If the error 404 “Failed to load data” is displayed, try using the Update an Order module to change the order status. The Update an Order Status module is intended for users with custom order status and requires Order Status ManagerCan manage members and space managers, view and manage items. Can modify space settings. plugin.
|
Allows you to modify product details.
|
Product ID |
Enter (map) the ID of the product you want to update. |
Please find the description of the module fields in the Create a Product section.
Update Products (batch)
Allows you to modify details of multiple products.
|
Products |
Add the products you want to modify. Please find the description of the module fields in the Create a Product section. |
Performs a search among customers.
|
Connection |
|
|
Search |
Enter the search term. |
|
|
Filter results by email. |
|
Role |
Filter search results by a specific user role. |
|
Number of results |
Set the maximum number of returned users. |
Retrieves notes for the specified order.
|
Connection |
|
|
Order ID |
Enter the ID of the order you want to retrieve notes from. |
Retrieves variations of the specified product.
|
Connection |
|
|
Product ID |
Enter the ID of the product that contains the variations you want to retrieve. |
Performs a search for a coupon.
|
Connection |
|
|
Search |
Enter the search term. |
|
|
Filter results by the coupon code. |
|
Number of results |
Set the maximum number of returned coupons. |
Performs a search for an order.
|
Connection |
|
|
Search |
Enter the search term. |
|
Customer ID |
Enter (map) the ID of the customer you want to filter results by. |
|
Product ID |
Enter (map) the ID of the product you want to filter results by. |
|
Status |
Select the status of the order you want to filter results by. |
|
Number of results |
Set the maximum number of returned orders. |
Performs a search for a product based on defined filter settings.
|
Connection |
|
|
Search |
Enter the search term. |
|
Slug |
Enter the product slug you want to filter results by. |
|
Category |
Select the category of the product you want to filter results by. |
|
Tag |
Select the tag of the product you want to filter results by. |
|
Status |
Select the status of the product you want to filter results by. |
|
SKU |
Enter the stock-keeping unit you want to filter results by. |
|
In stock |
Select whether you want to search for products that are in stock or not. |
|
On sale |
Select whether you want to search for products that are on sale or not. |
|
Featured product |
Select whether you want to search for products that are featured or not. |
|
Min price |
Enter the minimum price of the searched product. |
|
Max price |
Enter the maximum price of the searched product. |
|
Attribute |
Select the attribute and Attribute term of the product. |
|
Number of results |
Set the maximum number of returned products. |