| Active with remarks |
|---|
| This application needs additional settings. Please follow the documentation below to create your own connectionUnique, active service acces point to a network. There are different types of connections (API key, Oauth…).. |
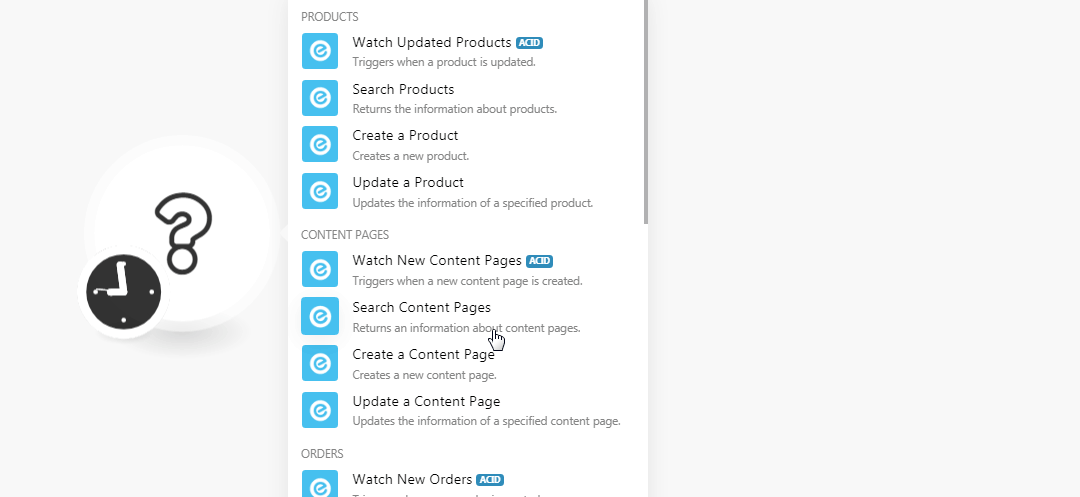
The Neto modulesThe module is an application or tool within the Boost.space system. The entire system is built on this concept of modularity. (module - Contacts) allow you to watch, create, update, retrieve, and delete the products, content pages, orders, customers, payments, and RMAs in your Neto account.
![[Note]](https://docs.boost.space/wp-content/uploads/2022/11/note.png) |
Note |
|---|---|
| Neto is now Maropost Commerce Cloud. Read more about the change
In Boost.spaceCentralization and synchronization platform, where you can organize and manage your data. IntegratorPart of the Boost.space system, where you can create your connections and automate your processes., the app is still named Neto. We are working on updating the app name. Despite the name change, the app is still functional. |
Prerequisites
- A Neto account
In order to use Neto with Boost.space Integrator, it is necessary to have a Neto account. If you do not have one, you can create a Neto account at netohq.com/free-trial.
There are two ways of connecting Neto to Boost.space Integrator:
- Connecting using OAuth 2.0 (recommended)
- Connecting using API Key
1. Go to Boost.space Integrator and open the Neto module’s Create a connection dialog.
2. Select the Neto OAuth2 option in the Connection type field.
3. Enter a name for the connection to the Connection name field and click Continue.
4. In the Your Neto Site URL field, enter your business site URL address. For example, https://diva-fashions.neto.com.au/_cpanel/home then your Neto Site URL address is https://diva-fashions.neto.com.au.
Click the Continue button, Boost.space Integrator will redirect you to the Neto website where you will be prompted to log in to your Neto account.After you are logged in the connection is established and you can proceed with setting up the moduleThe module is an application or tool within the Boost.space system. The entire system is built on this concept of modularity. (module - Contacts).
You need to obtain the API Key from your Neto account and insert it in the Create a connection dialog in the Boost.space Integrator module.
1. Log in to your account.
2. Click Settings & Tools > All Settings > Developers Tools > API Settings. Copy the API Key to your clipboard.
3. Copy the API Key to your clipboard.

4. Go to Boost.space Integrator and open the Neto module’s Create a connection dialog.
5. Select the Neto API Key option in the Connection type field.
6. In the Connection name field. enter a name for the connection.
7. In the Your Neto Site URL field, enter your business site URL address. For example, https://diva-fashions.neto.com.au/_cpanel/home then your Neto Site URL address is https://diva-fashions.neto.com.au.
8. In the API Key field, enter the API key copied in step 3 and click Continue.
The connection has been established.
TriggersEvery scenario has a trigger, an event that starts your scenario. A scenario must have a trigger. There can only be one trigger for each scenario. When you create a new scenario, the first module you choose is your trigger for that scenario. Create a trigger by clicking on the empty module of a newly created scenario or moving the... when a product is updated.
Connection |
Establish a connection to your Neto account. |
Output Selector |
Select the output options you want to list the products. |
Limit |
Set the maximum number of products Boost.space Integrator should return during one scenarioA specific connection between applications in which data can be transferred. Two types of scenarios: active/inactive. execution cycleA cycle is the operation and commit/rollback phases of scenario execution. A scenario may have one or more cycles (one is the default).. |
Returns the information about products.
Connection |
Establish a connection to your Neto account. |
Output Selector |
Select the output options you want to list the products. |
SKU |
Select the SKU details of the product you want to list. |
Accounting Code |
Add the accounting codes to list only those products with the specified codes. |
Inventory ID |
Add the Inventory IDs to list only those products with the specified ID. |
Parent SKU |
Enter the parent SKU to list all the products with that SKU. |
Brand |
Add the brand to list the products associated with that brand. |
Model |
Select the models to list the products with the specified model. |
Name |
Select the names of the product you want to list. |
Primary Supplier |
Select the supplier |
Approved |
Select whether to list the approved products:
|
Approved For POS |
Select whether to list the approved products for POS:
|
Approved For Mobile Store |
Select whether to list the approved products for the mobile store:
|
Sales Channel |
Add the sales channels to search the products associated with the specified channel:
Enter the Sales Channel ID.
Select whether the sales channel is approved:
|
Visible |
Select whether to list visible products:
|
Is Active |
Select whether to list the active products:
|
Is Neto Utility |
Select whether to list the Neto utility products:
|
Au Gst Exempt |
Select whether to list the products that are AU GST exempt:
|
Nz Gst Exempt |
Select whether to list the products that are NZ GST exempt:
|
Date Added From |
Enter the date to list the products added on or after the specified date. |
Date Added To |
Enter the date to list the products added on or before the specified date. |
Date Updated From |
Enter the date to list the products updated on or after the specified date. |
Date Updated To |
Enter the date to list the products updated on or before the specified date. |
Category ID |
Enter the Category ID of the products you want to list. |
Priority |
Enter the priority of the products you want to list. For example, high. |
Page |
Enter the number of results you want per page. |
Limit |
Set the maximum number of products Boost.space Integrator should return during one scenario execution cycle. |
Order By |
Select the option to sort the products you want to list:
|
Order Direction |
Select the direction in which you want to list the products:
|
Creates a new product.
Connection |
Establish a connection to your Neto account. | ||||||||||||||
SKU |
Select the SKU details of the product you want to create. | ||||||||||||||
Inventory ID |
Enter the Inventory ID of the product. | ||||||||||||||
Parent SKU |
Enter the parent SKU information of the product. | ||||||||||||||
Accounting Code |
Enter the accounting code of the product. | ||||||||||||||
Virtual |
Select whether this is a virtual product:
|
||||||||||||||
Brand |
Enter the product’s brand name. | ||||||||||||||
Name |
Enter the name of the product. | ||||||||||||||
Model |
Enter the product model details. | ||||||||||||||
Sort Order (1-2) |
Enter the sort orders for the product. | ||||||||||||||
RRP |
Enter the retail recommended price of the product. | ||||||||||||||
Default Price |
Enter the default price of the product. | ||||||||||||||
Promotion Price |
Enter the promotion price of the product. | ||||||||||||||
Promotion Start Date |
Enter the date when the product promotion starts. | ||||||||||||||
Promotion Expiry Date |
Enter the date when the product promotion ends. | ||||||||||||||
Date Arrival |
Enter the date when the product has arrived. | ||||||||||||||
Cost Price |
Enter the cost price of the product. | ||||||||||||||
Unit of Measure |
Enter the measuring unit of the product. | ||||||||||||||
Base Unit of Measure |
Enter the base unit measure of the product allowed per quantity. | ||||||||||||||
Base Unit Per Quantity |
Enter the base unit of the product allowed per quantity. | ||||||||||||||
Buy Unit Quantity |
Enter the buying quantity allowed for the product. | ||||||||||||||
Sell Unit Quantity |
Enter the selling unit quantity allowed for the product. | ||||||||||||||
Pre Order Quantity |
Enter the pre-order quantity allowed for the product. | ||||||||||||||
Pick Priority |
Enter the pickup priority of the product. | ||||||||||||||
Pick Zone |
Enter the pickup zone of the product. | ||||||||||||||
Restricted To UserCan use the system on a limited basis based on the rights assigned by the admin. Group |
Enter the user group restricted for the product. | ||||||||||||||
Approved |
Select whether the product is approved:
|
||||||||||||||
Approved For POS |
Select whether the product is approved for POS:
|
||||||||||||||
Approved For Mobile Store |
Select whether the product is approved for mobile store:
|
||||||||||||||
Is Active |
Select whether the product is active:
|
||||||||||||||
Active |
Select whether the product is active:
|
||||||||||||||
Visible |
Select whether the product is visible:
|
||||||||||||||
Tax Category |
Enter the product tax category. | ||||||||||||||
Tax Free ItemItems are rows in records (order/request/invoice/purchase...) |
Select whether the product is tax-free:
|
||||||||||||||
Tax Inclusive |
Select whether the product price is inclusive of taxes:
|
||||||||||||||
Au Gst Exempt |
Select whether the product is AU GST exempt:
|
||||||||||||||
Nz Gst Exempt |
Select whether the product is NZ GST exempt:
|
||||||||||||||
Search Keywords |
Enter the keywords to search for the product on the website. | ||||||||||||||
Short Description |
Enter the brief description of the product. | ||||||||||||||
Description |
Enter the product description or details. | ||||||||||||||
Terms And Conditions |
Enter the product’s terms and conditions. | ||||||||||||||
Features |
Enter the product feature details. | ||||||||||||||
Specifications |
Enter the product’s specifications. | ||||||||||||||
Warranty |
Enter the product warranty information. | ||||||||||||||
Artist Or Author |
Enter the product’s artist name or author’s name. | ||||||||||||||
Format |
Enter the product format. For example, soft copy or hardware. | ||||||||||||||
Model Number |
Enter the product model number details. | ||||||||||||||
Subtitle |
Enter the product’s subtitle. | ||||||||||||||
Availability Description |
Enter the product’s availability details. | ||||||||||||||
Images |
Enter the URL address of the product images. | ||||||||||||||
Brochure URL |
Enter the product’s brochure URL address. | ||||||||||||||
Product URL |
Enter the product’s website URL address. | ||||||||||||||
UPC |
Enter the Universal Product Code (UPC) details of the product. | ||||||||||||||
UPC 1 – 3 |
Enter any additional UPC details of the product. | ||||||||||||||
Type |
Enter the product type details. | ||||||||||||||
Subtype |
Enter the product subtype details. | ||||||||||||||
Numbers Of LabelsA label is a “tag” that can be added to items within a module. It's a flexible tool used to categorize and organize data, making it easier to customize workflows and processes. To Print |
Enter the number of labels you want to print for the product. | ||||||||||||||
Reference Number |
Enter the product’s reference number. | ||||||||||||||
Internal Notes |
Enter any additional information about the product you want to share internally. | ||||||||||||||
Barcode Height |
Enter the product’s barcode height. | ||||||||||||||
Is Inventoried |
Select whether the product is inventoried:
|
||||||||||||||
Is Bought |
Select whether the product is bought:
|
||||||||||||||
Is Sold |
Enter if the product is sold out. | ||||||||||||||
Expense Account |
Enter the product’s expense account details. | ||||||||||||||
Purchase Tax Code |
Enter the product’s purchase tax code details. | ||||||||||||||
Cost Of Sales Account |
Enter the product’s cost of sales account details. | ||||||||||||||
Income Account |
Enter the product income account details. | ||||||||||||||
Asset Account |
Enter the product asset account details. | ||||||||||||||
Item Height |
Enter the product height. | ||||||||||||||
Item Length |
Enter the product length. | ||||||||||||||
Item Width |
Enter the product width. | ||||||||||||||
Shipping Height |
Enter the product shipping height. | ||||||||||||||
Shipping Length |
Enter the product shipping length. | ||||||||||||||
Shipping Width |
Enter the product shipping width. | ||||||||||||||
Shipping Weight |
Enter the product shipping weight. | ||||||||||||||
Cubic Weight |
Enter the product weight in cubic. | ||||||||||||||
Handling Time |
Enter the time taken for handling the product assembling. | ||||||||||||||
Supplier Item Code |
Enter the product supplier item code details. | ||||||||||||||
Split For Warehouse Picking |
Select whether you want to split the product for warehouse picking:
|
||||||||||||||
eBay Description |
Enter the product’s eBay site details. | ||||||||||||||
Primary Supplier |
Enter the product’s primary supplier details. | ||||||||||||||
Display Template |
Enter the product’s display template details. | ||||||||||||||
Editable Kit BundleA bundle is a chunk of data and the basic unit for use with modules. A bundle consists of items, similar to how a bag may contain separate, individual items. |
Select whether the product kit is editable:
|
||||||||||||||
Requires Packaging |
Select whether the product requires packaging:
|
||||||||||||||
Item URL |
Enter the product item URL address. | ||||||||||||||
SEO Page Title |
Enter the page name that helps the product visibility in the search engines. | ||||||||||||||
SEO Meta Keywords |
Enter the product keywords that help product visibility in the search engines. | ||||||||||||||
SEO Page Heading |
Enter the page heading text that appears in the search engines. | ||||||||||||||
SEO Meta Description |
Enter the product details summary that appears when the product is searched on the web. | ||||||||||||||
SEO Canonical URL |
Enter the marketing URL address of the product. | ||||||||||||||
Automatic URL |
Enter the product automatic URL address. | ||||||||||||||
Is Asset |
Select whether the product is an asset:
|
||||||||||||||
When To Repeat On Standing Orders |
Select the option for repeating on the standing orders:
|
||||||||||||||
Serial Tracking |
Select whether tracking is enabled for product serial number:
|
||||||||||||||
Group |
Enter the product group details. | ||||||||||||||
Shipping Category |
Enter the product shipping category information. | ||||||||||||||
Job |
Enter the job details of the product. | ||||||||||||||
Monthly Spend Requirement |
Enter the minimum amount that needs to spend on the product per month. | ||||||||||||||
Free Gift |
Add if there are any free gifts associated with the product. | ||||||||||||||
Cross Sell Products |
Add the product cross-sell SKUs. | ||||||||||||||
Upsell Products |
Add the product SKUs. | ||||||||||||||
Kit Components |
Add the product kit components:
|
||||||||||||||
Price Groups |
Add the product price groups:
|
||||||||||||||
Categories |
Add the product categories:
Enter the category ID of the item.
Select the priority of the items. |
||||||||||||||
Item Specifics |
Add the item specific details:
|
||||||||||||||
eBay Items |
Add the eBay Items:
|
||||||||||||||
eBay Product IDs |
Add the product details in eBay:
Enter the eBay website name.
Enter the eBay Product ID. |
||||||||||||||
Warehouse Quantity |
Add the warehouse quantity:
|
||||||||||||||
Sales Channels |
Add the sales channels to search the products associated with the specified channel:
Enter the Sales Channel ID.
Select whether the sales channel is approved:
|
||||||||||||||
Warehouse Locations |
Add the warehouse locations for the product:
|
||||||||||||||
Miscellaneous (1-40) |
Enter any miscellaneous details about the product. |
Updates the information of a specified product.
Connection |
Establish a connection to your Neto account. | ||||||||||||||
SKU |
Select the SKU details of the product you want to create. | ||||||||||||||
Inventory ID |
Enter the Inventory ID of the product. | ||||||||||||||
Parent SKU |
Enter the parent SKU information of the product. | ||||||||||||||
Accounting Code |
Enter the accounting code of the product. | ||||||||||||||
Virtual |
Select whether this is a virtual product:
|
||||||||||||||
Brand |
Enter the product’s brand name. | ||||||||||||||
Name |
Enter the name of the product. | ||||||||||||||
Model |
Enter the product model details. | ||||||||||||||
Sort Order (1-2) |
Enter the sort orders for the product. | ||||||||||||||
RRP |
Enter the retail recommended price of the product. | ||||||||||||||
Default Price |
Enter the default price of the product. | ||||||||||||||
Promotion Price |
Enter the promotion price of the product. | ||||||||||||||
Promotion Start Date |
Enter the date when the product promotion starts. | ||||||||||||||
Promotion Expiry Date |
Enter the date when the product promotion ends. | ||||||||||||||
Date Arrival |
Enter the date when the product has arrived. | ||||||||||||||
Cost Price |
Enter the cost price of the product. | ||||||||||||||
Unit of Measure |
Enter the measuring unit of the product. | ||||||||||||||
Base Unit of Measure |
Enter the base unit measure of the product allowed per quantity. | ||||||||||||||
Base Unit Per Quantity |
Enter the base unit of the product allowed per quantity. | ||||||||||||||
Buy Unit Quantity |
Enter the buying quantity allowed for the product. | ||||||||||||||
Sell Unit Quantity |
Enter the selling unit quantity allowed for the product. | ||||||||||||||
Pre Order Quantity |
Enter the pre-order quantity allowed for the product. | ||||||||||||||
Pick Priority |
Enter the pickup priority of the product. | ||||||||||||||
Pick Zone |
Enter the pickup zone of the product. | ||||||||||||||
Restricted To User Group |
Enter the user group restricted for the product. | ||||||||||||||
Approved |
Select whether the product is approved:
|
||||||||||||||
Approved For POS |
Select whether the product is approved for POS:
|
||||||||||||||
Approved For Mobile Store |
Select whether the product is approved for mobile store:
|
||||||||||||||
Is Active |
Select whether the product is active:
|
||||||||||||||
Active |
Select whether the product is active:
|
||||||||||||||
Visible |
Select whether the product is visible:
|
||||||||||||||
Tax Category |
Enter the product tax category. | ||||||||||||||
Tax Free Item |
Select whether the product is tax-free:
|
||||||||||||||
Tax Inclusive |
Select whether the product price is inclusive of taxes:
|
||||||||||||||
Au Gst Exempt |
Select whether the product is AU GST exempt:
|
||||||||||||||
Nz Gst Exempt |
Select whether the product is NZ GST exempt:
|
||||||||||||||
Search Keywords |
Enter the keywords to search for the product on the website. | ||||||||||||||
Short Description |
Enter the brief description of the product. | ||||||||||||||
Description |
Enter the product description or details. | ||||||||||||||
Terms And Conditions |
Enter the product’s terms and conditions. | ||||||||||||||
Features |
Enter the product feature details. | ||||||||||||||
Specifications |
Enter the product’s specifications. | ||||||||||||||
Warranty |
Enter the product warranty information. | ||||||||||||||
Artist Or Author |
Enter the product’s artist name or author’s name. | ||||||||||||||
Format |
Enter the product format. For example, soft copy or hardware. | ||||||||||||||
Model Number |
Enter the product model number details. | ||||||||||||||
Subtitle |
Enter the product’s subtitle. | ||||||||||||||
Availability Description |
Enter the product’s availability details. | ||||||||||||||
Images |
Enter the URL address of the product images. | ||||||||||||||
Brochure URL |
Enter the product’s brochure URL address. | ||||||||||||||
Product URL |
Enter the product’s website URL address. | ||||||||||||||
UPC |
Enter the Universal Product Code (UPC) details of the product. | ||||||||||||||
UPC (1-3) |
Enter any additional UPC details of the product. | ||||||||||||||
Type |
Enter the product type details. | ||||||||||||||
Subtype |
Enter the product subtype details. | ||||||||||||||
Numbers Of Labels To Print |
Enter the number of labels you want to print for the product. | ||||||||||||||
Reference Number |
Enter the product’s reference number. | ||||||||||||||
Internal Notes |
Enter any additional information about the product you want to share internally. | ||||||||||||||
Barcode Height |
Enter the product’s barcode height. | ||||||||||||||
Is Inventoried |
Select whether the product is inventoried:
|
||||||||||||||
Is Bought |
Select whether the product is bought:
|
||||||||||||||
Is Sold |
Enter if the product is sold out. | ||||||||||||||
Expense Account |
Enter the product’s expense account details. | ||||||||||||||
Purchase Tax Code |
Enter the product’s purchase tax code details. | ||||||||||||||
Cost Of Sales Account |
Enter the product’s cost of sales account details. | ||||||||||||||
Income Account |
Enter the product income account details. | ||||||||||||||
Asset Account |
Enter the product asset account details. | ||||||||||||||
Item Height |
Enter the product height. | ||||||||||||||
Item Length |
Enter the product length. | ||||||||||||||
Item Width |
Enter the product width. | ||||||||||||||
Shipping Height |
Enter the product shipping height. | ||||||||||||||
Shipping Length |
Enter the product shipping length. | ||||||||||||||
Shipping Width |
Enter the product shipping width. | ||||||||||||||
Shipping Weight |
Enter the product shipping weight. | ||||||||||||||
Cubic Weight |
Enter the product weight in cubic. | ||||||||||||||
Handling Time |
Enter the time taken for handling the product assembling. | ||||||||||||||
Supplier Item Code |
Enter the product supplier item code details. | ||||||||||||||
Split For Warehouse Picking |
Select whether you want to split the product for warehouse picking:
|
||||||||||||||
eBay Description |
Enter the product’s eBay site details. | ||||||||||||||
Primary Supplier |
Enter the product’s primary supplier details. | ||||||||||||||
Display Template |
Enter the product’s display template details. | ||||||||||||||
Editable Kit Bundle |
Select whether the product kit is editable:
|
||||||||||||||
Requires Packaging |
Select whether the product requires packaging:
|
||||||||||||||
Item URL |
Enter the product item URL address. | ||||||||||||||
SEO Page Title |
Enter the page name that helps the product visibility in the search engines. | ||||||||||||||
SEO Meta Keywords |
Enter the product keywords that help product visibility in the search engines. | ||||||||||||||
SEO Page Heading |
Enter the page heading text that appears in the search engines. | ||||||||||||||
SEO Meta Description |
Enter the product details summary that appears when the product is searched in the web. | ||||||||||||||
SEO Canonical URL |
Enter the marketing URL address of the product. | ||||||||||||||
Automatic URL |
Enter the product’s automatic URL address. | ||||||||||||||
Is Asset |
Select whether the product is an asset:
|
||||||||||||||
When To Repeat On Standing Orders |
Select the option for repeating on the standing orders:
|
||||||||||||||
Serial Tracking |
Select whether tracking is enabled for product serial number:
|
||||||||||||||
Group |
Enter the product group details. | ||||||||||||||
Shipping Category |
Enter the product shipping category information. | ||||||||||||||
Job |
Enter the job details of the product. | ||||||||||||||
Monthly Spend Requirement |
Enter the minimum amount that needs to spend on the product per month. | ||||||||||||||
Free Gift |
Add if there are any free gifts associated with the product. | ||||||||||||||
Cross Sell Products |
Add the product cross-sell SKUs. | ||||||||||||||
Upsell Products |
Add the product SKUs. | ||||||||||||||
Kit Components |
Add the product kit components:
|
||||||||||||||
Price Groups |
Add the product price groups:
|
||||||||||||||
Categories |
Add the product categories:
Enter the category ID of the item.
Select the priority of the items. |
||||||||||||||
Item Specifics |
Add the item specific details:
|
||||||||||||||
eBay Items |
Add the eBay Items:
|
||||||||||||||
eBay Product IDs |
Add the product details in eBay:
Enter the eBay website name.
Enter the eBay Product ID. |
||||||||||||||
Warehouse Quantity |
Add the warehouse quantity:
|
||||||||||||||
Sales Channels |
Add the sales channels to search the products associated with the specified channel:
Enter the Sales Channel ID.
Select whether the sales channel is approved:
|
||||||||||||||
Warehouse Locations |
Add the warehouse locations for the product:
|
||||||||||||||
Miscellaneous (1-40) |
Enter any miscellaneous details about the product. |
Triggers when a new content page is created.
Connection |
Establish a connection to your Neto account. |
Limit |
Set the maximum number of content pages Boost.space Integrator should return during one scenario execution cycle. |
Output Selector |
Select the output options in which you want to watch the content pages. |
Returns information about content pages.
Connection |
Establish a connection to your Neto account. |
Output Selector |
Select the output options whose content pages you want to list. |
Content |
Enter the content details to list the content pages associated with it. |
Parent Content ID |
Enter the Parent Content ID whose content pages you want to list. |
Content Name |
Enter the content name whose pages you want to list. |
Active |
Select whether you want to list the active content pages:
|
Content Type |
Enter the content type whose associated content pages you want to list. |
On Site Map |
Select whether you want to list the content page with the onsite map:
|
On Menu |
Select whether you want to list content page on the menu:
|
Allow Reviews |
Select whether you want to list the content pages with reviews:
|
Require Login |
Select whether you want to list the content pages which requires a login:
|
Date Posted From |
Enter the date to list the content pages posted on or after the specified date. |
Date Posted To |
Enter the date to list the content pages posted on or before the specified date. |
Date Updated From |
Enter the date to list the content pages updated on or after the specified date. |
Date Update To |
Enter the date to list the content pages updated on or before the specified date. |
Page |
Enter the page name you want to list. |
Limit |
Set the maximum number of content pages Boost.space Integrator should return during one scenario execution cycle. |
Creates a new content page.
Connection |
Establish a connection to your Neto account. |
Content Name |
Enter the name of the content page. |
Content Type |
Select the content-type:
|
Content Reference |
Enter the content reference details of the content page. |
Short Description (1-3) |
Enter the brief details of the content page. |
Description (1-3) |
Enter the details of the content page. |
Header Template |
Enter the header template details of the content page. |
Body Template |
Enter the body template details of the content page. |
Footer Template |
Enter the template details of the content page’s footer. |
Search Results Template |
Enter the template details for the content page’s search results page. |
Search Keywords |
Enter the keywords for searching the content page. |
Author |
Enter the content page’s author name. |
LabelA label is a “tag” that can be added to items within a module. It's a flexible tool used to categorize and organize data, making it easier to customize workflows and processes. (1-3) |
Enter the labels for the content page. |
SEO Page Title |
Enter the page name that improves the content page visibility in the search engines. |
SEO Meta Keywords |
Enter the product keywords that improve the content page visibility in the search engines. |
SEO Page Heading |
Enter the page heading text for the content page that appears in the search engines. |
SEO Meta Description |
Enter the content page details summary that appears in the search engine results. |
SEO Canonical URL |
Enter the marketing URL address of the content page. |
Content URL |
Enter the URL address of the content page. |
Automatic URL |
Enter the content page’s automatic URL address. |
Parent Content |
Select the parent content page where this content page will be posted. |
Sort Order |
Enter the order to sort the content page. |
Active |
Select whether this is an active content page:
|
On Site Map |
Select whether the content page is on the onsite map:
|
On Menu |
Select whether you want to list content page on the menu:
|
Allow Reviews |
Select whether the content pages allow posting the reviews:
|
Require Login |
Select whether the content pages require login:
|
Related Content |
Add any related content pages for this content page. |
Date Posted |
Enter the date when the content page is posted. |
Updates the information of a specified content page.
Connection |
Establish a connection to your Neto account. |
Content |
Select the content whose page details you want to update. |
Content Name |
Enter the name of the content page. |
Content Type |
Select the content-type:
|
Content Reference |
Enter the content reference details of the content page. |
Short Description (1-3) |
Enter the brief details of the content page. |
Description (1-3) |
Enter the details of the content page. |
Header Template |
Enter the header template details of the content page. |
Body Template |
Enter the body template details of the content page. |
Footer Template |
Enter the template details of the content page’s footer. |
Search Results Template |
Enter the template details for the content page’s search results page. |
Search Keywords |
Enter the keywords for searching the content page. |
Author |
Enter the content page’s author name. |
Label (1-3) |
Enter the labels for the content page. |
SEO Page Title |
Enter the page name that improves the content page visibility in the search engines. |
SEO Meta Keywords |
Enter the product keywords that improve the content page visibility in the search engines. |
SEO Page Heading |
Enter the page heading text for the content page that appears in the search engines. |
SEO Meta Description |
Enter the content page details summary that appears in the search engine results. |
SEO Canonical URL |
Enter the marketing URL address of the content page. |
Content URL |
Enter the URL address of the content page. |
Automatic URL |
Enter the content page’s automatic URL address. |
Parent Content |
Select the parent content page where this content page will be posted. |
Sort Order |
Enter the order to sort the content page. |
Active |
Select whether this is an active content page:
|
On Site Map |
Select whether the content page is on the onsite map:
|
On Menu |
Select whether you want to list content page on the menu:
|
Allow Reviews |
Select whether the content pages allow posting the reviews:
|
Require Login |
Select whether the content pages requires login:
|
Related Content |
Add any related content pages for this content page. |
Date Posted |
Enter the date when the content page is posted. |
Triggers when an order is created.
Connection |
Establish a connection to your Neto account. |
Limit |
Set the maximum number of new orders Boost.space Integrator should return during one scenario execution cycle. |
Output Selector |
Select the output options for which you want to watch the new orders. |
Triggers when an order is paid.
Connection |
Establish a connection to your Neto account. |
Limit |
Set the maximum number of paid orders Boost.space Integrator should return during one scenario execution cycle. |
Output Selector |
Select the output options for which you want to watch the paid orders. |
Triggers when an order is completed.
Connection |
Establish a connection to your Neto account. |
Limit |
Set the maximum number of completed orders Boost.space Integrator should return during one scenario execution cycle. |
Output Selector |
Select the output options for which you want to watch the completed orders. |
Triggers when an order is updated.
Connection |
Establish a connection to your Neto account. |
Limit |
Set the maximum number of updated orders Boost.space Integrator should return during one scenario execution cycle. |
Output Selector |
Select the output options for which you want to watch the updated orders. |
Returns information about orders.
Connection |
Establish a connection to your Neto account. |
Output Selector |
Select the output options of the orders you want to search. |
Order |
Select the orders whose information you are searching for. |
Username |
Select the username whose orders you are searching for. |
SKU |
Select the SKUs whose orders you are searching for. |
Supplier |
Add the suppliers whose orders you are searching for. |
Order StatusCreate statuses for each module separately to create an ideal environment for efficient and consistent work. |
Select the status of the orders you are searching for. |
Order Type |
Select the order type you are searching for. |
On Hold Type |
Select the on-hold type of orders you are searching for. |
Complete Status |
Select the completion status of orders you are searching for. |
Payment Status |
Select the payment status of the orders you are searching for. |
Export Status |
Select the export status of the whose orders you are searching for. |
Warehouse ID |
Select the Warehouse IDs whose orders you are searching for. |
Exported To WMS |
Select whether the order you are searching is export VMS:
|
Shipping Method |
Add the shipping method of the order you are searching for. |
Sales Channel |
Add the sales channels of the order you are searching for. |
Date Paid From |
Enter the date to search the orders whose amount was paid on or after the specified date. |
Date Paid To |
Enter the date to search the orders whose amount was paid on or before the specified date. |
Date Required From |
Enter the date to search the orders that are required on or after the specified date. |
Date Required To |
Enter the date to search the orders that are required on or before the specified date. |
Date Invoiced From |
Enter the date to search the orders that are invoiced on or after the specified date. |
Date Invoiced To |
Enter the date to search the orders that are invoiced one or before the specified date. |
Date Placed From |
Enter the date to search the orders that are placed on or after the specified date. |
Date Placed To |
Enter the date to search the orders that are placed on or before the specified date. |
Date Completed From |
Enter the date to search the orders that are completed on or after the specified date. |
Date Completed To |
Enter the date to search the orders that are completed on or before the specified date. |
Warehouse Quantity Updated From |
Enter the date to search the orders whose warehouse quantity is updated on or after the specified date. |
Warehouse Quantity Updated To |
Enter the date to search the orders whose warehouse quantity is updated on or before the specified date. |
Date Updated From |
Enter the date to search for the orders updated on or after the specified date. |
Date Updated To |
Enter the date to search for the orders updated on or before the specified date. |
Split Kit Components |
Select whether you want to search the orders whose component kits are split:
|
External System Identifier |
Add the external system identifiers of the order you are searching for. |
External Order Reference |
Enter the order reference number whose details you are searching for. |
External Order Line Reference |
Enter the external order line reference of the order whose details you are searching for. |
Page |
Enter the number of results you want per page. |
Limit |
Set the maximum number of updated orders Boost.space Integrator should return during one scenario execution cycle. |
Export Status |
Select the export status of the orders you are searching for:
|
Export To WMS |
Select whether the order is exported to WMS:
|
Updates the information of the specified order.
Connection |
Establish a connection to your Neto account. | ||||||||||||||||||||||||||||||||||||||||||
Order ID |
Select the Order ID whose details you want to update. | ||||||||||||||||||||||||||||||||||||||||||
Username |
Select the username assigned for the order. | ||||||||||||||||||||||||||||||||||||||||||
| Enter the email address of the customer. | |||||||||||||||||||||||||||||||||||||||||||
Bill Company |
Enter the company to which the order is being billed. | ||||||||||||||||||||||||||||||||||||||||||
Ship Company |
Enter the shipping company name. | ||||||||||||||||||||||||||||||||||||||||||
Purchase Order Number |
Enter hte purchse order number. | ||||||||||||||||||||||||||||||||||||||||||
Order Type |
Select the order type:
|
||||||||||||||||||||||||||||||||||||||||||
On Hold Type |
Select whether the order is on hold:
|
||||||||||||||||||||||||||||||||||||||||||
User Group |
Enter the user group for the order. | ||||||||||||||||||||||||||||||||||||||||||
Document Template |
Select the order document template. | ||||||||||||||||||||||||||||||||||||||||||
Date Placed UTC |
Enter the date when the order is placed in UTC. | ||||||||||||||||||||||||||||||||||||||||||
Date Placed |
Enter the date when the order is placed | ||||||||||||||||||||||||||||||||||||||||||
Date Required |
Enter the date when the order is required to be fulfilled. | ||||||||||||||||||||||||||||||||||||||||||
Date Required UTC |
Enter the date when the order is required to be fulfilled in UTC. | ||||||||||||||||||||||||||||||||||||||||||
Date Invoiced |
Enter the date on the order invoice. | ||||||||||||||||||||||||||||||||||||||||||
Date Invoiced UTC |
Enter the date on the order invoice in UTC. | ||||||||||||||||||||||||||||||||||||||||||
Date Due |
Enter the date when the order is due. | ||||||||||||||||||||||||||||||||||||||||||
Date Due UTC |
Enter the date when the order is due in UTC. | ||||||||||||||||||||||||||||||||||||||||||
Bill First Name |
Enter the first name of the customer that appears on the billing address. | ||||||||||||||||||||||||||||||||||||||||||
Bill Last Name |
Enter the last name of the customer that appears on the billing address. | ||||||||||||||||||||||||||||||||||||||||||
Bill Street 1 |
Enter the street address. | ||||||||||||||||||||||||||||||||||||||||||
Bill Street 2 |
Enter the street address. | ||||||||||||||||||||||||||||||||||||||||||
Bill City |
Enter the city name. | ||||||||||||||||||||||||||||||||||||||||||
Bill State |
Enter the state name. | ||||||||||||||||||||||||||||||||||||||||||
Bill Post Code |
Enter the area postal code. | ||||||||||||||||||||||||||||||||||||||||||
Bill Contact Phone |
Enter the phone number. | ||||||||||||||||||||||||||||||||||||||||||
Bill Country |
Enter the country name. | ||||||||||||||||||||||||||||||||||||||||||
Ship First Name |
Enter the first name of the person that appears on the shipping address. | ||||||||||||||||||||||||||||||||||||||||||
Ship Last Name |
Enter the last name of the person that appears on the shipping address. | ||||||||||||||||||||||||||||||||||||||||||
Ship Company |
Enter the company name. | ||||||||||||||||||||||||||||||||||||||||||
Ship Street 1 |
Enter the street address. | ||||||||||||||||||||||||||||||||||||||||||
Ship Street 2 |
Enter the street address. | ||||||||||||||||||||||||||||||||||||||||||
Ship City |
Enter the city name. | ||||||||||||||||||||||||||||||||||||||||||
Ship State |
Enter the state name. | ||||||||||||||||||||||||||||||||||||||||||
Ship Post Code |
Enter the area postal code. | ||||||||||||||||||||||||||||||||||||||||||
Ship Contact Phone |
Enter the phone number. | ||||||||||||||||||||||||||||||||||||||||||
Ship Country |
Enter the country name. | ||||||||||||||||||||||||||||||||||||||||||
Enable Address Validation |
Select whether order address validation is enabled:
|
||||||||||||||||||||||||||||||||||||||||||
Operator |
Enter the operator details of the order. | ||||||||||||||||||||||||||||||||||||||||||
Operator Date Updated |
Enter the date when teh operator details are updated. | ||||||||||||||||||||||||||||||||||||||||||
Sales Person |
Enter the salesperson’s name who brought the order. | ||||||||||||||||||||||||||||||||||||||||||
Customer Ref (1-10) |
Enter the customer reference details. | ||||||||||||||||||||||||||||||||||||||||||
Sales Channel |
Enter the sales channel details. | ||||||||||||||||||||||||||||||||||||||||||
Ship Instructions |
Enter the order shipping instructions. | ||||||||||||||||||||||||||||||||||||||||||
Internal Order Notes |
Enter any additional information about the order. | ||||||||||||||||||||||||||||||||||||||||||
Sticky Note Title |
Enter the name of the sticky notes. | ||||||||||||||||||||||||||||||||||||||||||
Sticky Note |
Enter the sticky note message. | ||||||||||||||||||||||||||||||||||||||||||
Order Status |
Select the order status. | ||||||||||||||||||||||||||||||||||||||||||
Order Approval |
Select whether the order is approved:
|
||||||||||||||||||||||||||||||||||||||||||
Payment Method |
Enter the order payment method details. | ||||||||||||||||||||||||||||||||||||||||||
Payment Terms |
Enter the payment terms details. | ||||||||||||||||||||||||||||||||||||||||||
Tax Inclusive |
Select whether the order amount inclusive of taxes:
|
||||||||||||||||||||||||||||||||||||||||||
Tax Free Shipping |
Select whether the order is eligible for tax-free shipping:
|
||||||||||||||||||||||||||||||||||||||||||
BPAYCRN |
Enter the BPAYCRN number of the order. | ||||||||||||||||||||||||||||||||||||||||||
Shipping Method |
Enter the shipping method details of the order. | ||||||||||||||||||||||||||||||||||||||||||
Shipping Cost |
Enter the shipping cost. | ||||||||||||||||||||||||||||||||||||||||||
Signature Required |
Select whether the order requires signature:
|
||||||||||||||||||||||||||||||||||||||||||
Currency Code |
Enter the currency code applicable to the order. | ||||||||||||||||||||||||||||||||||||||||||
Order Line |
Add the order line items:
|
||||||||||||||||||||||||||||||||||||||||||
Order Rounding |
Enter the order rounding off amount. |
Triggers when a new customer is created.
Connection |
Establish a connection to your Neto account. |
Limit |
Set the maximum number of new customers Boost.space Integrator should return during one scenario execution cycle. |
Output Selector |
Select the output options in which you want to watch the new customers. |
Triggers when a customer is updated.
Connection |
Establish a connection to your Neto account. |
Limit |
Set the maximum number of updated customers Boost.space Integrator should return during one scenario execution cycle. |
Output Selector |
Select the output options in which you want to watch the updated customers. |
Returns information about customers.
Connection |
Establish a connection to your Neto account. |
Output Selector |
Select the output options in which you want to watch the new customers. |
Username |
Select the username of the customers you are searching for. |
Type |
Select the customer type you are searching for. For example, Prospect |
Active |
Select whether you are searching the active customers:
|
| Add the email address of the customers you are searching for. | |
Company |
Add the companies whose customers you are searching for. |
On Credit Hold |
Select whether you want to search the customers whose credit is on hold:
|
Newsletter Subscriber |
Select whether the customers are subscribed newsletter:
|
User Group |
Add the user groups of the customers you are searching for. |
Bill State |
Enter the status of the customer’s bill status. |
Date Added From |
Enter the date to search the customers added on or after the specified date. |
Date Added To |
Enter the date to search the customers added on or before the specified date. |
Date Updated From |
Enter the date to search for the customers updated on or after the specified date. |
Date Updated To |
Enter the date to search for the customers updated on or before the specified date. |
Page |
Enter the number of results you want per page. |
Limit |
Set the maximum number of customers Boost.space Integrator should return during one scenario execution cycle. |
Creates a new customer.
Connection |
Establish a connection to your Neto account. |
Username |
Enter the username of the customer. |
Type |
Select the customer type:
|
Password |
Enter the password of the customer. |
Email Address |
Enter the email address of the customer. |
Secondary Email Address |
Enter the alternative email address of the customer. |
Newsletter Subscriber |
Select whether the customer is subscribed to the newsletter:
|
Parent Username |
Enter the parent username of the customer. |
Approval Username |
Enter the username who approved the customer. |
Referral Username |
Enter the name of the person who referred the customer. |
Referral Commission |
Enter the commission detail given for the customer referral. |
Gender |
Select the gender type of customer. |
Date Of Birth |
Enter the date of birth details of the customer. |
Identification Type |
Enter the identification type of the customer. |
Identification Details |
Enter the customer’s identification details. |
Default Discounts |
Enter the default discounts provided to the customer. |
Default Document Template |
Enter the customer’s document template details. |
Internal Notes |
Enter any additional information about the customer which you want to share internally. |
ABN |
Enter the ABN details of the customer. |
Website |
Enter the customer’s website URL address. |
Credit Limit |
Enter the credit limit amount of the customer. |
Default Invoice Term |
Enter the customer invoice terms. |
Classification (1-2) |
Enter the customer classification details. |
Sales Channel |
Enter the sales channel details of the customer. |
Active |
Select whether the customer is active:
|
On Credit Hold |
Select whether the customer is on credit hold:
|
User Group |
Enter the user group details for the customer. |
Account ManagerCan manage members and space managers, view and manage items. Can modify space settings. |
Enter the account manager for the customer. |
Default Order Type |
Enter the default order type for the customer. |
Bill First Name |
Enter the first name that appears on the billing address of the customer. |
Bill Last Name |
Enter the last name. |
Bill Company |
Enter the billing address company name. |
Bill Street Line 1 |
Enter the billing street address. |
Bill Street Line 2 |
Enter the billing street address. |
Bill City |
Enter the city name. |
Bill State |
Enter the state name. |
Bill Post Code |
Enter the area postal code. |
Bill Country |
Enter the country name. |
Bill Phone |
Enter the phone number. |
Bill Fax |
Enter the fax number. |
Ship Title |
Enter the shipping address name. |
Ship First Name |
Enter the first name. |
Ship Last Name |
Enter the last name. |
Ship Company |
Enter the shipping company name. |
Ship Street Line 1 |
Enter the shipping street address. |
Ship Street Line 2 |
Enter the shipping street address. |
Ship City |
Enter the city name. |
Ship State |
Enter the state name. |
Ship Post Code |
Enter the area postal code. |
Ship Country |
Enter the country name. |
Ship Phone |
Enter the phone number. |
Ship Fax |
Enter the fax number. |
User Custom (1-50) |
Enter any custom fieldsA feature in Boost.space that allows you to define and manage data within each module according to your specific needs. for the customer. |
Updates the information of a specified customer.
Connection |
Establish a connection to your Neto account. |
Username |
Enter the username of the customer. |
Type |
Select the customer type:
|
Password |
Enter the password of the customer. |
Email Address |
Enter the email address of the customer. |
Secondary Email Address |
Enter the alternative email address of the customer. |
Newsletter Subscriber |
Select whether the customer is subscribed to the newsletter:
|
Parent Username |
Enter the parent username of the customer. |
Approval Username |
Enter the username who approved the customer. |
Referral Username |
Enter the name of the person who referred the customer. |
Referral Commission |
Enter the commission detail given for the customer referral. |
Gender |
Select the gender type of customer. |
Date Of Birth |
Enter the date of birth details of the customer. |
Identification Type |
Enter the identification type of the customer. |
Identification Details |
Enter the customer’s identification details. |
Default Discounts |
Enter the default discounts provided to the customer. |
Default Document Template |
Enter the customer’s document template details. |
Internal Notes |
Enter any additional information about the customer which you want to share internally. |
ABN |
Enter the ABN details of the customer. |
Website |
Enter the customer’s website URL address. |
Credit Limit |
Enter the credit limit amount of the customer. |
Default Invoice Term |
Enter the customer invoice terms. |
Classification (1-2) |
Enter the customer classification details. |
Sales Channel |
Enter the sales channel details of the customer. |
Active |
Select whether the customer is active:
|
On Credit Hold |
Select whether the customer is on credit hold:
|
User Group |
Enter the user group details for the customer. |
Account Manager |
Enter the account manager for the customer. |
Default Order Type |
Enter the default order type for the customer. |
Bill First Name |
Enter the first name that appears on the billing address of the customer. |
Bill Last Name |
Enter the last name. |
Bill Company |
Enter the billing address company name. |
Bill Street Line 1 |
Enter the billing street address. |
Bill Street Line 2 |
Enter the billing street address. |
Bill City |
Enter the city name. |
Bill State |
Enter the state name. |
Bill Post Code |
Enter the area postal code. |
Bill Country |
Enter the country name. |
Bill Phone |
Enter the phone number. |
Bill Fax |
Enter the fax number. |
Ship Title |
Enter the shipping address name. |
Ship First Name |
Enter the first name. |
Ship Last Name |
Enter the last name. |
Ship Company |
Enter the shipping company name. |
Ship Street Line 1 |
Enter the shipping street address. |
Ship Street Line 2 |
Enter the shipping street address. |
Ship City |
Enter the city name. |
Ship State |
Enter the state name. |
Ship Post Code |
Enter the area postal code. |
Ship Country |
Enter the country name. |
Ship Phone |
Enter the phone number. |
Ship Fax |
Enter the fax number. |
User Custom (1-50) |
Enter any custom fields for the customer. |
Returns information about payments.
Connection |
Establish a connection to your Neto account. |
Output Selector |
Select the output selector options whose payments you are searching for. |
Payment ID |
Add the Payment IDs whose details you are searching for. |
Order ID |
Select the Order ID whose payment details you are searching for. |
Date Paid From |
Enter the date to search the payments on or after the specified date. |
Date Paid To |
Enter the date to search the payments on or before the specified date. |
Page |
Enter the number of results you want per page. |
Limit |
Set the maximum number of payments Boost.space Integrator should return during one scenario execution cycle. |
Creates a new Payment.
Connection |
Establish a connection to your Neto account. |
Order ID |
Select the Order ID whose payment you are creating. |
Card Authorisation |
Enter the card authorization details for the payment. |
Amount Paid |
Enter the amount paid for the order. |
Payment Method |
Select the payment method:
|
Date Paid |
Enter the date when the payment is made. |
Transaction Notes |
Add the transaction notes:
Enter the name of the transaction.
Enter the details of the transaction. |
Returns information about RMAs.
Connection |
Establish a connection to your Neto account. |
Output Selector |
Select the output options to retrieve RMAs information. |
Order ID |
Select the Order ID whose RMAs you are searching. |
Username |
Select the username whose RMAs details you want to search. |
RMA ID |
Add the RMA IDs whose details you want to search. |
Invoice Number |
Add the invoice numbers whose details you want to search. |
Rma Status |
Add the status of RMAs whose details you want to search. |
Split Kit Components |
Add the kit component details of the RMAs you are searching for. |
Sort By |
Enter the details to sort the RMAs you are searching for. |
Date Issued From |
Enter the date to search the RMAs issued on or after the specified date. |
Date Issued To |
Enter the date to search the RMAs issued on or before the specified date. |
Date Updated From |
Enter the date to search the RMAs updated on or after the specified date. |
Date Updated To |
Enter the date to search the RMAs updated on or before the specified date. |
Date Approved From |
Enter the date to search the RMAs approved on or after the specified date. |
Date Approved To |
Enter the date to search the RMAs issued on or before the specified date. |
Creates a new RMA.
Connection |
Establish a connection to your Neto account. | ||||||||||||||||||||||||
Invoice Number |
Select the output options to retrieve RMAs information. | ||||||||||||||||||||||||
Customer Username |
Select the username of the customer. | ||||||||||||||||||||||||
Order ID |
Select the Order ID whose RMA you are creating. | ||||||||||||||||||||||||
Staff Username |
Enter the staff username who is assigned the order or RMA. | ||||||||||||||||||||||||
Purchase Order Number |
Enter the purchase order number of the RMA. | ||||||||||||||||||||||||
Internal Notes |
Enter any additional information about the RMA that you would like to share internally. | ||||||||||||||||||||||||
RMA Status |
Select the RMA status:
|
||||||||||||||||||||||||
Shipping Refund Amount |
Enter the refund amount of shipping charges. | ||||||||||||||||||||||||
Shipping Refund Tax Code |
Enter the shipping refund tax code. | ||||||||||||||||||||||||
RMA Line |
Add the RMA lines:
|
||||||||||||||||||||||||
Date Issued |
Enter the date when the RMA is issued. | ||||||||||||||||||||||||
Tax Inclusive |
Select whether the tax is included in the RMA amount:
|
||||||||||||||||||||||||
Refund |
Add the refund details:
|
Performs an arbitrary authorized API call.
|
Note |
|---|---|
| For the list of available endpoints, refer to the Neto API Documentation. |
Connection |
Establish a connection to your Neto account. |
API Action |
Enter the method request. For example, GetOrder |
Headers |
Enter the desired request headers. You don’t have to add authorization headers; we already did that for you. |
Body |
Enter the body content for your API call. |
The following API call returns all the selected orders from your Neto account:
API Action: GetOrder
Body: {"Filter": {"OrderStatus":["New", "Pick", "Pack"]}}
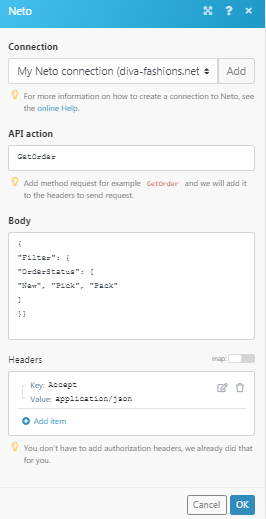
Matches of the search can be found in the module’s Output under Bundle > Body > order. In our example, 22 orders were returned:
